Run the
application again
Where you are
Attach the DataWindow
object to the master DataWindow control
Attach the DataWindow
object to the detail DataWindow control
Attach DataWindow
objects to the Product window
Now you run the application again to test the Product window.
At this point the Product window should have all of the capabilities
of the Customer window. Like the Customer window, the Product window
functions as a master/detail window, providing support for retrieval,
insert, update, and delete operations against the database.
-
Click the Run button (
 ) in the PowerBar.
 PowerBuilder prompts you to save your changes.
-
Click Yes.
The application begins running, and the login window
displays. -
Type dba in the User ID box.
Type sql in the Password box and click OK.
The database connection is established, and the MDI frame for
the application displays. -
Select File>Report>Maintain Products from the menu
bar.The Product window displays. The top DataWindow control shows
all of the rows retrieved from the Product table.The bottom DataWindow control shows information about the
product selection in the top DataWindow control.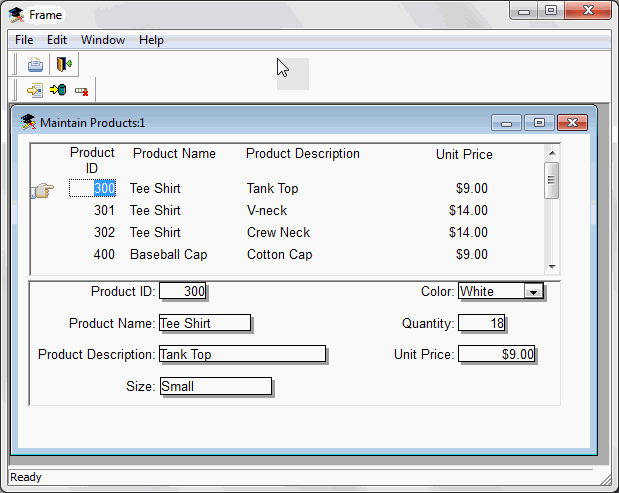
-
Select Edit>Insert from the menu bar.
This clears the dw_detail DataWindow and allows you to add a new
row to the DataWindow. The cursor is in the Product ID box in the
dw_detail control. -
Add a new product row by entering information in the boxes in
the lower DataWindow.Use the Tab key to move from box to box.
-
Select Edit>Update from the menu bar.
This sends the new product data to the database and displays a
confirmation message, as coded in the script for the ue_update
event.The new product does not display yet in the top DataWindow, but
if you open another product sheet, the new information displays. If
you want, you can add code to the Clicked event of the update button
to automatically refresh the data in the master DataWindow
control. -
Click OK in the message box.
Click a product in the master DataWindow.
That product data displays in the detail DataWindow.
-
Change the product’s unit price.
Select Edit>Update from the menu bar.
This sends the revised product data to the database and displays
another confirmation message. -
Click OK in the message box.
Select another product in the master DataWindow.
That product’s data displays in the detail DataWindow.
-
Select Edit>Delete from the menu bar.
The product is deleted from the DataWindow immediately but is
not deleted from the database until you select the Update option on
the Edit menu. -
Select File>Exit from the menu bar.
The application closes and you return to the Window
painter. -
Close the Window painter.