Grouping rows
You can group related rows together and, optionally, calculate
statistics for each group separately. For example, you might want
to group employee information by department and get total salaries
for each department.
How groups are defined
Each group is defined by one or more DataWindow object columns. Each
time the value in a grouping column changes, a break occurs and
a new section begins.
For each group, you can:
- Display
the rows in each section - Specify the information you want to display at the
beginning and end of each section - Specify page breaks after each break in the data
- Reset the page number after each break
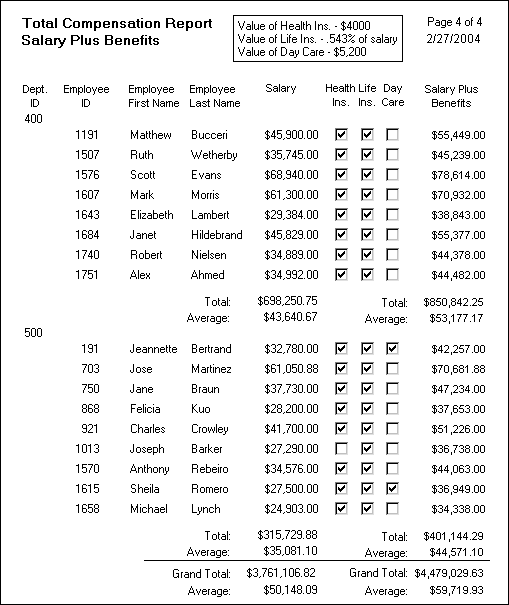
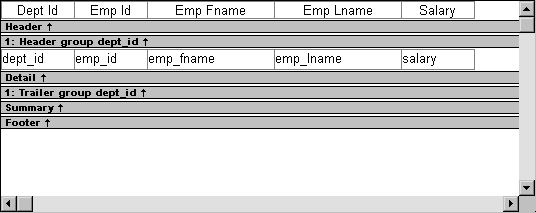
Grouping example
The following DataWindow object retrieves employee information. It
has one group defined, Dept_ID, so
it groups rows into sections according to the value in the Dept_ID column.
In addition, it displays:
- Department
ID before the first row for that department - Totals and averages for salary and salary plus benefits
(a computed column) for each department - Grand totals for the company at the end
The following screenshot shows the DataWindow object.
How to do it
You can create a grouped DataWindow object in three ways:
- Use the Group presentation style to create a grouped DataWindow object from
scratch (“Using the Group presentation
style”). - Take an existing tabular DataWindow object and define grouping (“Defining groups in an existing DataWindow object”).
- Use the TreeView presentation style (Chapter 28, “Working with TreeViews”).
Making the DataWindow control large enough
If a DataWindow object has grouped rows, each page contains all group headers
(including zero-height headers) at the top of the page. Your DataWindow
control must be large enough to accommodate all the group headers
that display on each page of the report.
The last row of a group displays on the same page as that
row’s group trailer and each applicable higher-level group
trailer. If the DataWindow object has a summary band, it displays on the
same page as the last row of the report. If the control is not large
enough, you might see anomalies when scrolling through the DataWindow object,
particularly in the last row of the report, which needs room to
display the report’s header band, all group headers, all
group trailers, the summary band, and the footer band.
If you cannot increase the height of the DataWindow control
so that it has room for all the headers and trailers, you can change
the design of the DataWindow object so that they require less space.
Scrolling through a grouped DataWindow
When you scroll through a grouped DataWindow object, you might see
the group header repeated where you do not expect it. This is because
the data is paginated in a fixed layout based on the size of the
DataWindow control. You can scroll to a point that shows the bottom
half of one page and the top of the next. When you use the arrow
keys to page through the data, you scroll one row at a time.
Using the Group presentation style
One of the DataWindow object presentation styles, Group, is a shortcut
to creating a grouped DataWindow object. It generates a tabular DataWindow object that
has one group level and some other grouping properties defined. You
can then further customize the DataWindow object.
![]() To create a basic grouped DataWindow object using the
To create a basic grouped DataWindow object using the
Group presentation style:
-
Select File>New from the menu
bar.The New dialog box displays.
-
Choose the DataWindow tab page and the Group presentation
style, and click OK. -
Choose a data source and define the data.
You are prompted to define the grouping column(s).
-
Drag the column(s) you want to group on from the
Source Data box to the Columns box. Multiple columns and multiple group levels You can specify more than one column, but all columns apply
to group level one. You can define one group level at this point.
Later you can define additional group levels.In the following example, grouping will be by department,
as specified by the dept_id column:
If you want to use an expression, you can define it when you
have completed the wizard. See “Using an expression for
a group”. -
Click Next.
PowerBuilder suggests a header based on your data source. For
example, if your data comes from the Employee table, PowerBuilder uses
the name Employee in the suggested header. -
Specify the Page Header text.
-
If you want a page break each time a grouping
value changes, select the New Page On Group Break box. -
If you want page numbering to restart at 1 each
time a grouping value changes, select the Reset Page Number On Group
Break box and the New Page On Group Break box. -
Click Next.
-
Select Color and Border settings and click Next.
-
Review your specification and click Finish.
The DataWindow object displays with the basic grouping properties
set.
This is an example of a Group style DataWindow object:
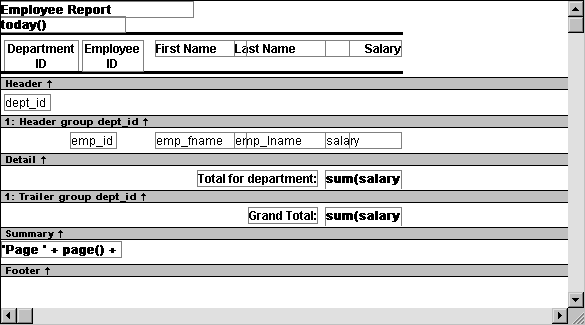
What PowerBuilder does
As a result of your specifications, PowerBuilder generates a
tabular DataWindow object and:
- Creates group header and trailer
bands - Places the column you chose as the grouping column
in the group header band - Sorts the rows by the grouping column
- Places the page header and the date (as a computed
field) in the header band - Places the page number and page count (as computed
fields) in the footer band - Creates sum-computed fields for all numeric columns
(the fields are placed in the group trailer and summary bands)
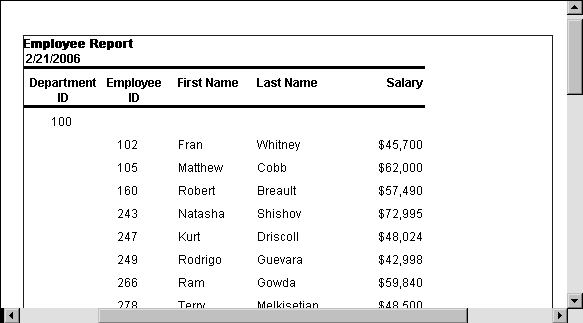
Here is the preceding DataWindow object in the Preview view:
Using an expression for
a group
If you want to use an expression for one or more column names
in a group, you can enter an expression as the Group Definition on
the General page in the Properties view after you have finished
using the Group wizard.
![]() To use an expression for a group:
To use an expression for a group:
-
Open the Properties view and select the
group header band in the Design view. -
Click the ellipsis button next to the Group Definition box
on the General page to open the Specify Group Columns dialog box. -
In the Columns box, double-click the column that
you want to use in an expression.The Modify Expression dialog box opens. You can specify more
than one grouping item expression for a group. A break occurs whenever
the value concatenated from each column/expression changes.
What you can do
You can use any of the techniques available in a tabular DataWindow object to modify
and enhance the grouped DataWindow object, such as moving controls, specifying
display formats, and so on. In particular, see “Defining groups in an existing DataWindow object” to learn more
about the bands in a grouped DataWindow object and how to add features
especially suited for grouped DataWindow objects (for example, add a second
group level, define additional summary statistics, and so on).
![]() DataWindow Object is not updatable by default When you generate a DataWindow object using the Group presentation
DataWindow Object is not updatable by default When you generate a DataWindow object using the Group presentation
style, PowerBuilder makes it not updatable by default. If you want
to be able to update the database through the grouped DataWindow object,
you must modify its update characteristics. For more information,
see Chapter 21, “Controlling Updates in DataWindow Objects.”
Defining groups in an existing DataWindow object
Instead of using the Group presentation style to create a
grouped DataWindow object from scratch, you can take an existing tabular DataWindow object and define
groups in it.
![]() To add grouping to an existing DataWindow object:
To add grouping to an existing DataWindow object:
-
Start with a tabular DataWindow object that retrieves
all the columns you need. -
Specify the grouping columns.
-
Sort the rows.
-
(Optional) Rearrange the DataWindow object.
-
(Optional) Add summary statistics.
-
(Optional) Sort the groups.
Steps 2 through 6 are described next.
Specifying the grouping columns
![]() To specify the grouping columns:
To specify the grouping columns:
-
In the DataWindow painter, Select Rows>Create
Group from the menu bar.The Specify Group Columns dialog box displays.
-
Specify the group columns, as described in “Using the Group presentation
style”. -
Set the Reset Page Count and New Page on Group
Break properties on the General page in the Properties view.
Creating subgroups
After defining your first group, you can define subgroups,
which are groups within the group you just defined.
![]() To define subgroups:
To define subgroups:
-
Select Rows>Create Group from
the menu bar and specify the column/expression for the
subgroup. -
Repeat step 1 to define additional subgroups if
you want.You can specify as many levels of grouping as you need.
How groups are identified
PowerBuilder assigns each group a number (or level) when you
create the group. The first group you specify becomes group 1, the
primary group. The second group becomes group 2, a subgroup within
group 1, and so on.
For example, suppose you define two groups. The first group
uses the dept_id column and the second
group uses the status column.
The rows are grouped first by department (group 1). Within
department, rows are grouped by status (group 2). If you specify
page breaks for the groups, a page break will occur when any of
these values changes.
You use the group’s number to identify it when defining
summary statistics for the group. This is described in “Adding summary statistics”.
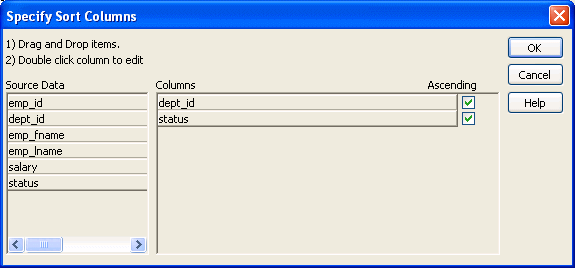
Sorting the rows
PowerBuilder does not sort the data when it creates a group.
Therefore, if the data source is not sorted, you must sort the data
by the same columns (or expressions) specified for the groups.
For example, if you are grouping by dept_id then status,
select Rows>Sort from the menu bar and specify dept_id and
then status as sorting columns:
You can also sort on additional rows. For example, if you
want to sort by employee ID within each group, specify emp_id as
the third sorting column.
For more information about sorting, see “Sorting rows “.
Rearranging the DataWindow object
When you create a group, PowerBuilder creates two new bands
for each group:
- A group header band
- A group trailer band
The bar identifying the band contains:
- The number of the group
- The name of the band
- The name of each column that defines the group
- An arrow pointing to the band
You can include any control in the DataWindow object (such as columns,
text, and computed fields) in the header and trailer bands of a
group.
Using the group header band
The contents of the group header band display at the top of
each page and after each break in the data.
Typically, you use this band to identify each group. You might
move the grouping column from the detail band to the group header
band, since it now serves to identify one group rather than each
row.
For example, if you group the rows by department and include
the department in the group header, the department will display
before the first line of data each time the department changes.
At runtime, you see this:

Suppressing group headers
If you do not want a group header to display at the top of
each page when you print or display a report, select the Suppress Group
Header check box on the General property page for the header. If
none of the headers are suppressed, they all display at the top
of each page. When a page break coincides with a group break, the
group header and any group headers that follow it display even if
the Suppress Group Header property is set, but higher level headers
are suppressed if the property is set for those headers.
For example, suppose a report has three groups: division,
sales region, and sales manager. If all three group headers are
suppressed, and a sales region group break coincides with a page
break, the division header is suppressed but the sales region and
sales manager headers display.
Using the group trailer band
The contents of the group trailer display after the last row
for each value that causes a break.
In the group trailer band, you specify the information you
want displayed after the last line of identical data for each value
in the group. Typically, you include summary statistics here, as
described next.
Adding summary statistics
One of the advantages of creating a grouped DataWindow object is
that you can have PowerBuilder calculate statistics for each group.
To do that, you place computed fields that reference the group.
Typically, you place these computed fields in the group’s
trailer band.
![]() To add a summary statistic:
To add a summary statistic:
-
Select Insert>Control>Computed
Field from the menu bar. -
Click in the Design view where you want the statistic.
The Modify Expression dialog box displays.
-
Specify the expression that defines the computed
field (see below). -
Click OK.
![]() A shortcut to sum values If you want to sum a numeric column, select the column in
A shortcut to sum values If you want to sum a numeric column, select the column in
Design view and click the Sum button in the Controls drop-down toolbar. PowerBuilder automatically
places a computed field in the appropriate band.
Specifying the expression
Typically, you use aggregate and other functions in your summary
statistic. PowerBuilder lists functions you can use in the Functions
box in the Modify Expression dialog box. When you are defining a
computed field in a group header or trailer band, PowerBuilder automatically
lists forms of the functions that reference the group:
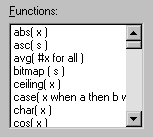
You can paste these templates into the expression, then replace
the #x that is pasted in as the function argument with
the appropriate column or expression.
For example, to count the employees in each department (group
1), specify this expression in the group trailer band:
|
1 |
Count( Emp_Id for group 1 ) |
To get the average salary of employees in a department, specify:
|
1 |
Avg( Salary for group 1 ) |
To get the total salary of employees in a department, specify:
|
1 |
Sum( Salary for group 1 |
The group trailer band in this example shows the average and
total salary for the group.
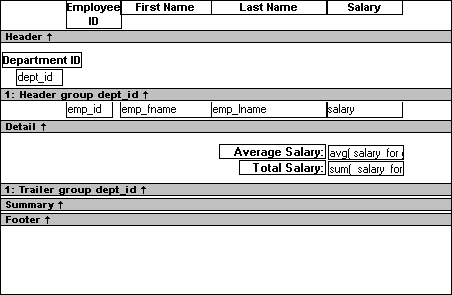
At runtime, the average and total salaries are calculated
and displayed:
Sorting the groups
You can sort the groups in a DataWindow object. For example, in a DataWindow object showing
employee information grouped by department, you might want to sort
the departments (the groups) by total salary.
Typically, this involves aggregate functions, as described
in “Adding summary statistics”.
In the department salary example, you would sort the groups using
the aggregate function Sum to calculate total
salary in each department.
![]() To sort the groups:
To sort the groups:
-
Place the mouse pointer on the group header
bar (not inside the band) until the pointer becomes a double-headed
arrow. -
Click.
The General property page for the group displays in the Properties
view. -
Click the ellipsis button next to the Group Sort
property.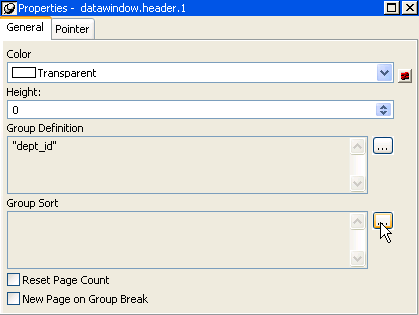
The Specify Sort Columns dialog box displays.
-
Drag the column you want to sort the groups by
from the Source Data box into the Columns box.If you chose a numeric column, PowerBuilder uses the Sum function
in the expression; if you chose a non-numeric column, PowerBuilder uses
the Count function.For example, if you chose the Salary column, PowerBuilder specifies
that the groups will be sorted by the expression sum(salary
for group 1):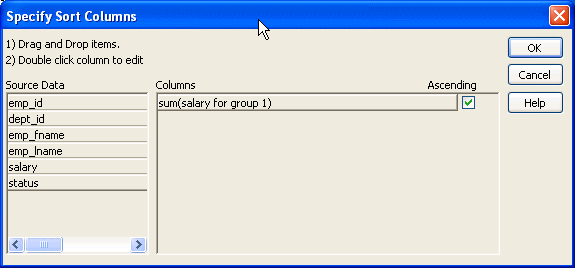
-
Select ascending or descending sort as appropriate.
-
If you want to modify the expression to sort on,
double-click the column in the Columns box.The Modify Expression dialog box displays.
-
Specify the expression to sort on.
For example, to sort the department group (the first group
level) on average salary, specify avg(salary for
group 1). -
Click OK.
You return to the Specify Sort Columns dialog box with the
expression displayed. -
Click OK again.
At runtime, the groups will be sorted on the expression you
specified.