Working with tables
When you open the Database painter, the Object view lists
all tables in the current database that you have access to (including
tables that were not created using PowerBuilder). You can create a
new table or alter an existing table. You can also modify table
properties and work with indexes and keys.
Creating a new table from scratch
You can create a new table in PowerBuilder in the current database
(the database to which PowerBuilder is connected).
![]() To create a table in the current database:
To create a table in the current database:
-
Click the Create Table button.
or
Right-click in the Columns view and select New Table
from the popup menu.or
Right-click Tables in the Objects view and select New
Table from the popup menu.or
Select Insert>Table from the Object menu.
The new table template displays in the Columns view. What
you see in the view is DBMS-dependent:
You use this template to specify each column in the table.
The insertion point is in the Column Name box for the first column. -
Enter the required information for this column.
For what to enter in each field, see “Specifying column definitions”.
As you enter information, use the tab key
to move from place to place in the column definition. After defining
the last item in the column definition, press the tab key
to display the work area for the next column. -
Repeat step 2 for each additional column in your
table. -
(Optional) Select Pending SQL from the popup menu
to see the pending SQL syntax.To hide the SQL syntax and return to the table columns, deselect Object>Pending
Syntax. -
Click the Save button or selecting Save from the
File or popup menu, then enter a name for the table in the Create
New Table dialog box.PowerBuilder submits the pending SQL syntax statements it generated
to the DBMS, and the table is created. The new table is displayed
in the Object Layout view. About saving the table If you make changes after you save the table and before you
close it, you see the pending changes when you select Pending SQL
again. When you click Save again, PowerBuilder submits a DROP TABLE
statement to the DBMS, recreates the table, and applies all changes
that are pending.Clicking Save many times can be time consuming when you are
working with large tables. So waiting to save a table until you
have finished defining it can be a good practice. -
Specify extended attributes for the columns.
For what to enter in each field, see “Specifying column extended
attributes”.
Creating a new table from an existing table
You can create a new table that’s similar to an existing
table very quickly by using the Save Table As menu option.
![]() To create a new table from an existing table:
To create a new table from an existing table:
-
Open the existing table in the Columns
view by dragging and dropping it or selecting Alter Table from the
popup menu.or
Display the existing table in the Columns view.
-
Right-click in the Columns view and select Save
Table As from the popup menu.The Create New Table dialog box displays.
-
Enter a name for the new table and then the owner’s
name and click OK.The new table appears in the Objects Layout view and the Columns
view. - Make whatever changes you want to the table definition.
- Save the table.
-
Make changes to the table’s properties
in the Object Details view.For more information about modifying table
properties, see “Specifying table and column
properties”.
Specifying column definitions
When you create a new table, you must specify a definition
for each column. The fields that display for each column in the
Columns view depend on your DBMS. You may not see all of the following
fields, and the values that you can enter are dependent on the DBMS.
For more information, see your DBMS documentation.
| Field | What you enter |
|---|---|
| Column name | (Required) The name by which the column will be identified |
| Data Type | (Required) Select a data type from the dropdown listbox. All data types supported by the current DBMS are displayed in the listbox |
| Width | For data types with variable widths, the number of characters in the field |
| Dec | For numeric data types, the number of decimal places to display |
| Null | Select Yes or No from the Null dropdown listbox to specify whether NULLs are allowed in the column. Specifying No means the column cannot have NULL values; users must supply a value. No is the default in a new table |
| Default | The value that will be placed in a column in a row that you insert into a DataWindow object. The dropdown listbox has built-in choices, but you can type any other value. For an explanation of the built-in choices, see your DBMS documentation |
Specifying table and columnproperties
After a table is created and has been saved, you can specify
the properties of a table and of any column in a table. Table properties
include the fonts used for headers, labels, and data, and a comment
that you can associate with the table. Column properties include
the text used for headers and labels, display formats, validation
rules, and edit styles used for data (also known as a column’s
extended attributes), and a comment you can associate with the column.
Specifying table properties
In addition to adding a comment to associate with the table,
you can choose the fonts that will be used to display information
from the table in a DataWindow object. You can specify
the font, point size, color, and style.
![]() To specify table properties:
To specify table properties:
-
Highlight the table in either the Objects
view or the Object Layout view and select Properties from the Object
or popup menu.or
Click the Properties button.
or
Drag and drop the table to the Object Details view.
The Table Properties property sheet displays in the Object
Details view.
-
Select a tab and specify properties:
Select this tab To modify this property General Comments associated with the table Data Font Font for data retrieved from the database
and displayed in a Data Manipulation viewHeading Font Font for column identifiers used in grid,
tabular, and n-up DataWindow objects displayed in a Data manipulation viewLabel Font Font for column identifiers used in freeform DataWindow objects displayed
in a Data Manipulation view -
Right-click on the Object Details view and select
Save Changes from the popup menu.Any changes you’ve made in the property sheet are
immediately saved to the table definition.
Specifying column extended
attributes
In addition to adding a comment to associate with a column,
you can specify extended attributes for each column. An extended
attribute is PowerBuilder-specific information that enhances the definition
of the column.
![]() To specify extended attributes:
To specify extended attributes:
-
Highlight the column in either the Objects
view or the Object Layout view and select Properties from the Object
or popup menu.or
Click the Properties button.
or
Drag and drop the column to the Object Details view.
The Column Properties property sheet displays in the Object
Details view.
-
Select a tab and specify extended attribute values:
Select this tab To modify these extended attributes General Column comments Headers Label text used in freeform DataWindow objectsHeader text used in tabular, grid, or n-up DataWindow objects Display How the data is formatted in a DataWindow objectas
well as display height, width, and position. For example, you can
associate a display format with a Revenue column so that its data
displays with a leading dollar sign and negative numbers display
in parenthesesValidation Criteria that a value must pass to be
accepted in a DataWindow object. For example, you can associate a validation
rule with a Salary column so that you can only enter a value within
a particular rangeThe initial value for the column. You can select a value from
the dropdown listbox. The initial value must be the same data type
as the column, must pass validation, and can be NULL only if NULL
is allowed for the columnEdit Style How the column is presented in a DataWindow object.
For example, you can display column values as radio buttons or in
a dropdown listbox -
Right-click on the Object Details view and select
Save Changes from the popup menu.Any changes you’ve made in the property sheet are
immediately saved to the table definition.
![]() Overriding definitions In the DataWindow painter, you can override the extended attributes
Overriding definitions In the DataWindow painter, you can override the extended attributes
specified in the Database painter for a particular DataWindow object.
How the information is stored Extended attributes are stored in the PowerBuilder system tables
in the database. PowerBuilder uses the information to display, present,
and validate data in the Database painter and in DataWindow objects. When
you create a view in the Database painter, the extended attributes
of the table columns used in the view are used by default.
About display formats, edit styles, and validation
rules In the Database painter, you select predefined display formats,
edit styles, and validation rules from dropdown listboxes. You can
see all the display formats, edit styles, and validation rules defined
for a table in the Extended Attributes view.
For more information about these extended
attributes, see Chapter 16, “Displaying and Validating
Data “.
About headings and labels By default, PowerBuilder uses the column names as labels and
headings, replacing any underscore characters with spaces and capitalizing
each word in the name. For example, the default label or heading
for the column Dept_name is Dept Name. To define multiple-line headings,
press ctrl+enter to begin a new line.
Specifying additional properties
for character columns
You can also set two additional properties for character columns
on the Extended Attributes property page: Case and Picture.
Specifying the displayed case You can specify whether PowerBuilder converts the case of characters
for a column in a report or form.
![]() To specify how character data should be displayed:
To specify how character data should be displayed:
-
On the Extended Attributes property page,
select a value in the Case dropdown listbox:Value Meaning Any Characters are displayed as they are
enteredUPPER Characters are converted to uppercase lower Characters are converted to lowercase
Specifying a column as a picture You can specify that a character column can contain names
of picture files (BMP or WMF files).
![]() To specify that column values are names of picture
To specify that column values are names of picture
files:
-
On the Extended Attributes property page,
select the Picture checkbox.When the Picture checkbox is selected, PowerBuilder expects
to find bitmap (BMP) or Windows metafile (WMF) filenames in the
column and displays the contents of the picture file–not
the name of the file–in reports and DataWindow objects.Because PowerBuilder cannot determine the size of the image
until execution time, it sets both display height and display width
to 0 when you check the Picture checkbox. -
Enter the size and the justification for the picture
(optional).
Altering a table
After a table is created, how you can alter the table depends
on your DBMS.
You can always:
- Add
or modify PowerBuilder-specific extended attributes for columns - Delete an index and create a new index
You can never:
- Insert
a column between two existing columns - Prohibit NULL values for an appended column
- Alter an existing index
Some DBMSs let you do the following but others do not:
- Append columns that allow NULLs
- Increase or decrease the number of characters allowed
for data in an existing column - Allow NULLs
- Prohibit NULLs in a column that allowed NULLs
![]() Database painter is DBMS-aware The Database painter grays out or notifies you about actions
Database painter is DBMS-aware The Database painter grays out or notifies you about actions
that your DBMS prohibits.
For complete information about what you can
and cannot do when you modify a table in your DBMS, see your DBMS
documentation.
![]() To alter a table:
To alter a table:
-
Highlight the table and select Alter Table
from the popup menu. Opening multiple instances of tables You can open another instance of a table by selecting Columns
from the View menu. Doing this is helpful when you want to use the
Database painter’s cut, copy, and paste features to cut
or copy and paste between tables.The table definition displays in the Columns view (this screen
shows the Employee table):
-
Make the changes you want in the Columns view
or in the property sheets in the Object Details view. -
Select Save Table or Save Changes.
PowerBuilder submits the pending SQL syntax statements it generated
to the DBMS, and the table is modified.
Cutting, copying, and pasting columns
In the Database painter, you can use the Cut, Copy, and Paste
buttons in the PainterBar (or Cut, Copy, and Paste from the Edit
or popup menu ) to cut, copy, and paste one column at a time within
a table or between tables.
![]() To cut or copy a column within a table:
To cut or copy a column within a table:
-
Put the insertion point anywhere in the
column you want to cut or copy. - Click the Cut or Copy button in the PainterBar.
![]() To paste a column within a table:
To paste a column within a table:
-
Put the insertion point in the column you
want to paste to.If you are changing an existing table, put the insertion point
in the last column of the table. If you try to insert a column between
two columns, you’ll get an error message. You can only
append a column to an existing table. If you are defining a new
table, you can paste a column anywhere. - Click the Paste button in the PainterBar.
![]() To paste a column to a different table:
To paste a column to a different table:
-
Open another instance of the Columns view
and use Alter Table to display an existing table or click New to
create a new table. -
Put the insertion point in the column you want
to paste to. - Click the Paste button in the PainterBar.
Closing a table
You can remove a table from a view by selecting Close or Reset
View from its popup menu. This action only removes the table from
the Database painter view. It does not drop (remove) the table from
the database.
Dropping a table
Dropping removes the table from the database.
![]() To drop a table:
To drop a table:
-
Select Drop Table from the table’s
popup menu.or
Select Object>Delete from the menu bar.
- Click Yes.
Deleting orphaned table information
If you drop a table outside PowerBuilder, information remains
in the system tables about the table, including extended attributes
for the columns.
![]() To delete orphaned table information from the
To delete orphaned table information from the
extended attribute system tables:
-
Select Design>Synch Extended Attributes
from the menu bar.If you try to delete orphaned table information and there
is none, a message tells you that synchronization is not necessary. - Click Yes.
Viewing pending SQL changes
As you create or alter a table definition, you can view the
pending SQL syntax changes that will be made when you save the table
definition.
![]() To view pending SQL syntax changes:
To view pending SQL syntax changes:
-
Right-click the table definition in the
Columns view and select Pending SQL from the popup menu.PowerBuilder displays in SQL syntax the pending changes to the
table definition: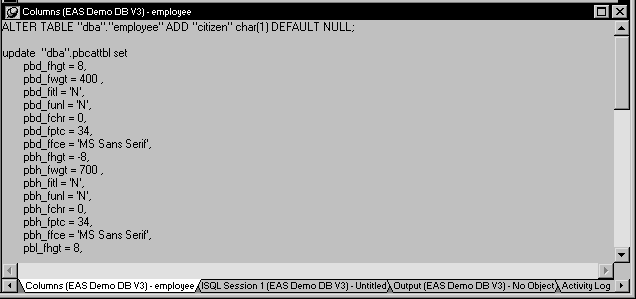
The SQL statements execute only when you save the table definition
or reset the view and then tell PowerBuilder to save changes.
Copying, saving, and printing pending SQL changes
When you are viewing pending SQL changes, you can:
- Copy pending changes to the
clipboard - Save pending changes to a file
- Print pending changes
![]() To copy, save, or print only part of the SQL syntax Select the part of the SQL syntax you want before you copy,
To copy, save, or print only part of the SQL syntax Select the part of the SQL syntax you want before you copy,
save, or print.
![]() To copy the SQL syntax to the clipboard:
To copy the SQL syntax to the clipboard:
-
In the Pending SQL view, click the Copy
button or select Copy from the popup menu.
![]() To save SQL syntax for execution at a later time:
To save SQL syntax for execution at a later time:
-
In the pending SQL view, Select File>Save
As.The Save Syntax to File dialog box displays.
-
Navigate to the folder where you want to save
SQL, name the file, and then click the Save button (on Windows)
or the OK button (on UNIX).
At a later time, you can import the SQL file into the Database
painter and execute it.
![]() To print pending table changes:
To print pending table changes:
-
While viewing the pending SQL syntax, click
the Print button or select Print from the File menu.
Printing the table definition
You can print a report of the table’s definition
anytime, whether or not the table has been saved. The Table Definition
Report contains information about the table and each column in the
table, including the extended attributes for each column.
![]() To print the table definition:
To print the table definition:
-
Select Print or Print Definition from the
File or popup menu or click the Print button.
Exporting table syntax
You can export the syntax for a table to the log. This feature
is useful when you want to create a backup definition of the table
before you alter it or when you want to create the same table in
another DBMS.
To export to another DBMS, you must have the PowerBuilder interface
for that DBMS.
![]() To export the syntax of an existing table to a
To export the syntax of an existing table to a
log:
- Select the table in the painter workspace.
-
Select Export Syntax from the Object menu or the
popup menu.If you selected a table and have more than one DBMS interface
installed, the DBMS dialog box displays. If you selected a view, PowerBuilder immediately
exports the syntax to the log. -
Select the DBMS to which you want to export the
syntax. -
If you selected ODBC, specify a data source in
the Data Sources dialog box. -
Supply any information you are prompted for.
PowerBuilder exports the syntax to the log. Extended attribute information
(such as validation rules used) for the selected table is also exported.
The syntax is in the format required by the DBMS you selected.For more information about the log, see “Logging your work”.
About system tables
Two kinds of system tables exist in the database:
- System tables provided by
your DBMS (for more information, see your DBMS documentation) - PowerBuilder extended attribute system tables
About PowerBuilder system tables
PowerBuilder stores extended attribute information you provide
when you create or modify a table (such as the text to use for labels
and headings for the columns, validation rules, display formats,
and edit styles) in system tables. These system tables contain information
about database tables and columns. Extended attribute information
extends database definitions.
In the Employee table, for example, one column name is Emp_lname.
A label and a heading for the column are defined for PowerBuilder to
use in DataWindow objects. The column label is defined as Last Name:. The
column heading is defined as Last Name. The label and heading are
stored in the PBCatCol table in the extended attribute system tables.
Table maintenance The extended attribute system tables are maintained by PowerBuilder.
Only PowerBuilder users can enter information into the extended attribute
system tables.
Five tables There are five extended attribute system tables:
| This system table | Stores this extended attribute information |
|---|---|
| PBCatCol | Column data such as name, header and label for reports and DataWindow objects, and header and label positions |
| PBCatEdt | Edit style names and definitions |
| PBCatFmt | Display format names and definitions |
| PBCatTbl | Table data such as name, fonts, and comments |
| PBCatVld | Validation rule names and definitions |
For more about the extended attribute system
tables, see Appendix A, “The Extended
Attribute System Tables”.
Opening and displaying system tables
You can open system tables in the Database painter just like
other tables.
By default, PowerBuilder shows only user-created tables in the
Objects view. If you highlight Tables and select Show System Tables
from the popup menu, PowerBuilder also shows system tables.