Using the RichText presentation style
The RichText presentation style allows you to combine input
fields that represent database columns with formatted text. This
presentation style is useful for display-only reports, especially
mail-merge documents. However, if you want to use the RichText DataWindow object for
data entry, you can specify validation rules and display formats
for the input fields.
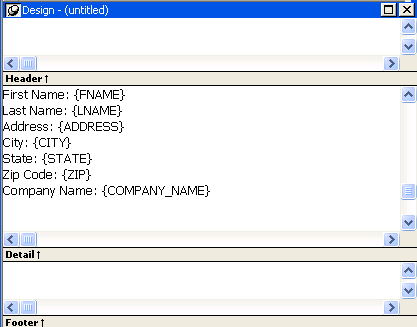
In the Design view, you see the text along with placeholders
called input fields:
|
1 |
{FNAME} {LNAME}<br />{COMPANY_NAME}<br />{ADDRESS}<br />{CITY}, {STATE} {ZIP}<br /> <br />Dear {FNAME}:<br />. . . |
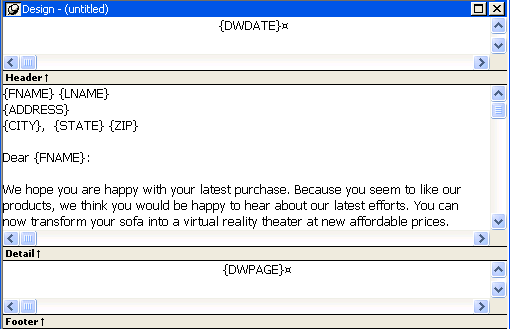
In the Preview view, the text is the same, but PowerBuilder replaces
the input fields with values from the database:
|
1 |
Beth Reiser<br />AMF Corp.<br />1033 Whippany Road<br />New York, NY 10154<br /> <br />Dear Beth:<br />. . . |
Document template
The formatted text acts like a document template. There is
only one copy of the text. As the user scrolls from row to row,
the data for the current row is inserted in the input fields and
the user sees the document with the current data. If the user edits
the text, the changes show up in every row of data.
Input fields
In the RichText presentation style, an input field is associated
with a column or computed field. It gets its value from the retrieved
data or from the computed field’s expression.
If an input field is not a computed field and its name does
not match a column, there is no way to specify data for the input
field.
There can be more than one copy of an input field in the rich
text. In the sample above, there are two instances of the field FNAME.
Each instance of the field displays the same data.
Unavailable settings
Not all the settings available in other DataWindow styles
are available. You cannot apply code tables and edit styles, such
as a DropDownDataWindow or EditMask, to input fields. You cannot
use slide left and slide up settings to reposition input fields
automatically. However, you can set the LineRemove property at runtime
to achieve a similar effect.
Creating the DataWindow object
![]() To create a RichText DataWindow object:
To create a RichText DataWindow object:
-
In the New dialog box, select RichText
from the DataWindow tab and click OK. -
Select data for the DataWindow object as you do for any DataWindow object.
If you want data to be retrieved into the Preview view automatically,
select the Retrieve on Preview check box. For more information,
see “Building a DataWindow object “. -
Specify settings for the DataWindow object on the Specify
RichText Settings screen, click Next, and then click Finish.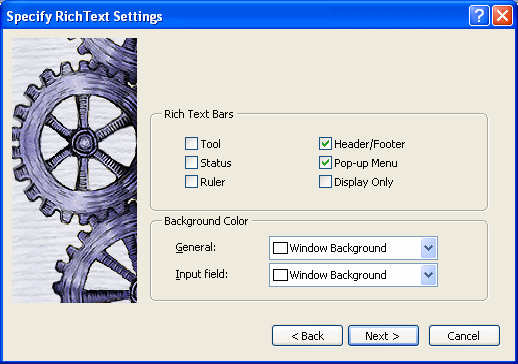
Available settings
Table 30-1 describes the types
of settings you can make for the RichText DataWindow object in the wizard.
| You can specify | With these settings |
|---|---|
| Tools available to the user | Rich text bars: Tool, Status, Ruler, and PopUp Menu |
| Whether there will be a header and footer for the printed DataWindow object |
Header/Footer |
| Whether users are prevented from editing input fields and text |
Display Only |
| Colors for the whole background and the background of input fields |
Background Color: General and Input Field |
Editing the content
After you click Finish in the wizard, you see input fields
with their labels in the detail band in the Design view:
You can:
- Begin editing text in the
detail, header, or footer bands, building a report around the input
fields. You can delete, move, copy, and paste text and input fields
as needed. - Include a rich text file you have already prepared.
If you include a rich text file created in PowerBuilder that contains
input fields, those names should match the columns selected in the DataWindow object.
For information about creating rich text files,
see Application Techniques
. - Add computed fields that will appear as input fields
in the report and whose values come from the computed field expression.
This sample shows how you might rearrange the input fields
in a sales letter:
Editing text
You can add text by typing directly in the Design view. You
do not have to create text objects as you do for other DataWindow object styles.
The DataWindow painter’s StyleBar lets you apply formatting
to selected text. The RichText toolbars are not available
in the painter.
![]() Preview mode and editing text You cannot edit text in the Preview view, but you can edit
Preview mode and editing text You cannot edit text in the Preview view, but you can edit
it when you preview the DataWindow object by selecting File>Run/Preview
from the menu bar. It may seem convenient to edit text in Preview
mode because the toolbars are available. However, any
changes you make to the text when previewing are temporary.
They are discarded as soon as you return to the Design view.
Inserting a file
If you have a rich text file, you can include it in the DataWindow object.
In the Design view, you can insert text from a file into the detail,
header, or footer band.
![]() To insert a file:
To insert a file:
-
Click in the text in any band to set the
insertion point for the file. -
Right-click in the Design view and select Insert
File from the pop-up menu. -
In the file selection dialog box, select the file
you want to insert.
Only the body of the file is used. If the file has a header
or footer, it is ignored.
Headers and footers
You decide whether your RichText DataWindow object has a header and
footer by checking Header/Footer in the wizard or Rich
Text Object dialog box (described in “Formatting for RichText
objects within the DataWindow object”). The
decision to include a header and footer must be made at design time;
it cannot be changed at runtime.
To display a page number or a date in the header or footer,
you can insert the predefined computed fields Page n of
n or Today(). You do not need to
write scripts to set the values of these fields for each page, as
you do for the RichTextEdit control.
Formatting for RichText objects within the DataWindow object
Each type of object in a RichText DataWindow object has its own dialog
box. When you select Properties from the pop-up menu, the dialog
box you get depends on what is selected.
![]() Properties and Control List views The Properties and Control List views are not available for
Properties and Control List views The Properties and Control List views are not available for
RichText DataWindow objects. The painter uses the same property sheets
as are available to users when they run the DataWindow object, and controls
in RichText DataWindow objects cannot be manipulated in the same way as
in other DataWindow objects.
Most of the objects in a RichText DataWindow object correspond to
familiar objects like bitmaps, columns, and computed fields. You
can also specify formatting for a temporary selected text
object. In a RichText DataWindow object, the objects are:
- The whole document
- Selected text and paragraphs
- Input fields (associated with columns or computed
fields) - Pictures
This section describes how to select each type of object and
access its dialog box. The user can access the property sheets too
if you enable the Popup Menu option on the Rich Text Object’s
General dialog box.
The whole RichText object
Settings for the whole RichText DataWindow object include the values
you specified in the wizard, as well as:
- Whether pictures are displayed
or represented by empty frames - Whether newly entered text will wrap within the
display - Whether various nonprinting characters, such as
tabs, returns, and spaces, are visible - Standard DataWindow object settings such as units of measurement
and the pointer - Print specifications
Use the following procedure to change settings:
![]() To set values for the RichText DataWindow object:
To set values for the RichText DataWindow object:
-
Make sure nothing is selected in the Design
view by clicking to set the insertion point. -
Right-click in the Design view and select Properties
from the pop-up menu. -
Click Help to get more information about a specific
setting.
Selected text and paragraphs
You can specify detailed font formatting for selected text.
The selected text can be one character or many paragraphs.
If an input field is part of the selection, the font settings
apply to it, too. A picture that is part of the selection ignores
settings for the selected text object.
![]() To specify formatting for selected text:
To specify formatting for selected text:
-
Select the text you want to format.
-
Right-click in the Design view and select Properties
from the pop-up menu.The Selected Text Object dialog box displays. You can set:
- Paragraph alignment The alignment setting on the Selected Text page applies to
all paragraphs in the selection. - Font formatting Settings on the Font page apply to text in the selection,
including input fields.
- Paragraph alignment The alignment setting on the Selected Text page applies to
Paragraphs
There are also settings for selected paragraphs. You can display
the Paragraph dialog box by pressing Ctrl+Shift+S.
The user can double-click the ruler bar or press the key combination
to display the same dialog box.
Default font
The user can change the default font by double-clicking on
the toolbar or pressing Ctrl+Shift+D. You cannot
change the default font in the painter.
Input fields
An input field can be either a column or a computed field.
Before you retrieve data, its value is shown as two question marks
(??).
The text can include many copies of a named input field. The
same data will appear in each instance of the input field.
Column input fields
The columns you select for the DataWindow object become input fields
in the rich text. Because the input field’s name matches
the column name, PowerBuilder displays the column’s data
in the input field.
If an input field exists in the text, you can copy and paste
it to create another copy. If you need to recreate a column input
field that you deleted, use this procedure.
![]() To insert a column input field in the text:
To insert a column input field in the text:
-
Select Insert>Control>Column
from the menu bar. -
Click in the text where you want the column input
field to appear.PowerBuilder displays a list of the columns selected for the DataWindow object.
-
Select a column for the input field.
Properties for input fields
You select an input field by clicking inside it. A computed
input field is selected when the whole field is highlighted.
![]() To set properties for an input field:
To set properties for an input field:
-
Click in the input field in Design view.
-
Display the pop-up menu and select Properties.
-
On the Font page, specify text formatting.
-
On the Format page, specify a display format.
-
On the Validation page, specify a validation rule
for the column.
If there are multiple copies of an input field, the validation
and format settings apply to all the copies. Background color on
the Font page applies to all input fields. Other settings on the
Font page apply to individual instances.
The user cannot change the format or validation rule. At runtime,
these pages are not available in the dialog box.
Computed field input fields When you display the dialog box for a computed field, the
settings are a little different. You can specify the input field name
and its expression on the Compute page and there is no validation.
Data Value in preview For both columns and computed fields, you see a value in the
Data Value box when you preview the DataWindow object. The user sees a
value in the Data Value box when the current row has a value. For columns,
users can change the value.
Computed fields
Computed fields have an expression that specifies the value
of the computed field. In rich text, they are represented as input
fields, too. You specify a name and an expression. The data value
comes from evaluating the expression and cannot be edited.
![]() To define a computed field:
To define a computed field:
-
Select Insert>Control>Computed
Field. Predefined computed fields You can also select one of the predefined computed fields
at the bottom of the menu. PowerBuilder provides several predefined
computed fields, but in a RichText DataWindow object, only the page number
(Page n of n) and today’s date (Today())
are available. -
Click in the text where you want the computed
field to appear.If you do not select a predefined computed field, PowerBuilder displays the
dialog box for the computed field: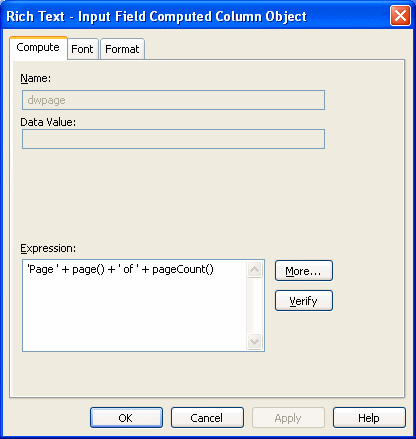
-
On the Compute page, name the computed field and
specify its expression. -
(Optional) On the Font page, specify text formatting.
-
(Optional) On the Format page, specify a display
format.
If there are multiple copies of a computed field input field,
the expression and format settings apply to all the copies. Font
settings apply to individual instances. For more about computed
field expressions and display formats, see Chapter 19, “Enhancing DataWindow Objects .”
Pictures
Inserting a picture
You can include bitmaps (BMP, GIF, JPG, RLE,
or WMF files) in a RichText DataWindow.
![]() To insert a picture in the rich text:
To insert a picture in the rich text:
-
Select Insert>Control>Picture
from the menu bar. -
Click in the text where you want the picture to
appear.PowerBuilder displays the Select Picture dialog box.
-
Select the file containing the picture.
Specifying picture size
A picture is selected when you can see a dashed outline in
Design or Preview view. When the picture is part of a text selection,
it displays with inverted colors.
You can change the size of a picture as a percentage of the
original picture size. The allowable range for a size percent change
is between 10 and 250 percent.
![]() To specify size settings for the picture:
To specify size settings for the picture:
-
Click on the picture in the Design or Preview
view so you see its dashed-outline frame. -
Right-click in the Design or Preview view and
select Properties from the pop-up menu.The Rich Text – Picture Object dialog box displays.
-
Change the percent of the original picture size
in the Width and Height text boxes.The picture expands or contracts according to the size percentage
you selected.
Previewing and printing
To see what the RichText DataWindow object looks like with data,
you can preview it in the Preview view or in preview mode.
![]() To preview the DataWindow object in preview mode:
To preview the DataWindow object in preview mode:
-
Select File>Run/Preview
from the menu bar, or click the Run/Preview button on the
PowerBar. -
Select Rows>Retrieve from the menu bar.
Retrieve on Preview If the RichText definition specifies Retrieve on Preview,
data is retrieved automatically when you open the Preview view or
preview the DataWindow object in preview mode.
Changes in preview
Data While previewing the DataWindow object in preview mode, or when focus
is in the Preview view, you can use the scroll buttons in the Preview toolbar
to move from row to row, and you can change data in the input fields. If
you choose the Save Changes button on the toolbar, you will update
the data in the database.
Text Any changes you make to the rich text in the Preview view will
not be reflected in the Design view. Any changes that
you want to keep must be made in the Design view, not in preview.
If the Display Only setting is checked, you cannot change
text or data in the Preview view.
Print Preview
Print Preview displays a reduced view of one row of data as
it would appear when printed.
![]() To see the DataWindow object in Print Preview:
To see the DataWindow object in Print Preview:
-
Click in the Preview view to make it the
current view. -
Select File>Print Preview.
In Print Preview, you can test different margin settings and
scroll through the pages of the document.
You cannot scroll to view other rows
of data.
Any changes you make to settings in Print Preview are discarded
when you return to the Design view.
![]() Setting margins To specify permanent margin settings for the RichText DataWindow object, use
Setting margins To specify permanent margin settings for the RichText DataWindow object, use
the Print Specifications page of the Rich Text Object dialog box.