Using the ODBC Driver Manager Trace tool
This section describes how to use the ODBC Driver Manager
Trace tool.
About ODBC Driver Manager Trace
You can use the ODBC Driver Manager Trace tool to trace a
connection to any ODBC data source that you access in PowerBuilder through
the ODBC interface.
Unlike the Database Trace tool, the ODBC Driver Manager Trace
tool cannot trace connections through one of
the native database interfaces.
What this tool does
ODBC Driver Manager Trace records information about ODBC API
calls (such as SQLDriverConnect, SQLGetInfo,
and SQLFetch) made by PowerBuilder while connected
to an ODBC data source. It writes this information to a default
log file named SQL.LOG or to a log file that
you specify.
What both tools do
The information from ODBC Driver Manager Trace, like Database
Trace, can help you:
- Understand what PowerBuilder is
doing internally while connected to an ODBC
data source - Identify and resolve problems with your ODBC connection
- Provide useful information to Technical Support
if you call them for help with your database connection
When to use this tool
Use ODBC Driver Manager Trace instead of
the Database Trace tool if you want more detailed information about
the ODBC API calls made by PowerBuilder.
![]() Performance considerations Turning on ODBC Driver Manager Trace can slow your performance
Performance considerations Turning on ODBC Driver Manager Trace can slow your performance
while working in PowerBuilder. Therefore, use ODBC Driver Manager
Trace for debugging purposes only and keep it turned off when you
are not debugging.
SQL.LOG file
PowerBuilder writes ODBC Driver Manager Trace output to a default
log file named SQL.LOG or to a log file that
you specify. The default location of SQL.LOG is
in your root directory.
Starting ODBC Driver Manager Trace
By default, ODBC Driver Manager Trace is turned off in PowerBuilder.
You can start it in order to trace your ODBC connection in two ways:
- Edit your database profile in the PowerBuilder development
environment - Edit a script in a PowerBuilder application
Starting ODBC Driver Manager Trace in the development environment
To start ODBC Driver Manager Trace in the PowerBuilder development environment,
edit the database profile for the connection you want to trace,
as described in the following procedure.
![]() To start ODBC Driver Manager Trace by editing
To start ODBC Driver Manager Trace by editing
the database profile:
-
Open the Database Profile Setup-ODBC dialog
box for the ODBC connection you want to trace. -
On the Options tab, select the Trace ODBC API
Calls check box. -
(Optional) To specify a log file where you want PowerBuilder to
write the output of ODBC Driver Manager Trace, type the path name
in the Trace File boxor
(Optional) Click Browse to display the pathname of an
existing log file in the Trace File box.By default, if the Trace ODBC API Calls check box is selected
and no trace file is specified, PowerBuilder sends ODBC Driver Manager
Trace output to the default SQL.LOG file.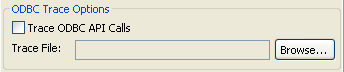
-
Click OK or Apply
or
Right-click on the connected database and select Re-connect
from the drop-down menu in the Database Profiles dialog box.The Database Profiles dialog box displays with the name of
the edited profile highlighted.PowerBuilder saves your settings in the database profile entry
in the registry in the HKEY_CURRENT_USERSoftwareSybasePowerBuilder11.0
DatabaseProfiles key.For example, here is the relevant portion of a database profile
entry for an ODBC data source named Employee. The settings that
start ODBC Driver Manager Trace (corresponding to the ConnectOption
DBParm parameter) are emphasized.1DBMS "ODBC"1...1DbParm "ConnectString='DSN=Emloyee;UID=dba;<br />PWD=00c61737',<i>ConnectOption='SQL_OPT_TRACE,SQL_OPT_TRACE_ON;SQL_OPT_TRACEFILE,C:Tempodbctrce.log'</i>" -
Click Connect in the Database Profiles dialog
box to connect to the databaseor
Right-click on the connected database and select Re-connect
from the drop-down menu in the Database Profiles dialog box.PowerBuilder connects to the database, starts tracing the ODBC connection,
and writes output to the log file you specified.
Starting ODBC Driver Manager Trace in a PowerBuilder
application
To start ODBC Driver Manager Trace in a PowerBuilder application,
you must specify certain values for the ConnectOption DBParm parameter
in the appropriate script. For example, you might include them in
the script that opens the application.
You can specify the required ConnectOption values in a PowerBuilder
script by:
- (Recommended)
Copying the PowerScript ConnectOption DBParm syntax from the Preview
tab in the Database Profile Setup dialog box into your script - Coding PowerScript to set a value for the DBParm
property of the Transaction object - Reading the DBParm values from an external text
file
For more about using Transaction objects to
communicate with a database in a PowerBuilder application, see Application
Techniques
.
About the ConnectOption DBParm parameter
ConnectOption includes several parameters, two of which control
the operation of ODBC Driver Manager Trace for any ODBC-compatible
driver you are using in PowerBuilder.
| Parameter | Description |
|---|---|
| SQL_OPT_TRACE |
Purpose Starts or stops ODBC Driver Manager Trace in PowerBuilder. Values The values you can specify are:
|
| SQL_OPT_TRACEFILE |
Purpose Specifies the name of the trace file where you want to send Values You can specify any filename for the trace file, following For information about the location of SQL.LOG on different |
Copying ConnectOption syntax from the Preview
tab
The easiest way to start ODBC Driver Manager Trace in a PowerBuilder application
script is to copy the PowerScript ConnectString DBParm syntax from
the Preview tab in the Database Profile Setup – ODBC dialog box
into your script, modifying the default Transaction object name
(SQLCA) if necessary.
As you complete the Database Profile Setup dialog box in the
development environment, PowerBuilder generates the correct connection
syntax on the Preview tab. Therefore, copying the syntax directly
from the Preview tab into your script ensures that it is accurate.
![]() To copy ConnectOption syntax from the Preview
To copy ConnectOption syntax from the Preview
tab into your script:
-
On the Options tab in the Database Profile
Setup – ODBC dialog box for your connection, select the Trace ODBC
API Calls check box and (optionally) specify a log file in the Trace
File box to start ODBC Driver Manager Trace. -
Click Apply to save your changes to the Options
tab without closing the dialog box. -
Click the Preview tab.
The correct PowerScript syntax for ODBC Driver Manager Trace
and other selected options displays in the Database Connection Syntax
box.The following example shows the PowerScript syntax that starts
ODBC Driver Manager Trace and sends output to the file C:TEMPODBCTRCE.LOG.1// Profile Employee1SQLCA.DBMS = "ODBC"1SQLCA.AutoCommit = False1SQLCA.DBParm = "Connectstring='DSN=Employee',1ConnectOption='SQL_OPT_TRACE,SQL_OPT_TRACE_ON;1SQL_OPT_TRACEFILE,c: empodbctrce.log'" -
Select the SQLCA.DBParm line
and any other syntax you want to copy to your script and click Copy.PowerBuilder copies the selected text to the clipboard.
-
Paste the selected text from the Preview tab into
your script, modifying the default Transaction object name (SQLCA) if necessary.
Coding PowerScript to set a value for the DBParm
property
Another way to start ODBC Driver Manager Trace in a PowerBuilder application
script is to include the ConnectOption parameters that control tracing
as values for the DBParm property of the Transaction object.
![]() To start ODBC Driver Manager Trace by setting
To start ODBC Driver Manager Trace by setting
the DBParm property:
-
In your application script, set the SQL_OPT_TRACE and
(optionally) SQL_OPT_TRACEFILE ConnectOption
parameters to start the trace and to specify a nondefault trace
file, respectively.
For example, the following statement starts ODBC Driver Manager
Trace in your application and sends output to a file named MYTRACE.LOG.
Insert a comma to separate the ConnectString and ConnectOption values.
This example assumes you are using the default Transaction
object SQLCA, but you can
also define your own Transaction object.
|
1 |
SQLCA.DBParm="ConnectString='DSN=Test;UID=PB;<br /> PWD=xyz',ConnectOption='SQL_OPT_TRACE,<br /> SQL_OPT_TRACE_ON;SQL_OPT_TRACEFILE,C:TRC.LOG'" |
Reading the DBParm value from an external text
file
As an alternative to setting the DBParm property in your PowerBuilder application
script, you can use the PowerScript ProfileString function
to read DBParm values from a specified section of an external text
file, such as an application-specific initialization file.
This assumes that the DBParm value read from your initialization
file includes the ConnectOption parameter to start ODBC Driver Manager
Trace, as shown in the preceding example.
![]() To start ODBC Driver Manager Trace by reading
To start ODBC Driver Manager Trace by reading
DBParm values from an external text file:
-
Use the following PowerScript syntax to
specify the ProfileString function with the DBParm
property:1<b>SQLCA.dbParm = </b><b><i></i><i></i>ProfileString</b>(<i>file</i>, <i>section</i>, <i>variable</i>,<br /> <i>default_value</i>)For example, the following statement in a PowerBuilder script
reads the DBParm values from the [Database] section
of the APP.INI file:1SQLCA.dbParm =1ProfileString("APP.INI","Database","DBParm","")
Stopping ODBC Driver Manager Trace
Once you start tracing an ODBC connection with ODBC Driver
Manager Trace, PowerBuilder continues sending trace output to the
log file until you stop tracing. After you stop tracing as described
in the following sections, you must reconnect to have the changes
take effect.
Stopping ODBC Driver Manager Trace in the development
environment
![]() To stop ODBC Driver Manager Trace by editing a
To stop ODBC Driver Manager Trace by editing a
database profile:
-
Open the Database Profile Setup – ODBC
dialog box for the connection you are tracing.For instructions, see “Starting ODBC Driver
Manager Trace in the development environment”. -
On the Options tab, clear the Trace ODBC API Calls
check box.If you supplied the pathname of a log file in the Trace File
box, you can leave it specified in case you want to restart tracing
later. -
Click OK in the Database Profile Setup – ODBC
dialog box.The Database Profiles dialog box displays, with the name of
the edited profile highlighted. -
Click Connect in the Database Profiles dialog
box or right-click on the connected database and select Re-connect
from the drop-down menu in the Database Profiles dialog box.PowerBuilder connects to the database and stops tracing the
connection.
Stopping ODBC Driver Manager Trace in a PowerBuilder application
To stop ODBC Driver Manager Trace in a PowerBuilder application
script, you must change the SQL_OPT_TRACE ConnectOption
parameter to SQL_OPT_TRACE_OFF.
You can do this by:
- Editing
the value of the DBParm property of the Transaction object - Reading the DBParm values from an external text
file
Editing the DBParm property
One way to change the ConnectOption value in a PowerBuilder script
is to edit the DBParm property of the Transaction object.
![]() To stop ODBC Driver Manager Trace by editing the
To stop ODBC Driver Manager Trace by editing the
DBParm property:
-
In your application script, edit the DBParm
property of the Transaction object to change the value of the SQL_OPT_TRACE ConnectOption parameter
to SQL_OPT_TRACE_OFF.
For example, the following statement starts ODBC Driver Manager
Trace in your application and sends the output to a file named MYTRACE.LOG.
(This example assumes you are using the default Transaction object SQLCA, but you can also define
your own Transaction object.)
|
1 |
SQLCA.DBParm="ConnectString='DSN=Test;UID=PB;<br /> PWD=xyz',ConnectOption='SQL_OPT_TRACE,<br /> SQL_OPT_TRACE_ON;SQL_OPT_TRACEFILE,C:TRC.LOG'" |
Here is how the same statement should look after you edit
it to stop ODBC Driver Manager Trace. (You can leave the name of
the trace file specified in case you want to restart tracing later.)
|
1 |
SQLCA.DBParm="ConnectString='DSN=Test;UID=PB;<br /> PWD=xyz',ConnectOption='SQL_OPT_TRACE,<br /> <i>SQL_OPT_TRACE_OFF</i>;SQL_OPT_TRACEFILE,C:TRC.LOG'" |
Reading DBParm values
As an alternative to editing the DBParm property in your PowerBuilder application
script, you can use the PowerScript ProfileString function to read DBParm
values from a specified section of an external text file, such as
an application-specific initialization file.
This assumes that the DBParm value read from your initialization
file sets the value of SQL_OPT_TRACE to SQL_OPT_TRACE_OFF,
as shown in the preceding example.
Viewing the ODBC Driver Manager Trace log
You can display the contents of the ODBC Driver Manager Trace
log file anytime during a PowerBuilder session.
![]() Location of SQL.LOG For information about where to find the default SQL.LOG file, see “About ODBC Driver
Location of SQL.LOG For information about where to find the default SQL.LOG file, see “About ODBC Driver
Manager Trace”.
![]() To view the contents of the log file:
To view the contents of the log file:
-
Open SQL.LOG or
the log file you specified in one of the following ways:- Use the File Editor
in PowerBuilder. (For instructions, see the User’s Guide
.) - Use any text editor outside PowerBuilder.
- Use the File Editor
![]() Leaving the log file open If you leave the log file open as you work in PowerBuilder,
Leaving the log file open If you leave the log file open as you work in PowerBuilder,
ODBC Driver Manager Trace does not update it.
Sample ODBC Driver Manager Trace output
This section shows a partial example of output from ODBC Driver
Manager Trace to give you an idea of the information it provides.
The example is part of the trace on an ODBC connection to the EAS Demo DB.
For more about a particular ODBC API call,
see your ODBC documentation.
|
1 |
PB110 179:192 EXIT SQLSetConnectOption with return code 0 (SQL_SUCCESS)<br /> HDBC 0x036e1300<br /> UWORD 104 <SQL_OPT_TRACE><br /> UDWORD 1<br /> <br />PB110 179:192 ENTER SQLSetConnectOption <br /> HDBC 0x036e1300<br /> UWORD 110 <SQL_OPT_TRACEFILE><br /> UDWORD 160694373<br />PB110 179:192 EXIT SQLSetConnectOption with return code 0 (SQL_SUCCESS)<br /> HDBC 0x036e1300<br /> UWORD 110 <SQL_OPT_TRACEFILE><br /> UDWORD 160694373<br />PB110 179:192 ENTER SQLDriverConnectW <br /> HDBC 0x036e1300<br /> HWND 0x004607fa<br /> WCHAR * 0x1f4be068 [ -3] "****** 0"<br /> SWORD -3 <br /> WCHAR * 0x1f4be068 <br /> SWORD 8 <br /> SWORD * 0x00000000<br /> UWORD 1 <SQL_DRIVER_COMPLETE><br />PB110 179:192 EXIT SQLDriverConnectW with return code 0 (SQL_SUCCESS)<br /> HDBC 0x036e1300<br /> HWND 0x004607fa<br /> WCHAR * 0x1f4be068 [ -3] "****** 0"<br /> SWORD -3 <br /> WCHAR * 0x1f4be068 <br /> SWORD 8 <br /> SWORD * 0x00000000<br /> UWORD 1 <SQL_DRIVER_COMPLETE><br />PB110 179:192 ENTER SQLGetInfoW <br /> HDBC 0x036e1300<br /> UWORD 6 <SQL_DRIVER_NAME><br /> PTR 0x036e2098 <br /> SWORD 6 <br /> SWORD * 0x0012cd30<br />PB110 179:192 EXIT SQLGetInfoW with return code 1 (SQL_SUCCESS_WITH_INFO)<br /> HDBC 0x036e1300<br /> UWORD 6 <SQL_DRIVER_NAME><br /> PTR 0x036e2098 [ 6] "DB 0"<br /> SWORD 6 <br /> SWORD * 0x0012cd30 (22)<br /> DIAG [01104] [Sybase][ODBC Driver]Data truncated (0) <br />PB110 179:192 ENTER SQLGetInfoW <br /> HDBC 0x036e1300<br /> UWORD 10 <SQL_ODBC_VER><br /> PTR 0x036e39f8 <br /> SWORD 100 <br /> SWORD * 0x0012cd38<br />PB110 179:192 EXIT SQLGetInfoW with return code 0 (SQL_SUCCESS)<br /> HDBC 0x036e1300<br /> UWORD 10 <SQL_ODBC_VER><br /> PTR 0x036e39f8 [ 20] "03.51.0000"<br /> SWORD 100 <br /> SWORD * 0x0012cd38 (20)<br />PB110 179:192 ENTER SQLGetInfoW <br /> HDBC 0x036e1300<br /> UWORD 2 <SQL_DATA_SOURCE_NAME><br /> PTR 0x036e3c88 <br /> SWORD 512 <br /> SWORD * 0x0012cc32<br />PB110 179:192 EXIT SQLGetInfoW with return code 0 (SQL_SUCCESS)<br /> HDBC 0x036e1300<br /> UWORD 2 <SQL_DATA_SOURCE_NAME><br /> PTR 0x036e3c88 [ 28] "EAS Demo DB"<br /> SWORD 512 <br /> SWORD * 0x0012cc32 (28)<br />PB110 179:192 ENTER SQLGetInfoW <br /> HDBC 0x036e1300<br /> UWORD 16 <SQL_DATABASE_NAME><br /> PTR 0x036e3c88 <br /> SWORD 512 <br /> SWORD * 0x0012cc32<br />PB110 179:192 EXIT SQLGetInfoW with return code 0 (SQL_SUCCESS)<br /> HDBC 0x036e1300<br /> UWORD 16 <SQL_DATABASE_NAME><br /> PTR 0x036e3c88 [ 16] "easdemodb"<br /> SWORD 512 <br /> SWORD * 0x0012cc32 (16)<br />PB110 179:192 ENTER SQLGetInfoW <br /> HDBC 0x036e1300<br /> UWORD 25 <SQL_DATA_SOURCE_READ_ONLY><br /> PTR 0x036e3c88 <br /> SWORD 512 <br /> SWORD * 0x0012cc32<br />PB110 179:192 EXIT SQLGetInfoW with return code 0 (SQL_SUCCESS)<br /> HDBC 0x036e1300<br /> UWORD 25 <SQL_DATA_SOURCE_READ_ONLY><br /> PTR 0x036e3c88 [ 2] "N"<br /> SWORD 512 <br /> SWORD * 0x0012cc32 (2)<br />PB110 179:192 ENTER SQLGetInfoW <br /> HDBC 0x036e1300<br /> UWORD 13 <SQL_SERVER_NAME><br /> PTR 0x036e3c88 <br /> SWORD 512 <br /> SWORD * 0x0012cc32<br />PB110 179:192 EXIT SQLGetInfoW with return code 0 (SQL_SUCCESS)<br /> HDBC 0x036e1300<br /> UWORD 13 <SQL_SERVER_NAME><br /> PTR 0x036e3c88 [ 16] "easdemodb"<br /> SWORD 512 <br /> SWORD * 0x0012cc32 (16)<br />PB110 179:192 ENTER SQLGetInfoW <br /> HDBC 0x036e1300<br /> UWORD 17 <SQL_DBMS_NAME><br /> PTR 0x036e3c88 <br /> SWORD 512 <br /> SWORD * 0x0012cab6<br />PB110 179:192 EXIT SQLGetInfoW with return code 0 (SQL_SUCCESS)<br /> HDBC 0x036e1300<br /> UWORD 17 <SQL_DBMS_NAME><br /> PTR 0x036e3c88 [ 48] " |
SQL Anywhere”
SWORD
512
SWORD * 0x0012cab6
(48)
PB110 179:192 ENTER SQLGetInfoW
HDBC
0x036e1300
UWORD
6 <SQL_DRIVER_NAME>
PTR
0x036e1a10
SWORD
550
SWORD * 0x0012cbbc
PB110
179:192 EXIT SQLGetInfoW with return
code 0 (SQL_SUCCESS)
HDBC
0x036e1300
UWORD
6 <SQL_DRIVER_NAME>
PTR
0x036e1a10 [ 22] “DBODBC9.DLL”
SWORD
550
SWORD * 0x0012cbbc
(22)
PB110 179:192 ENTER SQLAllocStmt
HDBC
0x036e1300
HSTMT * 0x0012d0b4
PB110
179:192 EXIT SQLAllocStmt with return
code 0 (SQL_SUCCESS)
HDBC
0x036e1300
HSTMT * 0x0012d0b4
( 0x036e1c48)
PB110 179:192 ENTER
SQLGetTypeInfo
HSTMT
0x036e1c48
SWORD
0 <SQL_ALL_TYPES>