Setting up JSP targets
A JSP target provides the physical and management structure
for the folders and files within it. When you work with a JSP target,
you do so within the context of a workspace. You must set up the
JSP target before you can begin developing content. After you set
up a JSP target, you can add new content or content based on existing
files that you import.
To produce most JSP targets, you must complete the following
tasks :
- Create a JSP target
- Configure the JSP target to meet your JSP environment
delivery requirements by modifying JSP target properties - Define connection profiles and the folder structure
for your files - Import existing files you want to use
- Create Web pages with the JSP page wizards and the
HTML editor - Add HTML elements and controls, including design-time
controls, to your Web pages using drag-and-drop programming - Build and deploy your target
- Test your pages to make sure that they appear and
work as planned - Deploy your Web application to a production environment
where client browsers can access your Web site
JSP Target wizard
You create a JSP target using
the JSP Target wizard. The JSP Target wizard creates a target with
Source and Build folders and a deployment configuration. JSP pages
are deployed as a Web application in a Web Archive (WAR) file.
The JSP Target wizard includes a server-specific deployment
page with properties that depend on the selection you make in the
JSP server page of the wizard. Any properties you specify in the
wizard, except for the deployment configuration name, can be modified
after target creation in the Deployment Configuration Properties
dialog box for the JSP target.
Specifying a server type
When you select a server type,
the wizard presents a page where you specify how to connect to the
server.
| JSP server | Server-specific selections |
|---|---|
| EAServer | The EAServer profile and the HTTP port you want to use |
| Tomcat | The deployment folder (typically, the webapps folder under the Tomcat installation directory), the HTTP server and port name, and a login name and password |
| Command Line | Command lines you can use to deploy your Web application to any JSP 1.2 compatible server |
Custom command-line deployment
Custom deployment configuration properties
You can use the custom
command-line deployment configuration to set commands for Java command-line
build tools such as Apache Ant, or to deploy a target to JSP 1.2
servers other than EAServer and
Tomcat, such as IBM WebSphere or BEA WebLogic. The configuration
screen for custom command-line deployment includes the following
fields and check boxes:
| Property | Field type | Use this field to |
|---|---|---|
| Description | Text box | Set a description for your deployment configuration. |
| Command | Column | Add one or more command lines in a defined sequence of execution. You can move command lines up or down in the command sequence by using the arrow controls. You can enter macros. |
| Start-up directory | Column | (Optional) Change the current directory to the location you want before executing the command you entered for the same row in the Command column. This is equivalent to a cd command to change directories. |
| Show messages in output window | Check box | Display messages from the command-line tool in the PowerBuilder Output window (selected by default). |
| Automatically generate WAR file | Check box | Generate the target WAR file when you deploy the target (selected by default). You should clear this check box if you generate the WAR file from a command you enter in the Command column. |
| Abort execution on error | Check box | Halt the execution of command lines once an error is detected (selected by default). |
| Command time-out | Text box | (Optional) Enter a time-out value in seconds that applies to all the command lines you enter. |
Command-line macros for custom deployment
You can use macros
on any of the command lines you enter in the list of commands for
your custom deployment configuration. There are five macros available
for use on the command lines you enter in the JSP Target wizard
(or in the Deployment Configuration wizard):
| Macro text | Pasted text | Value added by macro |
|---|---|---|
| Configuration Directory | $(ConfigDir) | Location of the local copy directory that you specify in a subsequent page of the wizard. |
| Display Name | $(DisplayName) | Display name from web.xml for the target. You also specify this in the wizard. |
| WAR Filename | $(WARFile) | File name, but not the full path. If you do not use a command line to build the WAR file, the value is specified in a subsequent page of the wizard. |
| Build Directory | $(BuildDir) | Full path to the build directory for the target that you specified in the JSP Target wizard. |
| Source Directory | $(SourceDir) | Full path to the source directory for the target that you specified in the JSP Target wizard. |
Creating
a JSP target
Creating a target is the first step in producing most JSP
targets.
 To create
a JSP target:
-
From an open workspace, select File>New
or
In the Workspace tab of the System Tree, right-click
the workspace name, and select New from the pop-up menu. -
On the Target page of the New dialog box, click
the JSP Target wizard.The JSP Target wizard starts. You use the JSP Target wizard
to create a JSP Web site that you deploy to a JSP 1.2 or later component
server such as Tomcat or EAServer. What the Source Controlled JSP Target wizard does The Source Controlled JSP Target wizard opens a JSP target
that has been checked in to a source control system -
Follow the instructions on the wizard pages.
Target Properties dialog box
After you create
a JSP target, you can modify the target properties and add deployment
configurations from the Target Properties dialog box. You access the
Target Properties dialog box from the pop-up menu for a JSP target
in the System Tree.
The Target Properties dialog box for a JSP target has the
following options for property selections:
| On this page | Set these options |
|---|---|
| Options | The path of the JSP target’s Source folder and Build folder. |
| Deploy | The local and remote deployment configurations for your target. You can also set the deployment priority of the various deployment |
| Run | The start page for the target and the deployment configuration you want to use for running when you click the Run button from the PowerBar or select Run>Run Target from the PowerBuilder menu. |
Adding deployment configurations
After you
create a target, you can add deployment configurations and change settings
for the target from the property pages for the target. For information about
deploying a JSP target, see Chapter 12, “Building and Deploying
JSP Targets.”
Local and target deployment configurations
Before you add a deployment configuration, you should decide
whether you want to create a test (local) configuration, a shared
or production (target) configuration, or both. You can deploy using
both types of configuration at the same time.
Local configurations are stored in your registry, whereas
target configurations are stored in the PBT file. PBT files with
target configurations can be shared in a source control system,
but users have to make certain that any configuration paths, database
profiles, and target mappings have identical names on all machines
that use the source-controlled target configurations.
Multiple deployment configurations
You can add multiple deployment configurations to the list
of local or target configuration profiles. You can change the order
of the configurations in the list by using the wavy arrow keys above
the configuration list boxes. A check box next to each deployment
configuration in the list lets you select which of the configurations
you want to use the next time you deploy your JSP target. When you
add a configuration, it is selected for deployment by default.
To add deployment configurations:
-
Right-click the JSP target on the Workspace
tab of the System Tree and select Properties from the pop-up menu. -
Click the Deploy tab.
The Deploy page is one of three pages in the Properties dialog
box for a JSP target.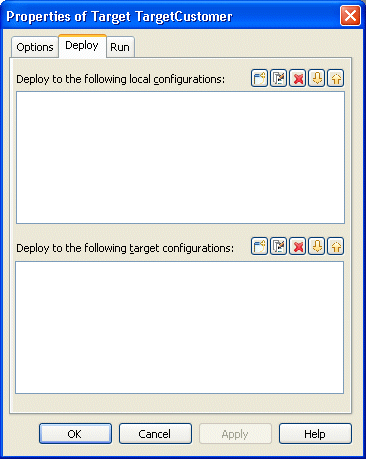
-
Click the Create New Configuration button for
either a local deployment configuration or a target deployment configuration.The Name New Deployment Configuration wizard starts.
-
Follow the instructions in the Name New Deployment
Configuration wizard. In the wizard, you provide the following information:- A name for the deployment
configuration - Whether you are using the default object model or
no object model - The JSP server to deploy to
- If your JSP server is EAServer,
the EAServer profile - If your JSP server is EAServer,
the HTTP server name and port - How to handle failures (deploy all or nothing or
only successful files) - A folder name for a local copy of the deployed files
- The WAR file name
The JSP server can also be Tomcat or Command Line.
After you click Finish on the last wizard page, the new deployment configuration
displays in one of the list boxes on the Deploy page of the Target
Properties dialog box. You can use the toolbar above the list box
to edit, delete, or change the order of the configurations in the
list. - A name for the deployment
-
Click the Run tab and select a start page for
your JSP target.If you want to start your Web application from the design-time environment,
you do not need the complete URL, but you can give the complete
URL, including the server name, if you want to. Choosing a URL You can use the Choose URL dialog box (URL picker) that you
access from the ellipsis button next to the Start Page field. When
you use Choose URL, only the file name portion of the URL that you
select is added to the field. -
Select a deployment configuration that you want
to use for running.The deployment configurations you created for the current
JSP target are available for selection from the Deploy Configuration
For Running drop-down list.
Defining connection profiles
If you plan to use database connections or EAServer connections, you must define
connection profiles for these types of connections:
| Profile type | Create for |
|---|---|
| Database connections | Database connections that your pages use directly, and connections to be used by Web DataWindow objects |
| Connections to EAServer | Components your application will access that are stored on the server |
You set up database connection profiles from the Tools>Database
Profile menu item. You can set up EAServer profiles
either from the Tools>EAServer Profile menu
item or by right-clicking anywhere on the Components tab of the
System Tree.
For information on setting up these profiles, see Connecting
to Your Database
.
Importing files from an existing Web site
You can import folders
or multiple files into your JSP target. If you want to use an existing
Web site as the starting point for development, you can import the site
into a JSP target.
The site you import must be a file-based Web site. The folder
structure of the Web site becomes the folder structure in the JSP
target. The JSP target creates a map of the resources used by the
site and tracks the content, links, and components.
Once you have imported files or a complete Web site, you can
modify the content and organizational structure to suit your Web
application.
To import files or an existing Web site into a
JSP target:
-
Right-click the JSP target on the Workspace
tab of the System Tree. -
Select Import Files or Import Folder from the
pop-up menu. -
Select the files or the folder you want to import
and click OK or Open.