Setting database preferences
How to set
The way you set connection-related database preferences in PowerBuilder varies,
as summarized in the following table (AutoCommit and Lock are the only
database preferences that you can set in a PowerBuilder application script).
| Database preference | Set in development environment by editing | Set in PowerBuilder application by editing |
|---|---|---|
| AutoCommit | Database Profile Setup dialog box for your connection |
Application script |
| Lock | Database Profile Setup dialog box for your connection |
Application script |
| Shared Database Profiles | Database Preferences property sheet | — |
| Connect to Default Profile | Database Preferences property sheet | — |
| Read Only | Database Preferences property sheet | — |
| Keep Connection Open | Database Preferences property sheet | — |
| Use Extended Attributes | Database Preferences property sheet | — |
| SQL Terminator Character | Database Preferences property sheet | — |
The following sections give the steps for setting database
preferences in the development environment and (for AutoCommit and
Lock) in a PowerBuilder application script.
For more information
For information about using a specific database preference,
see its description in the online Help.
Setting database preferences in the development
environment
There are two ways to set database preferences in the PowerBuilder development
environment on all supported development platforms,
depending on the preference you want to set:
- Set AutoCommit and Lock (Isolation Level) in the
Database Profile Setup dialog box for your connection - Set all other database preferences in the Database
Preferences property sheet in the Database painter
Setting AutoCommitand Lock in the database profile
The AutoCommit and Lock (Isolation Level) preferences are
properties of the default Transaction object, SQLCA. For AutoCommit
and Lock to take effect in the PowerBuilder development environment,
you must specify them before you connect to
a database. Changes to these preferences after the connection occurs
have no effect on the current connection.
To set AutoCommit and Lock before PowerBuilder connects to your
database, you specify their values in the Database Profile Setup
dialog box for your connection.
![]() To set AutoCommit and Lock (Isolation Level) in
To set AutoCommit and Lock (Isolation Level) in
a database profile:
- Display the Database Profiles dialog box.
-
Click the plus sign (+) to the left of
the interface you are using.or
Double-click the interface name.
The list expands to display the database profiles defined
for your interface. -
Select the name of the profile you want and click
Edit.The Database Profile Setup dialog box for the selected profile
displays. -
On the Connection tab page, supply values for
one or both of the following:- Isolation
Level If your database supports the use of locking and isolation
levels, select the isolation level you want to use for this connection
from the Isolation Level drop-down list. (The Isolation Level drop-down
list contains valid lock values for your interface.) - AutoCommit Mode The setting of AutoCommit controls whether PowerBuilder issues
SQL statements outside (True) or inside (False) the scope of a transaction. If
your database supports it, select the AutoCommit Mode
check box to set AutoCommit to True or clear the AutoCommit Mode
check box (the default) to set AutoCommit to False.
For example, in addition to values for basic connection parameters (Server,
Login ID, Password, and Database), the Connection tab page for the
following Sybase Adaptive Server Enterprise profile named Sales shows
nondefault settings for Isolation Level and AutoCommit Mode.
- Isolation
-
(Optional) In PowerBuilder, click the Preview
tab if you want to see the PowerScript connection syntax generated
for Lock and AutoCommit.PowerBuilder generates correct PowerScript connection syntax
for each option you set in the Database Profile Setup dialog box.
You can copy this syntax directly into a PowerBuilder application
script.For instructions, see “Copying DBParm syntax from
the Preview tab”. -
Click OK to close the Database Profile Setup dialog
box.PowerBuilder saves your settings in the database profile entry
in the registry.For example, here is the database profile entry for Sales:
1[Default] [value not set]1AutoCommit "TRUE"1Database "Sales"1DatabasePassword "00"1DBMS "SYC Sybase Adaptive Server Enterprise"1DbParm "Release='12.5'"1Lock "3"1LogId "login"1LogPassword "pass"1Prompt "0"1ServerName "Sales"
Setting preferencesin the Database Preferences property sheet
To set the following connection-related database preferences,
complete the Database Preferences property sheet in the PowerBuilder Database
painter:
- Shared Database Profiles
- Connect to Default Profile
- Read Only
- Keep Connection Open
- Use Extended Attributes
- SQL Terminator Character
![]() Other database preferences The Database Preferences property sheet also lets you set
Other database preferences The Database Preferences property sheet also lets you set
other database preferences that affect the behavior of the Database
painter itself. For information about the other preferences you
can set in the Database Preferences property sheet, see the User’s
Guide
.
![]() To set connection-related preferences in the Database
To set connection-related preferences in the Database
Preferences property sheet:
- Open the Database painter.
-
Select Design>Options from the menu bar.
The Database Preferences property sheet displays. If necessary,
click the General tab to display the General property page.
-
Specify values for one or more of the connection-related
database preferences in the following table.Table 7-2: Connection-related database preferences Preference Description For details, see Shared Database Profiles Specifies the pathname of the file containing
the database profiles you want to share. You can type the pathname or
click Browse to display it.“Sharing database profiles” Connect to Default Profile Controls whether the Database painter establishes
a connection to a database using a default profile when the painter
is invoked. If not selected, the Database painter opens without
establishing a connection to a database.Connect to Default Profile in online Help Read Only Specifies whether PowerBuilder should update
the extended attribute system tables and any other tables in your database.
Select or clear the Read Only check box as follows:- Select the check
box Does not update the extended attribute system tables or any
other tables in your database. You cannot modify
(update) information in the extended attribute system tables or
any other database tables from the DataWindow painter when the Read
Only check box is selected. - Clear the check box (Default) Updates the extended attribute system tables and
any other tables in your database.
Read Only in the online Help Keep Connection Open When you connect to a database in PowerBuilder
without using a database profile, specifies when PowerBuilder closes
the connection. Select or clear the Keep Connection Open check box
as follows:- Select
the check box (Default) Stays connected to the database throughout your
session and closes the connection when you exit - Clear the check box Opens the connection only when a painter requests it and closes
the connection when you close a painter or finish compiling a script
 Not used with profile This preference has no effect when you connect using a database
profile.Keep Connection Open in the online Help Use Extended Attributes Specifies whether PowerBuilder should create
and use the extended attribute system tables. Select or clear the
Use Extended Attributes check box as follows:- Select the check box (Default) Creates and uses the extended attribute system tables
- Clear the check box Does not create the extended attribute
system tables
Use Extended Attributes in the online
HelpSQL Terminator Character Specifies the SQL statement terminator character
used in the ISQL view in the Database painter in PowerBuilder.The default terminator character is a semicolon (;). If you
are creating stored procedures and triggers in the ISQL view of
the database painter, change the terminator character to one that
you do not expect to use in the stored procedure or trigger syntax
for your DBMS. A good choice is the backquote (`) character.SQL Terminator Character in the online
Help - Select the check
-
Do one of the following:
- Click Apply to apply the preference settings to
the current connection without closing the Database Preferences
property sheet. - Click OK to apply the preference settings to the
current connection and close the Database Preferences property sheet.
PowerBuilder saves your preference settings in the database
section of PB.INI. - Click Apply to apply the preference settings to
Setting AutoCommit and Lock in a PowerBuilder application
script
If you are developing a PowerBuilder application that connects
to a database, you must specify the required connection parameters
in the appropriate script as properties of the default Transaction
object (SQLCA) or a Transaction object that you create. For example,
you might specify connection parameters in the script that opens
the application.
AutoCommit and Lock are properties of SQLCA. As such, they
are the only database preferences that you
can set in a PowerBuilder script. You can do this by:
- (Recommended) Copying
PowerScript syntax for AutoCommit and Lock from the Preview tab
in the Database Profile Setup dialog box into your script - Coding PowerScript to set values for the AutoCommit
and Lock properties of the Transaction object - Reading AutoCommit and Lock values from an external
text file
For more about using Transaction objects to
communicate with a database in a PowerBuilder application, see Application
Techniques
.
Copying AutoCommit and Lock syntax from the Preview
tab
The easiest way to specify AutoCommit and Lock in a PowerBuilder application
script is to copy the PowerScript syntax from the Preview tab in
the Database Profile Setup dialog box into your script, modifying
the default Transaction object name (SQLCA) if necessary.
As you complete the Database Profile Setup dialog box in the
development environment, PowerBuilder generates the correct connection
syntax on the Preview tab for each selected option. Therefore, copying
the syntax directly from the Preview tab ensures that you use the
correct PowerScript syntax in your script.
![]() To copy AutoCommit and Lock syntax from the Preview
To copy AutoCommit and Lock syntax from the Preview
tab into your script:
-
On the Connection tab in the Database Profile
Setup dialog box for your connection, supply values for AutoCommit
and Lock (Isolation Level) as required.For instructions, see “Setting AutoCommit
and Lock in the database profile”.For example, in addition to values for basic connection parameters (Server,
Login ID, Password, and Database), the Connection tab for the following
Adaptive Server profile named Sales shows nondefault settings for
Isolation Level and AutoCommit Mode.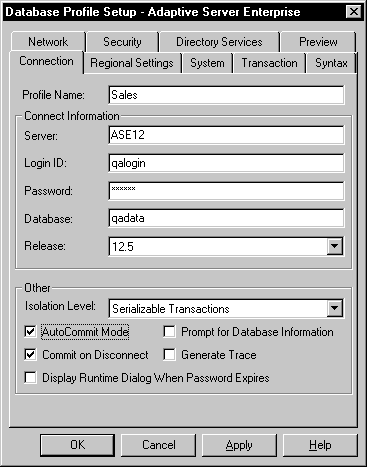
For information about the DBParm parameters
for your interface and the values to supply, click Help. -
Click Apply to save your changes to the current
tab without closing the Database Profile Setup dialog box. -
Click the Preview tab.
The correct PowerScript syntax for each selected option displays
in the Database Connection Syntax box. For example: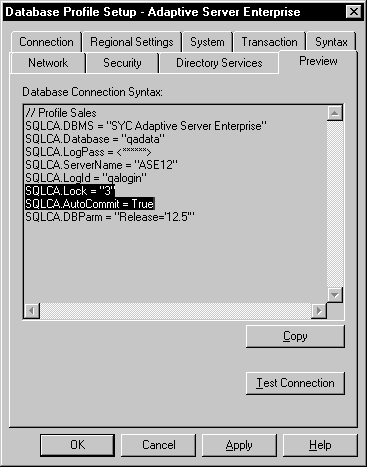
-
Select one or more lines of text in the Database
Connection Syntax box and click Copy.PowerBuilder copies the selected text to the clipboard.
-
Click OK to close the Database Profile Setup dialog
box. -
Paste the selected text from the Preview tab into
your script, modifying the default Transaction object name (SQLCA)
if necessary.
Coding PowerScript to set values for AutoCommit
and Lock
Another way to specify the AutoCommit and Lock properties
in a script is by coding PowerScript to assign values to the AutoCommit
and Lock properties of the Transaction object. PowerBuilder uses a
special nongraphic object called a Transaction object to
communicate with the database. The default Transaction object is
named SQLCA, which stands for SQL Communications Area.
SQLCA has 15 properties, 10 of which are used to connect to
your database. Two of the connection properties are AutoCommit and
Lock, which you can set as described in the following procedure.
![]() To set the AutoCommit and Lock properties in a PowerBuilder script:
To set the AutoCommit and Lock properties in a PowerBuilder script:
-
Open the application script in which you
want to set connection properties.For instructions, see the User’s
Guide
. -
Use the following PowerScript syntax to set the
AutoCommit and Lock properties. (This syntax assumes you are using
the default Transaction object SQLCA, but you can also define your
own Transaction object.)1<b>SQLCA.AutoCommit</b> = <i>value</i>1<b>SQLCA.Lock</b> = "<i>value</i>"For example, the following statements in a PowerBuilder script
use the default Transaction object SQLCA to connect to a Sybase
Adaptive Server Enterprise database named Test. SQLCA.AutoCommit
is set to True and SQLCA.Lock is set to isolation level 3 (Serializable
transactions).1SQLCA.DBMS = "SYC"1SQLCA.Database = "Test"1SQLCA.LogID = "Frans"1SQLCA.LogPass = "xxyyzz"1SQLCA.ServerName = "HOST1"1SQLCA.AutoCommit = True1SQLCA.Lock = "3"For more information, see AutoCommit or Lock
in the online Help. -
Compile the script to save your changes.
For instructions, see the User’s
Guide
.
Reading AutoCommit and Lock values from an external
text file
As an alternative to setting the AutoCommit and Lock properties
in a PowerBuilder application script, you can use the PowerScript ProfileString function
to read the AutoCommit and Lock values from a specified section
of an external text file, such as an application-specific initialization
file.
![]() To read AutoCommit and Lock values from an external
To read AutoCommit and Lock values from an external
text file:
-
Open the application script in which you
want to set connection properties.For instructions, see the User’s
Guide
. -
Use the following PowerScript syntax to specify
the ProfileString function with the SQLCA.Lock
property:1<b>SQLCA.Lock</b> = <b>ProfileString</b> ( <i>file</i>, <i>section</i>, <i>key</i>, <i>default</i> )The AutoCommit property is a boolean, so you need to convert
the string returned by ProfileString to a boolean.
For example, the following statements in a PowerBuilder script read
the AutoCommit and Lock values from the [Database] section
of the APP.INI file:1string ls_string<br /> ls_string=Upper(ProfileString("APP.INI","Database",<br /> "Autocommit",""))<br /> if ls_string = "TRUE" then<br /> SQLCA.Autocommit = TRUE<br /> else<br /> SQLCA.Autocommit = FALSE<br /> end if<br /> SQLCA.Lock=ProfileString("APP.INI","Database",<br /> "Lock","") - Compile the script to save your changes.
Getting values from theregistry
If the AutoCommit and Lock values are stored in an application
settings key in the registry, use the RegistryGet function
to obtain them. For example:
|
1 |
string ls_string<br /> RegistryGet("HKEY_CURRENT_USERSoftwareMyCoMyApp", &<br /> "Autocommit", RegString!, ls_string)<br /> if Upper(ls_string) = "TRUE" then<br /> SQLCA.Autocommit = TRUE <br /> else<br /> SQLCA.Autocommit = FALSE<br /> end if<br /> RegistryGet("HKEY_CURRENT_USERSoftwareMyCoMyApp", &<br /> "Lock", RegString!, ls_string)<br /> |