Providing toolbars
To make your application easier to use, you can add toolbars
with buttons that users can click as a shortcut for choosing an
item from a menu. In PowerBuilder, you can associate a toolbar with
the window types listed in Table 14-4.
| Window type | Description |
|---|---|
| Main window | A main window is a standalone window that can be independent of all other windows. You use the main window as the anchor for your application. The first window your application opens is a main window (unless you are building an MDI application, in which case the first window is an MDI frame window). |
| MDI window | A window in a Multiple Document Interface application, an application in which users work within a frame window that lets them perform activities on multiple sheets of information. This is useful in applications where users require the ability to do several different things at a time. An MDI frame window has a menu bar, a client area, sheets, and (usually) a toolbar. An MDI sheet window is a window that can be opened in the client area of an MDI frame. |
| MDI Help window | An MDI window with a status area that can display MicroHelp. |
Creating windows in PowerBuilder
You can create a main window, an MDI window, or an MDI Help
window in PowerBuilder by clicking the New button in the PowerBar
and selecting Window on the PB Object tab page. The new window’s
type is Main by default. To change it to MDI or MDI Help, select
the window type on the General page in the Properties view.
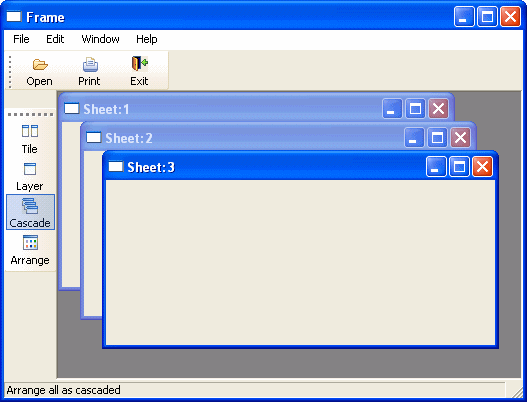
In MDI windows, you can associate a toolbar with the MDI frame
and a toolbar with the active sheet. This screen shows New, Print,
and Exit buttons on the toolbar associated with the MDI Frame, and
window management buttons on the toolbar associated with the sheet. The toolbar associated
with the MDI frame is called the FrameBar.
The toolbar associated with the active sheet is called the SheetBar.
This section provides you with the information you need to
create and use toolbars. For information about customizing toolbar
behavior and saving and restoring toolbar settings, see Application
Techniques
.
How toolbars work
Toolbars you add to a window behave like the toolbars provided
in the PowerBuilder development environment:
- Users can choose whether or not to display text
in a toolbar, use PowerTips, float the toolbar, move the toolbar
around the frame, and dock it underneath or beside any other toolbar.
No coding is required to support these basic toolbar operations. - Toolbar buttons map directly to menu items. Clicking
a toolbar button is the same as clicking its corresponding menu
item (or pressing the accelerator key for that item). - Toolbars work only in MDI frame, MDI sheet, and
Main windows. If you open a pop-up window with a menu that has a
toolbar, the toolbar does not display. - If both the MDI sheet and the frame have toolbars
and the sheet is open, then the menu that is displayed is the menu
for the sheet, but both toolbars appear and are operative. - If the currently active sheet does not have a menu,
then the menu and toolbar for the frame remain in place and are
operative. This can be confusing to your user, because the displayed
menu is not for the active sheet. If any sheet has a menu, then
all sheets should probably have menus.
Menus with multiple toolbars
A single menu can have more than one toolbar. When you associate
a menu that has multiple toolbars with a window, PowerBuilder displays
all the toolbars when you open the window. This screen shows a sheet
open in an MDI frame, with one FrameBar and two SheetBars:
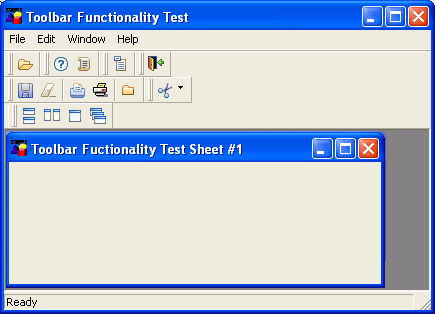
You can work with the toolbars independently. For example,
you can float any of the toolbars, move them around the window,
and dock them at different locations within the window.
The button associated with a menu item can appear on only
one toolbar at a time. To indicate which toolbar a menu item’s
button belongs to, you set the ToolbarItemBarIndex property for
the menu item. All items that have the same index number appear
on the same toolbar.
Adding toolbars to a window
PowerBuilder provides an easy way to add toolbars to a window:
when you are defining an item in the Menu painter for a menu that
will be associated with an MDI frame window, an MDI sheet, or a
main window, you simply specify that you want the menu item to display
in the toolbar with a specific picture. At runtime, PowerBuilder
automatically generates a toolbar for the window containing the
menu.
![]() To add toolbars to a window:
To add toolbars to a window:
-
In the Menu painter, specify the display
characteristics of the menu items you want to display in the toolbar.For details, see “Toolbar item display characteristics”.
-
(Optional) In the Menu painter, specify drop-down
toolbars for menu items. -
In the Window painter, associate the menu with
the window and turn on the display of the toolbar. -
(Optional) In the Window painter, specify other
properties, such as the size and location of a floating toolbar,
on the Toolbar property page.
Selecting a toolbar style
You select a toolbar style on the Appearance tab of the Properties
view for the top-level menu object in the Menu painter.
A toolbar can have a contemporary or traditional style.
| Menu style | Description |
|---|---|
| Contemporary | A 3D-style toolbar similar to Microsoft Office 2003 and Visual Studio 2005 toolbars |
| Traditional | A more traditional and older toolbar style |
Toolbars that you import or migrate from earlier versions
of PowerBuilder have the traditional style, and new toolbars use
the traditional toolbar style by default.
![]() To specify the toolbar style:
To specify the toolbar style:
-
Select the top-level menu object.
-
At the bottom of the Appearance tab page, select
the toolbar style you want, contemporarytoolbar! or traditionaltoolbar!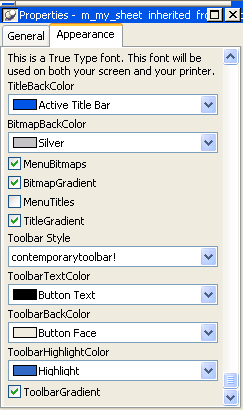
If you select traditionaltoolbar! in
the Toolbar Style drop-down list, the rest of the toolbar style
properties are grayed. If you select contemporarytoolbar! style,
you can customize the display properties for that style and have
them apply to all menu items with associated toolbar buttons in
the current menu.
Selecting the toolbar button style property Unless you are using the traditional toolbar style for the
current menu object, you can select the ToolbarAnimation check box
on the Toolbar tab or the Properties view for each menu item. If
you do not select an image for the ToolbarItemName property of a
menu item, the selection you make for the ToolbarAnimation property
is ignored.
Setting toolbar properties
You can customize the display of toolbars in applications
that you create with PowerBuilder by setting toolbar properties.
Toolbar style properties
In addition to customizing the style of a menu, you can customize
the style of a toolbar associated with the menu. For example, the
following picture shows a contemporary style toolbar with an expanded
toolbar cascade and a highlighted Exit button:
Toolbar style properties Toolbars have style properties that you can change at design
time on the top-level menu object. You can modify these properties only
if you select contemporarytoolbar! as
the toolbar style for the top-level menu object.
| Property | Datatype | Use to assign |
|---|---|---|
| ToolbarBackColor | Long | Background color of the menu toolbar. |
| ToolbarGradient | Boolean | Gradient of the menu toolbar background. |
| ToolbarHighlightColor | Long | Highlight color for the toolbar buttons when they are selected. |
| ToolbarStyle | Enumerated | Overall style of the menu toolbar. Values are: contemporarytoolbar! and traditionaltoolbar! |
| ToolbarTextColor | Long | Color of the text in the menu toolbar. |
Toolbar item style property You can select the ToolbarAnimation property for a menu item
toolbar button. This property offsets the button image by two pixels
to the upper left when a user positions the cursor over the button.
You cannot assign this property at the menu object or toolbar level.
You must assign it to individual toolbar items (buttons) at design
time. This property has a Boolean datatype. You can select it on
the Toolbar tab for each menu item below the top-level menu object.
With a contemporary menu, you can set the ToolbarAnimation property
at runtime at runtime using scripts.
The customizable menu and toolbar styles can be used for MDI
and main windows. Pop-up menus can also use menu style properties.
The styles do not affect existing PowerBuilder applications that
use a traditional style. You can, however, update an existing PowerBuilder
application to use the new style properties.
Toolbar item display characteristics
In the Menu painter, you specify the menu items you want to
display in the toolbar, the text for the toolbar button and tip,
the pictures to use to represent the menu items, and other characteristics
of the toolbar.
![]() To specify the display characteristics of a toolbar
To specify the display characteristics of a toolbar
item:
-
Open the menu in the Menu painter and select
the menu item you want to display in the toolbar. -
Select the Toolbar property page and set properties
of the toolbar item as shown in Table 14-5.Table 14-5: Toolbar properties in the Menu
painterProperty What to specify ToolbarItemText Specify two different text values for
the toolbar button and PowerTip with a comma-delimited string, as
follows:1<i>Text in button, PowerTip</i>ToolbarItemName Choose a stock picture from the drop-down
list or browse to select a bitmap, GIF, JPEG or icon file. If you
choose a stock picture, PowerBuilder uses the up version when the item
is not clicked and the down version when the item is clicked. (The
up version appears raised and the down version appears indented.)
If you are specifying a file, the picture should be 16 pixels wide
and 16 pixels high.ToolbarItemDownName Specify a different picture to display
when the item is clicked (optional).ToolbarItemVisible Clear if you want the toolbar button
to be hidden. The default is visible.ToolbarItemDown Check if you want the down version of
the button to display initially.ToolbarAnimation If you want the toolbar image to be animated
when selected, select the check box.ToolbarItemSpace Specify any integer if you want to leave
space before the picture in the toolbar. Experiment with values
to get the spacing the way you want it. If you leave the value at
0, there will be no spacing before the picture. (Spacing is used
only when the toolbar is not displaying text.)ToolbarItemOrder Specify the order in which the item displays
in the toolbar. If you leave the value 0, PowerBuilder places the
item in the order in which it goes through the menu to build the toolbar.ToolbarItemBarIndex Specify a number other than 1 if you
want multiple toolbars to display for this menu. The number you
specify determines which toolbar the current menu item appears on.
All items that have the same index number appear on the same toolbar.ObjectType Specify Menu or MenuCascade. Columns (This property displays only if you choose
MenuCascade in the ObjectType drop-down list.) Indicate the number
of columns you want to display in the cascading toolbar.Drop Down (This property displays only if you choose
MenuCascade in the ObjectType drop-down list.) If you want the button to
be a drop-down toolbar button, select the check box.
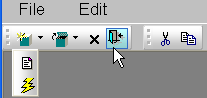
Menu items can have drop-down toolbars
A menu item can have a toolbar button associated with it that
displays a drop-down toolbar. When the user clicks on the
button, PowerBuilder displays a drop-down toolbar that shows all
of the toolbar buttons for menu items defined at the next level.
For example, if you define a drop-down toolbar for the File menu
item, the drop-down toolbar will show the buttons defined for the
items on the File menu (such as New, Open, Close, and Exit).
PowerBuilder displays a drop-down toolbar at runtime by default
if the Object Type of the menu item is MenuCascade. You can specify
programmatically whether submenu items display in a drop-down toolbar
or as normal toolbar items by setting the DropDown property of the
menu item. For example, if you want a descendent menu item to have
a drop-down toolbar, but not its ancestor, clear the DropDown check
box on the ancestor’s Toolbar property page, and set the
DropDown property of the descendent menu item to TRUE in
a script.
![]() To specify a drop-down toolbar for a menu item:
To specify a drop-down toolbar for a menu item:
-
In the Menu painter, select the menu item
for which you want to add a drop-down toolbar. -
On the Toolbar property page, change the Object
Type to MenuCascade. -
(Optional) Specify the number of columns you
want to display in the Columns box.The default is a single column. If there are many items on
the submenu, as there are on the toolbar item for inserting controls
in the Window painter, you will probably want to specify three or
four columns.
Setting toolbar properties in the Window painter
In the Window painter, you associate the menu with the window
on the window’s General property page. The window displays
the toolbar by default. If you do not want the toolbar to display,
clear the ToolbarVisible
check box on the window’s Toolbar property page. You can
also specify the toolbar’s alignment and position on this
property page.
Setting toolbar properties in the Application painter
You can specify global properties for all toolbars in your
application on the Toolbar property page in the Application painter
or by setting properties of the Application object in a script.
Typically you set these in the application’s Open event,
but you can set them anywhere.
| Property | Meaning |
|---|---|
| ToolbarFrameTitle | The text that displays as the title for the FrameBar when it is floating. |
| ToolbarSheetTitle | The text that displays as the title for the SheetBar when it is floating. |
| ToolbarPopMenuText | (String) Text to display on the pop-up menu for toolbars (see below). |
| ToolbarUserControl | (Boolean) If TRUE (default), users can use the toolbar pop-up menu to hide or show the toolbars, move toolbars, or show text. If FALSE, users cannot manipulate the toolbar. |
| ToolbarText | (Boolean) If TRUE, text displays in the buttons. If FALSE (the default), text does not display. |
| ToolbarTips | (Boolean) If TRUE (default), PowerTips display when text is not displayed in the buttons. If FALSE, PowerTips do not display. |
Specifying the text in the toolbar’s
pop-up menu
By default, PowerBuilder provides a pop-up menu for the toolbar,
which users can use to manipulate the toolbar. It is similar to
the pop-up menu you use to manipulate the PowerBar and PainterBar.
You can change the text that displays in this menu, but you
cannot change the functionality of the menu items in the menu. Typically,
you do this when you are building an application in a language other
than English.
You change the text as follows:
- The first
two items in the pop-up menu display the titles set in ToolbarFrameTitle
and ToolbarSheetTitle (defaults: FrameBar and SheetBar). - The remaining text items are specified by the property ToolbarPopMenuText.
To specify values for this property, use a comma-delimited
list of values to replace the text “Left,” “Top,” “Right,” “Bottom,” “Floating,” “Show
Text,” and “Show PowerTips”:1ToolbarPopMenuText = "<i>left, top, right, bottom, floating, showText,<br /> showPowerTips</i>"
For example, to change the text for the toolbar pop-up menu
to German and have hot keys underlined for each, you would specify
the following:
|
1 |
ToolbarPopMenuText = "&Links, &Oben, &Rechts, " + &<br /> "&Unten, &Frei positionierbar, &Text anzeigen, " &<br /> + "&PowerTips anzeigen" |