Oracle
This section describes how to use the native Oracle database
interfaces in PowerBuilder.
Supported versions for Oracle
PowerBuilder provides three Oracle database interfaces. These
interfaces use different DLLs and access different versions of Oracle.
| Oracle interface | DLL |
|---|---|
| O73 Oracle 7.3 | PBO7390.DLL |
| O84 Oracle 8.0.x and Oracle8i | PBO8490.DLL |
| O90 Oracle9i | PBO9090.DLL |
![]() For more information Oracle has announced that it will no longer support Oracle
For more information Oracle has announced that it will no longer support Oracle
7.3 as of the end of 2002. Therefore, this will be the last version
of PowerBuilder that will provide support for this interface. Updated
information about supported versions of databases may be available
electronically on the Sybase Customer Service and Support Web site
or in
the PowerBuilder Release Bulletin.
Supported Oracle datatypes
The Oracle database interfaces support the Oracle datatypes
listed in
Table 5-4 in DataWindow objects and embedded SQL:
| Bfile (Oracle 8 and later only) |
NChar (Oracle9i only) |
| Blob (Oracle 8 and later only) |
Number |
| Char | NVarChar2 (Oracle9i only) |
| Clob (Oracle 8 and later only) |
Raw |
| Date | TimeStamp (Oracle9i only) |
| Float | VarChar |
| Long | VarChar2 |
| LongRaw |
NChar and NVarChar2 datatypes
PowerBuilder supports the NChar and NVarChar2 datatypes
when connecting to an Oracle9i server using
the O90 interface. This support is not available for Oracle8i because
the DataWindow object is unable to generate a prefix required when
sending an ANSI string to an NChar or NVarChar2 column
in a table on an Oracle8i server. The prefix
instructs the server to convert data to a Unicode string. Oracle9i servers
do not need to convert ANSI strings to Unicode strings.
For Oracle8i, a client statement might look like this:
|
1 |
Update table1 set C1 = N'NEW STRING' where C1 = N'OLD STRING'; |
where the datatype of C1 is NChar or NVarChar2,
and the prefix N instructs the Oracle8i server
to convert the data to a Unicode string.
TimeStamp datatype
The Oracle9i TimeStamp datatype
is an extension of the Date datatype. It stores the
year, month, and day of the Date value plus hours, minutes, and
seconds:
|
1 |
Timestamp[<i>fractional_seconds_precision</i>] |
The fractional_seconds_precision value
is optional and provides the number of digits for indicating seconds.
The range of valid values for use with PowerBuilder is 0-6.
Datatype conversion
When you retrieve or update columns, in general PowerBuilder
converts data appropriately between the Oracle datatype and the
PowerScript datatype. Keep in mind, however, that similarly or identically
named Oracle and PowerScript datatypes do not necessarily
have the same definitions.
For information about the definitions of PowerScript
datatypes, see the PowerScript Reference
.
Number datatype converted to decimal
When a DataWindow object is defined in PowerBuilder, the Oracle
datatype number(size,d) is mapped to a decimal datatype.
In PowerBuilder, the precision of a decimal is 18 digits. If a column’s
datatype has a later precision, for example number(32,30), inserting
a number with a precision greater than 18 digits produces an incorrect
result when the number is retrieved in a DataWindow. For example, 1.8E-17
displays as 0.000000000000000018, whereas 1.5E-25 displays as 0.
You may be able to avoid this problem by using a different
datatype, such as float, for high precision
number columns in the Oracle DBMS. The float datatype
is mapped to the number datatype within the
DataWindow’s source.
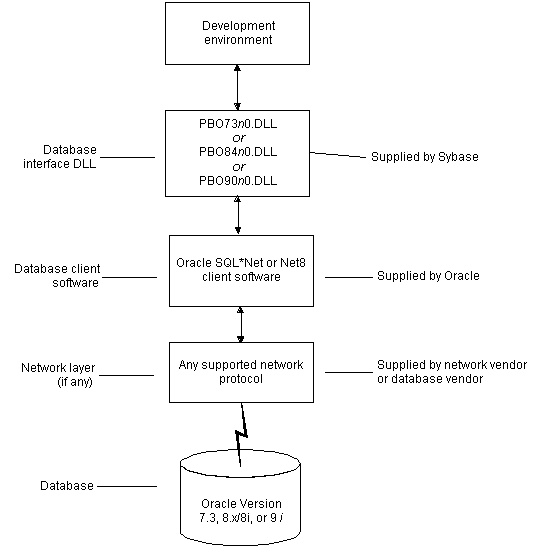
Basic software components for Oracle
You must install the software components in Figure 5-4 to access an Oracle database
in PowerBuilder.
Preparing to use the Oracle database
Before you define the database interface and connect to an
Oracle database in PowerBuilder, follow these steps to prepare the
database for use:
- Install and configure the required
database server, network, and client software. - Install the native Oracle database interface for
the version of Oracle you want to access. - Verify that you can connect to the Oracle server
and database outside PowerBuilder.
Preparing an Oracle database for use with PowerBuilder involves
these three basic tasks.
Step 1: Install and configure the database server
You must install and configure the database server, network,
and client software for Oracle.
![]() To install and configure the database server,
To install and configure the database server,
network, and client software:
-
Make sure the Oracle database software
is installed on your computer or on the server specified in your
database profile.For example, with the Oracle O84 interface you can access
an Oracle 8.0.x or Oracle8i database server.You must obtain the database server software from Oracle Corporation.
For installation instructions, see your Oracle
documentation. -
Make sure the supported network software (such
as TCP/IP) is installed and running on your computer and
is properly configured so that you can connect to the Oracle database
server at your site.The Hosts and Services files must be present on your computer
and properly configured for your environment.You must obtain the network software from your network vendor
or database vendor.For installation and configuration instructions,
see your network or database administrator. -
Install the required Oracle client software on
each client computer on which PowerBuilder is installed.You must obtain the client software from Oracle Corporation.
Make sure the client software version you install supports all of
the following:- The operating
system running on the client computer - The version of the database that you want to access
- The version of PowerBuilder that you are running
 Required client software versions To use the Oracle 7.3 (O73) interface, you must install Oracle
SQL*Net client software version 2.3 or later.To use the Oracle 8.0.x and Oracle8i (O84)
interface or the Oracle9i (O90) interface,
you must install Oracle Net client software version 8.0.4 or later. - The operating
-
Make sure the Oracle SQL*Net or Net client
software is properly configured so that you can connect to the Oracle
database server at your site.Installing SQL*Net software places the correct configuration
file in the Oracle directory on your computer. For example, if you
are using SQL*Net version 2.x, the required configuration
file is called TNSNAMES.ORA.The configuration file provides information that Oracle needs
to find and connect to the database server at your site. To modify
and view the information in TNSNAMES.ORA, use
an Oracle tool designed to edit the configuration file (such as
Oracle Network Manager or the SQL*Net Easy Configuration
utility).For information about setting up Oracle configuration
files, see your SQL*Net or Net documentation. -
If required by your operating system, make sure
the directory containing the Oracle client software is in your system
path.
Step 2: Install the database interface
In the PowerBuilder Setup program, select the Typical install
or select the Custom install and select the Oracle database interfaces
you require. You must select the Custom install to install the Oracle
7.3 database interface.
For a list of the Oracle database interfaces
available, see “Supported versions for Oracle”.
Step 3: Verify the connection
Make sure you can connect to the Oracle database server and
log in to the database you want to access from outside PowerBuilder.
Some possible ways to verify the connection are by running
the following Oracle tools:
- Accessing the database server Tools such as Oracle TNSPING (or any other ping utility)
check whether you can reach the database server from your computer. - Accessing the database Tools such as Oracle SQL*Plus check
whether you can log in to the Oracle database you want to access
and perform database operations. It is a good idea to specify the
same connection parameters you plan to use in your PowerBuilder database
profile to access the database.
What to do next
For instructions on defining the Oracle database
interface in PowerBuilder, see “Defining the Oracle database
interface”.
Defining the Oracle database interface
To define a connection through an Oracle database interface,
you must create a database profile by supplying values for at least
the basic connection parameters in the Database Profile Setup dialog
box for your Oracle interface. You can then select this profile
at any time to connect to your database in the development environment.
For information on how to define a database profile, see “Using database profiles”.
Specifying the Oracleserver connect descriptor
To connect to an Oracle database server that resides on a
network, you must specify the proper connect descriptor in the Server
box on the Connection tab of the Database Profile Setup dialog box
for your Oracle interface. The connect descriptor specifies the
connection parameters that Oracle uses to access the database.
For help determining the proper connect descriptor
for your environment, see your Oracle documentation or system administrator.
Specifying a connect descriptor
The syntax of the connect descriptor depends on the Oracle
client software you are using.
If you are using Net version 8.x or later, the syntax is:
|
1 |
<i>OracleServiceName</i> |
If you are using SQL*Net version 2.x, the syntax
is:
|
1 |
@ <b>TNS:</b> <i>OracleServiceName</i> |
| Parameter | Description |
|---|---|
| @ | The at ( @ ) sign is required |
| TNS | The identifier for the Oracle Transparent Network Substrate (TNS) technology |
| : | The colon ( : ) is required |
| OracleServiceName | The service name assigned to your server in the Oracle configuration file for your platform |
Net version 8.x example To use Net version 8.x or later client software to connect
to the service named ORA8, type the following connect descriptor
in the Server box on the Connection tab of the Database Profile
Setup dialog box for Oracle 8.x and later:ORA8.
Using Oracle stored procedures as a data source
This section describes how you can use Oracle stored procedures.
What is an Oracle stored procedure?
Oracle defines a stored procedure (or
function) as a named PL/SQL program unit that logically
groups a set of SQL and other PL/SQL programming language
statements together to perform a specific task.
Stored procedures can take parameters and return one or more
result sets (also called cursor variables). You create stored procedures
in your schema and store them in the data dictionary for use by
multiple users.
What you can do with Oraclestored procedures
Ways to use Oracle stored procedures
You can use an Oracle stored procedure in the following ways
in your PowerBuilder application:
- As a data source for DataWindow objects
- Called by an embedded SQL DECLARE PROCEDURE statement
in a PowerBuilder application (includes support for fetching against
stored procedures with result sets) - Called as an external function or subroutine in
a PowerBuilder application by using the RPCFUNC keyword
when you declare the procedure
For information about the syntax for using
the DECLARE PROCEDURE statement with the RPCFUNC keyword,
see the PowerScript Reference
.
Procedures with a single result set You can use stored procedures that return a single result
set in DataWindow objects and embedded SQL, but not when
using the RPCFUNC keyword to declare the stored
procedure as an external function or subroutine.
Procedures with multiple result sets You can use procedures that return multiple result sets only in
embedded SQL. Multiple result sets are not supported in
DataWindows, reports, or with the RPCFUNC keyword.
Using Oracle stored procedures with result sets
Overview of basic steps
The following procedure assumes you are creating the stored
procedure in the ISQL view of the Database painter in PowerBuilder.
![]() To use an Oracle stored procedure with a result
To use an Oracle stored procedure with a result
set:
-
Set up the ISQL view of the Database painter
to create the stored procedure. -
Create the stored procedure with a result set
as an IN OUT (reference) parameter. -
Create DataWindow objects that use the stored procedure
as a data source.
Setting up the Database painter
When you create a stored procedure in the ISQL view of the
Database painter, you must change the default SQL statement terminator
character to one that you do not plan to use in your stored procedure
syntax.
The default SQL terminator character for the Database painter
is a semicolon (;). If you plan to use a semicolon in your Oracle
stored procedure syntax, you must change the painter’s
terminator character to something other than a semicolon to avoid
conflicts. A good choice is the backquote ( ` ) character.
![]() To change the default SQL terminator character
To change the default SQL terminator character
in the Database painter:
-
Connect to your Oracle database in PowerBuilder as
the System user.For instructions, see “Defining the Oracle database
interface”. - Open the Database painter.
-
Select Design>Options from the menu bar.
The Database Preferences property sheet displays. If necessary,
click the General tab to display the General property page. -
Type the character you want (for example, a backquote)
in the SQL Terminator Character box. -
Click Apply or OK.
The SQL Terminator Character setting is applied to the current
connection and all future connections (until you change it).
Creating the stored procedure
After setting up the Database painter, you can create an Oracle
stored procedure that has a result set as an IN OUT (reference)
parameter. PowerBuilder retrieves the result set to populate a DataWindow object.
There are many ways to create stored procedures with result
sets. The following procedure describes one possible method that
you can use.
For information about when you can use stored
procedures with single and multiple result sets, see “What you can do with Oracle
stored procedures”.
![]() To create Oracle stored procedures with result
To create Oracle stored procedures with result
sets:
-
Make sure your Oracle user account has
the necessary database access and privileges to access Oracle objects
(such as tables and procedures).Without the appropriate access and privileges, you will be
unable to create Oracle stored procedures. -
Assume the following table named tt exists
in your Oracle database:a b c 1 Newman sysdate 2 Everett sysdate -
Create an Oracle package that holds the result
set type and stored procedure. The result type must match your table
definition.For example, the following statement creates an Oracle package
named spm that holds a result set type named rctl and
a stored procedure named proc1. The tt%ROWTYPE
attribute defines rctl to contain all of the columns
in table tt. The procedure proc1 takes
one parameter, a cursor variable named rc1 that
is an IN OUT parameter of type rctl.1CREATE OR REPLACE PACKAGE spm<br /> IS TYPE rctl IS REF CURSOR<br /> RETURN tt%ROWTYPE;<br /> PROCEDURE proc1(rc1 IN OUT rctl);END;` -
Create the Oracle stored procedure separately
from the package you defined.The following examples show how to create two stored procedures: spm_proc
1 (returns a single result set) and spm_proc2 (returns
multiple result sets).The IN OUT specification means that PowerBuilder passes
the cursor variable (rc1 or rc2)
by reference to the Oracle procedure and expects the procedure to
open the cursor. After the procedure call, PowerBuilder fetches the
result set from the cursor and then closes the cursor. - spm_proc1 example for DataWindow objects The following statements create spm_proc1 that
returns one result set. You can use this procedure as the data source
for a DataWindow object in PowerBuilder.1CREATE OR REPLACE PROCEDURE spm_proc1(rc1 IN OUT spm.rctl)<br /> AS<br /> BEGIN<br /> OPEN rc1 FOR SELECT * FROM tt;END;` - spm_proc2 example for embedded SQL The following statements create spm_proc2 which
returns two result sets. You can use this procedure only in embedded
SQL.1CREATE OR REPLACE PROCEDURE spm_proc2 (rc1 IN OUT spm.rctl, rc2 IN OUT spm.rctl)<br /> AS<br /> BEGIN<br /> OPEN rc1 FOR SELECT * FROM tt ORDER BY 1;<br /> OPEN rc2 FOR SELECT * FROM tt ORDER BY 2;END;`
![]() Error checking If necessary, check the Oracle system table public.user_errors for
Error checking If necessary, check the Oracle system table public.user_errors for
a list of errors.
Creating the DataWindow object
After you create the stored procedure, you can define the DataWindow object that
uses the stored procedure as a data source.
You can use Oracle stored procedures that return a single
result set in a DataWindow object. If your stored procedure returns multiple
result sets, you must use embedded SQL commands to access it.
The following procedure assumes that your Oracle stored procedure
returns only a single result set.
![]() To create a DataWindow object using an Oracle stored
To create a DataWindow object using an Oracle stored
procedure with a result set:
-
Select a presentation style on the DataWindow
page of the New dialog box and click OK. -
Select the Stored Procedure icon and click OK.
The Select Stored Procedure wizard page displays, listing
the stored procedures available in your database. -
Select the stored procedure you want to use as
a data source, and click Next. -
Complete the wizard to define the DataWindow object.
When you preview the DataWindow object or call Retrieve, PowerBuilder fetches
the result set from the cursor in order to populate the DataWindow object.
If you selected Retrieve on Preview on the Choose Data Source page
in the wizard, the result set displays in the Preview view when
the DataWindow opens.For more instructions on defining DataWindow objects,
see the User’s Guide
.
Using
a large-object output parameter
You can define a large object (LOB) as an output parameter
for an Oracle stored procedure or function to retrieve large-object
data. There is no limit on the number of LOB output arguments that
may be defined for each stored procedure or function.
Using Oracle user-defined types
What PowerBuilder supports
When you use the O84 and O90 database interfaces, PowerBuilder supports SQL CREATE
TYPE and CREATE TABLE statements for
Oracle user-defined types (objects) in the ISQL view of the Database
painter. It correctly handles SQL SELECT, INSERT, UPDATE,
and DELETE statements for user-defined types
in the Database and DataWindow painters.
What you can do
This means that using these database interfaces in PowerBuilder,
you can:
| Do this | In |
|---|---|
| Use Oracle syntax to create user-defined types |
Database painter |
| Use Oracle syntax to create tables with columns that reference user-defined types |
Database painter |
| View columns in Oracle tables that reference user-defined types |
Database painter |
| Manipulate data in Oracle tables that have user-defined types |
Database painter
DataWindow painter DataWindow objects |
| Export Oracle table syntax containing use-defined types to a log file |
Database painter |
| Invoke methods of objects columns | DataWindow painter (Compute tab in SQL Toolbox) |
Example
Here is a simple example that shows how you might create and
use Oracle 8 user-defined types in PowerBuilder.
For more information about Oracle user-defined
types, see your Oracle 8 documentation.
![]() To create and use Oracle 8 and later user-defined
To create and use Oracle 8 and later user-defined
types:
-
In the ISQL view of the Database painter,
create two Oracle user-defined types: ball_stats_type
and player_type.Here is the Oracle syntax to create ball_stats_type.
Notice that the ball_stats object
of type ball_stats_type has
a method associated with it called get_avg.1CREATE OR REPLACE TYPE ball_stats_type AS OBJECT (bat_avg NUMBER(4,3),rbi NUMBER(3),MEMBER FUNCTION get_avg RETURN NUMBER,PRAGMA RESTRICT_REFERENCES (get_avg,WNDS,RNPS,WNPS));<br /> CREATE OR REPLACE TYPE BODY ball_stats_type ASMEMBER FUNCTION get_avg RETURN NUMBER ISBEGINRETURN SELF.bat_avg;<br /> END;<br /> END;Here is the Oracle SQL syntax to create player_type. Player_type references
the user-defined type ball_stats_type. PowerBuilder supports such
nesting graphically in the Database, DataWindow, and Table painters (see
step 3).1CREATE TYPE player_type AS OBJECT (player_no NUMBER(2),player_name VARCHAR2(30),ball_stats ball_stats_type); -
In the Database painter, create an Oracle 8 table
named lineup that references these user-defined types.Here is the Oracle SQL syntax to create the lineup table and
insert a row. Lineup references the player_type user-defined
type.1CREATE TABLE lineup (position NUMBER(2) NOT NULL, player player_type);<br /> INSERT INTO lineup VALUES (1,player_type (5, 'Nomar Garciaparra',ball_stats_type (0.310, 120))); -
Display the lineup table in the Database or DataWindow painter.
PowerBuilder uses the following structure->member notation
to display the table:1lineup1======1position1player->player_no1player->player_name1player->ball_stats->bat_avg1player->ball_stats->rbi -
To access the get_avg method
of the object ball_stats contained in the object column
player, use the following structure->member notation
when defining a computed column for the DataWindow object. For example, when
working in the DataWindow painter, you could use this notation on the Compute
tab in the SQL Toolbox:1player->ball_stats->get_avg()
What to do next
For instructions on connecting to the database,
see “Connecting to a database”.