Defining the data source
The data source you choose determines how you select the data
that will be used in the DataWindow object.
![]() About the term data source
About the term data source
The term data source
used here refers
to how you use the DataWindow painter to specify the data to retrieve
into the DataWindow object.
Data source can also refer to where the data comes from, such
as an Adaptive Server Anywhere data source (meaning a database file) or a dBASE
data source (meaning a DBF file). Connecting to Your Database
uses
the term data source this second way.
How to choose the data source
If the data is in the database
If the data for the DataWindow object will be retrieved from a database,
choose one of the following data sources:
| Data source | Use when |
|---|---|
| Quick Select | The data is from a single table (or from tables that are related through foreign keys) and you only need to choose columns, selection criteria, and sorting |
| SQL Select | You want more control over the SQL SELECT statement generated for the data source or your data is from tables that are not connected through a key. For example, you need to specify grouping, computed columns or retrieval arguments within the SQL SELECT statement |
| Query | The data has been defined as a query |
| Stored Procedure | The data is defined in a stored procedure |
If the data is not in a database
Select the External data source if:
- The DataWindow object will be populated from
a script - Data will be imported from a DDE application
- Data will be imported from an external file, such
as a tab-separated text file (TXT file) or a dBASE file (DBF file)
You can also use an ODBC driver to access data from a text
or dBASE file. PowerBuilder includes ODBC drivers for both text and
dBASE files.For more information, see Connecting
to Your Database.
After you choose a data source in the various DataWindow wizards,
you specify the data. The data source you choose determines what
displays in the wizards and how you define the data.
Why use a DataWindow if the data is not from
a DBMS
Even when the data is not coming from the database, there
are many times when you want to take advantage of the intelligence
of a DataWindow object:
- Data Validation You have full access to validation rules for data
- Display Formats You can use any existing display formats to present the data,
or create your own - Edit Styles You can use any existing edit styles, such as radio buttons and
edit masks, to present the data, or create your own
Using Quick Select
The easiest way to define a data source is using Quick Select.
With Quick Select, you can choose columns from one table or from
multiple tables if they are joined through foreign keys. After you
choose the columns, you can specify:
- Whether you want to sort the retrieved rows
- Retrieval criteria for the rows
Quick Select limitations
When you choose Quick Select as your data source, you cannot:
- Specify grouping before rows
are retrieved - Include computed columns
- Specify retrieval arguments
To use these options, choose SQL Select as your data source.
![]() To define the data source using Quick Select:
To define the data source using Quick Select:
-
Click Quick Select in the wizard’s
Choose Data Source dialog box and click Next.The Quick Select dialog box displays. The Tables box lists
tables and views in the current database.To display a comment about a table, position the pointer on
the table and click the right mouse button or
select
the table. Which tables and views display The DBMS determines what tables and views display. For some
DBMSs, all tables and views display, whether or not you have authorization.
Then if you select a table or view you aren’t authorized
to access, the DBMS issues a message.For ODBC databases, the tables and views that display depend
on the driver for the data source. Adaptive Server Anywhere does not restrict
the display, so all tables and views display, whether or not you
have authorization. -
Select a table containing the data you want to
use.The table’s column names display in the Columns box,
and any tables having a key relationship with the selected table
display in the Tables box. These tables are indented and marked
with an arrow to show their relationship to the selected table: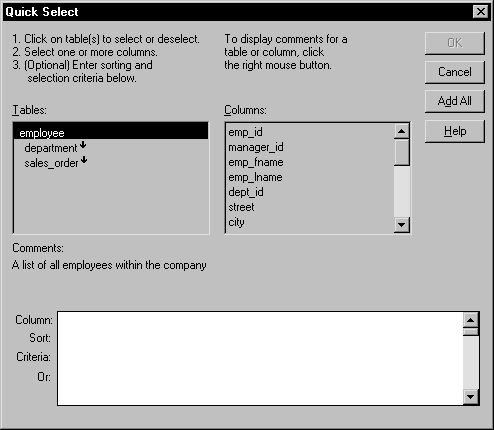 Meaning of the up and down arrows An arrow displays next to a table to indicate its relationship
to the selected table. The arrow always points in the many
direction
of the relationship–toward the selected table (up) if the
selected table contains a foreign key in the relationship and away
from the selected table (down) if the selected table contains a
primary key in the relationship: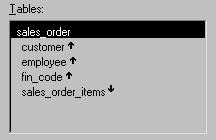
In this example, a foreign key in the sales_order
table is mapped to the primary key in the customer, employee, and
fin_code tables. The sales_order_items
table contains a foreign key mapped to the primary key in the sales_order
table. -
Select any additional tables containing data you
want to use.The column names of selected tables display in the Columns
box. If you select more than one table, the column names are identified
as:1<i>tablename.columnname</i>For example, department.dept_name and employee.emp_id
display when the Employee table and the Department table are selected. To return to the original table list Click the table you first selected at the top of the table
list. -
Select the columns you want to use:
- To add a column, select it
in the Columns box. - To add all columns, click Add All.
- To remove a column, deselect it in the Columns box.
- To view comments that describe a table or column,
position the pointer on a table or column name, and press and hold
the right mouse button.
The selected columns display at the bottom of the dialog box.
- To add a column, select it
-
Use the grid to reorder columns, sort rows before
you retrieve data, and specify what data to retrieve:- To reorder a column, drag
the column name where you want it. - To specify the sorting of rows before retrieval,
select the sorting order in the Sort row.
For information, see “Specifying sorting criteria”. - To specify restrictions on what data to retrieve,
enter expressions in the Criteria row.
For information, see “Specifying selection criteria”.
- To reorder a column, drag
-
Click OK.
The Quick Select dialog box closes and you continue in the
wizard.
![]() Quick Select and retrieval arguments When you use Quick Select to define the data, you cannot define
Quick Select and retrieval arguments When you use Quick Select to define the data, you cannot define
retrieval arguments for the SELECT statement that are supplied during
execution. If you decide later that you want to use retrieval arguments,
you can define them by modifying the data source.
For more information, see Chapter 18, “Enhancing DataWindow Objects “.
Specifying sorting criteria
In the grid at the bottom of the Quick Select dialog box,
you can specify if you want the retrieved rows to be sorted. As
you specify sorting criteria, PowerBuilder builds an ORDER BY clause
for the SELECT statement.
![]() To sort retrieved rows on a column:
To sort retrieved rows on a column:
-
Click in the Sort row for the column you
want to sort on.PowerBuilder displays a dropdown listbox:
-
Select the sorting order for the rows: Ascending
or Descending.
Multilevel sorts
You can specify as many columns for sorting as you want. PowerBuilder processes
the sorting criteria left to right in the grid: the first column
with Ascending or Descending specified becomes the highest level
sorting column, the next column with Ascending or Descending specified
becomes the next level sorting column, and so on.
If you want to do a multilevel sort that doesn’t
match the column order in the grid, drag the columns to the correct
order and then specify the columns for sorting.
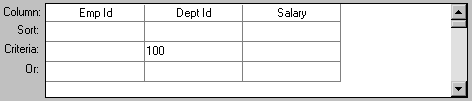
Specifying selection criteria
You can enter selection criteria in the grid to specify which
rows to retrieve. For example, instead of retrieving data about
all employees, you might want to limit the data to employees in
Sales and Marketing or to employees in Sales and Marketing who make
more than $50,000.
As you specify selection criteria, PowerBuilder builds a WHERE
clause for the SELECT statement.
![]() To specify selection criteria:
To specify selection criteria:
-
Click the Criteria row below the first
column for which you want to select the data to retrieve. -
Enter an expression, or if the column has an edit
style, select or enter a value.If the column is too narrow for the criteria, drag the grid
line to enlarge the column. This enlargement does not affect the
column size in a DataWindow object. -
Enter additional expressions until you have specified
the data you want to retrieve.
![]() About edit styles If a column has an edit style associated with it in the extended
About edit styles If a column has an edit style associated with it in the extended
attribute system tables (that is, the association was made in the
Database painter), the edit style is used in the grid–except
that dropdown listboxes are used for columns with code tables and
columns using the CheckBox and RadioButton edit styles.
SQL operators supported in Quick Select
You can use these SQL relational operators in the retrieval
criteria:
| Operator | Meaning |
|---|---|
| = | Is equal to (default operator) |
| > | Is greater than |
| < | Is less than |
| < > | Is not equal to |
| > = | Is greater than or equal to |
| < = | Is less than or equal to |
| LIKE | Matches this pattern |
| NOT LIKE | Does not match this pattern |
| IN | Is in this set of values |
| NOT IN | Is not in this set of values |
Because = is the default operator, you can enter
the value 100
instead of = 100
, or
the value New Hampshire
instead of = New
Hampshire
.
Comparison operators
You can use the LIKE, NOT LIKE, IN, and NOT IN operators to
compare expressions.
The LIKE and NOT LIKE operators Use LIKE to search for strings that match a predetermined
pattern; use NOT LIKE to find strings that do not match a predetermined
pattern. When you use LIKE or NOT LIKE, you can use wildcards:
- The percent sign (%),
like the DOS wildcard asterisk (*), matches multiple characters.
For example, Good% matches all names that begin with Good. - The underscore character (_) matches a
single character. For example, Good _ _ _ matches
all 7-letter names that begin with Good.
The IN and NOT IN operators Use IN
to compare and include a value to a set of values; use NOT IN to
compare and include values that are not in a set of values. For
example, the following clause selects all employees in department
100, 200, or 500:
|
1 |
SELECT * from employee<br /> <br /> WHERE dept_id<i> IN (100, 200, 500)</i> |
Using NOT IN would exclude employees in those departments.
Connection operators
You can use the OR and AND logical operators to connect expressions.
PowerBuilder makes some assumptions based on how you specify
selection criteria. When you specify:
- Criteria for more than one column on one line PowerBuilder assumes a logical AND between the criteria. A row
from the database is retrieved if all
criteria
in the line are met. - Two or more lines of selection criteria PowerBuilder assumes a logical OR. A row from the database is
retrieved if the criteria in any
of the lines
is met.
By default, criteria expressions in one line are logically
ANDed; expressions in different lines are logically ORed. To override
these defaults, begin an expression with the AND or OR operator:
| Operator | Meaning |
|---|---|
| OR | The row is selected if one expression OR another expression is true |
| AND | The row is selected if one expression AND another expression are true |
This technique is particularly handy when you want to retrieve
a range of values in a column. See example 6 below.
SQL expression examples
Example 1 The following expression in the grid retrieves information
for employees whose salaries are less than $50,000:

The SELECT statement that PowerBuilder creates is:
|
1 |
SELECT emp_id, dept_id, salary<br /> FROM employee<br /> WHERE salary < 50000 |
Example 2 The following expression in the grid retrieves information
for employees who belong to department 100:
The SELECT statement that PowerBuilder creates is:
|
1 |
SELECT emp_id, dept_id, salary<br /> FROM employee<br /> WHERE dept_id = 100 |
Example 3 The following expressions in the grid retrieve information
for employees whose employee ID is greater than 300 and
whose
salary is less than $50,000:
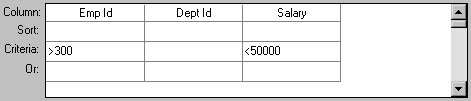
The SELECT statement that PowerBuilder creates is:
|
1 |
SELECT emp_id, dept_id, salary<br /> FROM employee<br /> WHERE emp_id >300 AND salary <50000 |
Example 4 The following expressions in the grid retrieve information
for employees who either belong to:
- Department 100 and
have a salary less
than $50,000
or
- A department whose ID is greater than 300, no matter
what their salary
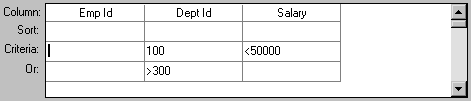
The SELECT statement that PowerBuilder creates is:
|
1 |
SELECT emp_id, dept_id, salary<br /> FROM employee<br /> WHERE (dept_id = 100 AND salary < 50000)<br /> OR dept_id > 300 |
Example 5 The following expression in the grid retrieves information
for employees who are in department 100 or
200 or
500:
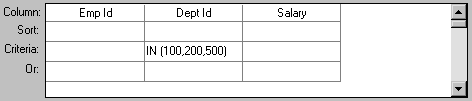
The SELECT statement that PowerBuilder creates is:
|
1 |
SELECT emp_id, dept_id, salary<br /> FROM employee<br /> WHERE dept_id IN (100, 200, 500) |
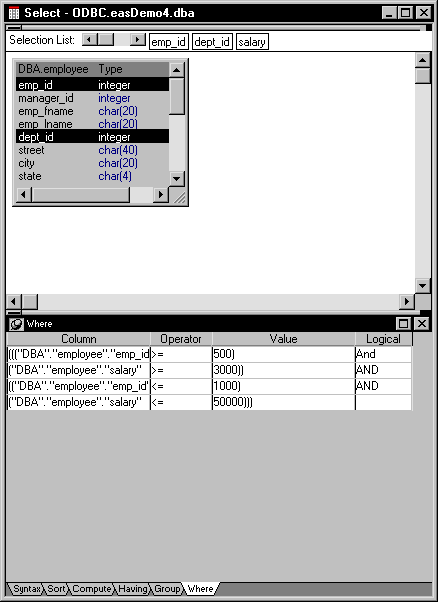
Example 6 The following expressions in the grid retrieve information
for employees who have an employee ID from 500 to 1000 and a salary
from $30,000 to $50,000:
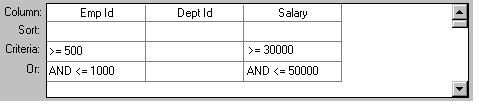
The SELECT statement that PowerBuilder creates is:
|
1 |
SELECT emp_id, dept_id, salary<br /> FROM employee<br /> WHERE (emp_id >= 500 AND emp_id <= 1000)<br /> AND (salary >= 30000 AND salary <= 50000) |
Example 7 The following expressions in the grid retrieve information
for employees who have last names that begin with C or G:
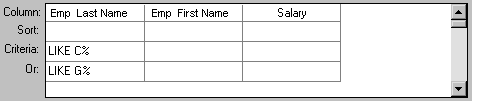
The SELECT statement that PowerBuilder creates is:
|
1 |
SELECT emp_last_name, emp_first_name, salary<br /> FROM employee<br /> WHERE emp_last_name LIKE 'C%'<br /> OR emp_last_name LIKE 'G%' |
Providing SQL functionality to users
You can allow your users to specify selection criteria in
a DataWindow object using these techniques during execution:
- You can automatically pop
up a window prompting users to specify criteria each time just before
data is retrieved.
For more information, see Chapter 18, “Enhancing DataWindow Objects “. - You can place the DataWindow object in query mode
using the Modify function.
For more information, see the DataWindow
Programmer’s Guide
.
Using SQL Select
In specifying your data for a DataWindow object, you have more options
for specifying complex SQL statements when you use SQL Select as
the data source. When you choose SQL Select, you go to the Select
painter, where you can paint a SELECT statement that includes the
following:
- More than one table
- Selection criteria (WHERE clause)
- Sorting criteria (ORDER BY clause)
- Grouping criteria (GROUP BY and HAVING clauses)
- Computed columns
- One or more arguments to be supplied during execution
![]() Saving your work as a query While in the Select painter, you can save the current SELECT
Saving your work as a query While in the Select painter, you can save the current SELECT
statement as a query by selecting File>Save Query from
the menu bar. Doing so allows you to easily use this data specification
again in other reports.
For more information about queries, see “Defining queries “.
![]() To define the data using SQL Select:
To define the data using SQL Select:
-
Click SQL Select in the Choose Data Source
dialog box in the wizard and click Next.The Select Tables dialog box displays.
-
Select the tables and/or views that you
will use in the DataWindow object.For more information, see “Selecting tables and views”.
-
Select the columns to be retrieved from the database.
For more information, see “Selecting columns”.
-
Join the tables if you have selected more than
one.For more information, see “Joining tables”.
-
Select retrieval arguments if appropriate.
For more information, see “Using retrieval arguments”.
-
Limit the retrieved rows with WHERE, ORDER BY,
GROUP BY, and HAVING criteria, if appropriate.For more information, see “Specifying selection, sorting,
and grouping criteria”. -
If you want to eliminate duplicate rows, select
Distinct from the Design menu. This adds the DISTINCT keyword to
the SELECT statement. -
Click the Return button on the PainterBar.
You return to the wizard to complete the definition of the DataWindow object.
Selecting tables and views
After you have chosen SQL Select, the Select Tables dialog
box displays in front of the Table Layout view of the Select painter. What tables and views display
in the dialog box depends on the DBMS. For some DBMSs, all tables and
views display, whether or not you have authorization. Then if you
select a table or view you aren’t authorized to access,
the DBMS issues a message.
For ODBC databases, the tables and views that display depend
on the driver for the data source. Adaptive Server Anywhere does not restrict
the display; so all tables and views display, whether or not you
have authorization.
Below the Table Layout view, several tabbed views also display
by default. You will use the views (for example, Compute, Having,
Group) to specify the SQL Select statement in more detail.You can
turn the views on and off from the View menu on the menu bar.
![]() To select the tables and views:
To select the tables and views:
-
Do one of the following:
- Click the name of each table or view you want to
open.
Each table you select is highlighted (to deselect a table,
click it again). Click the Open button to close the Select Tables
dialog box. - Double-click the name of each table or view you
want to open.
Each object opens immediately behind the Select Tables dialog
box. Click the Cancel button to close the Select Tables dialog box.
- Click the name of each table or view you want to
Representations of the selected tables and views display.
You can move or size each table to fit the space as needed.
Specifying what is displayed
You can display the label and data type of each column in
the tables (the label information comes from the extended attribute
system tables). If you need more space, you can choose to hide this
information.
![]() To hide or display comments, data types, and labels:
To hide or display comments, data types, and labels:
-
Position the pointer on any unused area of the
Table Layout view and select Show from the popup menu.A cascading menu displays.
- Select or clear Datatypes, Labels, or Comments as needed.
Colors in the Select painter
The colors used by the Select painter to display the Table
Layout view background and table information are specified in the
Database painter. You can also set colors for the text and background
components in the table header and detail areas.
For more information about specifying colors
in the Database painter, see “Modifying database preferences”.
Adding and removing tables and views
At any time, you can add tables and views to your Table Layout
view:
| To do this | Do this |
|---|---|
| Add tables or views | Click the Tables button in the PainterBar and select tables or views to add |
| Remove a table or view | Display its popup menu and select Close |
| Remove all tables and views | Select Design>Undo All from the menu bar |
You can also remove individual tables and views from the Table
Layout view, or clear them all at once and begin selecting a new
set of tables.
How PowerBuilder joins tables
If you select more than one table in the Select painter, PowerBuilder joins columns
based on their key relationship.
For information about joins, see “Joining tables”.
Selecting columns
You can click each column you want to include from the table
representations in the Table Layout view. PowerBuilder highlights
selected columns and places them in the Selection List at the top
of the Select painter.
![]() To reorder the selected columns:
To reorder the selected columns:
-
Drag a column in the Selection List with
the mouse. Release the mouse button when the column is in the proper
position in the list:

![]() To select all columns from a table:
To select all columns from a table:
-
Move the pointer to the table name and
select Select All from the popup menu.
![]() To include computed columns:
To include computed columns:
-
Click the Compute tab to make the Compute
view available (or select View>Compute if the Compute view
is not currently displayed).Each row in the Compute view is a place for entering an expression
that defines a computed column. -
Enter an expression for the computed column–for
example:1salary / 12or a function supported by your DBMS (the following is an Adaptive Server Anywhere function):
1substr("employee"."emp_fname",1,2)You can display the popup menu for any row in the Compute
view. Using the popup menu, you can select and paste columns, functions,
and arguments (if you have created any) into the expression:- Names of columns in the tables
used in the report, form, or pipeline - Any retrieval arguments you have specified
- Functions supported by the DBMS About these functions The functions listed here are functions provided by
your DBMS
. They are not PowerBuilder functions. (This is
because you are now defining a SELECT statement that will be sent
to your DBMS for processing.)
- Names of columns in the tables
-
Press the tab key to get to
the next row to define another computed column.or
Click another tab to make additional specifications.
PowerBuilder adds the computed columns to the list of columns
you have selected.
![]() About defining computed columns here Computed columns you define in the Select painter are added
About defining computed columns here Computed columns you define in the Select painter are added
to the SQL statement and used by the DBMS to retrieve the data.
The expression you define here follows your DBMS’s rules.
You can also choose to define computed fields, which are created
and processed dynamically by PowerBuilder after the data has been
retrieved from the DBMS. There are advantages to doing this. For
example, work is offloaded from the database server, and the computer
fields update dynamically as data changes in the DataWindow object (though
if you have many rows, this updating can result in slower performance).
For more information, see Chapter 18, “Enhancing DataWindow Objects “.
Displaying the underlying SQL statement
As you specify the data for the DataWindow object in the Select painter, PowerBuilder is
generating a SQL SELECT statement. It is this SQL statement that
will be sent to the DBMS when you retrieve data into the DataWindow object.
You can look at the SQL as it is being generated while you continue defining
the data for the DataWindow object.
![]() To display the SQL statement:
To display the SQL statement:
-
Click the Syntax tab to make the Syntax
view available (or select View>Syntax if the Syntax view
is not currently displayed).You may need to use the scroll bar to see all parts of the
SQL SELECT statement. This statement is updated each time you make
a change.
Editing the SELECT statement syntactically
Instead of modifying the data source graphically, you can
directly edit the SELECT statement in the Select painter.
![]() Converting from syntax to graphics If the SQL statement contains unions or the BETWEEN operator,
Converting from syntax to graphics If the SQL statement contains unions or the BETWEEN operator,
it may not be possible to convert the syntax back to graphics mode.
In general, once you convert the SQL statement to syntax, you should
maintain it in syntax mode.
![]() To edit the SELECT statement:
To edit the SELECT statement:
-
Select Design>Convert to Syntax
from the menu bar.PowerBuilder displays the SELECT statement in a text window.
- Edit the SELECT statement.
-
Return to a painter:
- Select
painter Select Design>Convert to Graphics from the menu bar. - DataWindow painter Click the Return button.
- Select
Joining tables
If the DataWindow object will contain data from more than one table,
you should join the tables on their common columns. If you have
selected more than one table, PowerBuilder joins columns based on
their key relationship:
- A primary/foreign key relationship PowerBuilder automatically joins them.
- No key relationship
PowerBuilder makes its best guess and tries
to join tables based on common column names and types.
PowerBuilder links joined tables in the Select painter Table
Layout view.
PowerBuilder joins can differ depending on the order in which
you select the tables, and sometimes the PowerBuilder best-guess join
is incorrect. So you may need to delete a join and manually define
a join.
![]() To delete a join:
To delete a join:
-
Click the join operator connecting the
tables.The Join dialog box displays.
- Click Delete.
![]() To join tables:
To join tables:
- Click the Join button.
-
Click the columns on which you want to join the
tables. -
To create a join other than an equality join,
click the join operator in the Table Layout view.The Join dialog box displays:
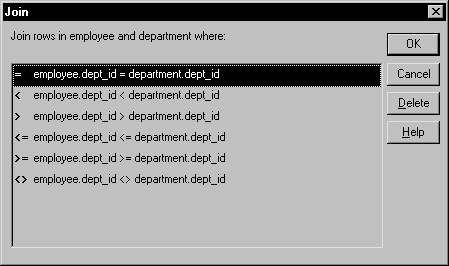
-
Select the join operator you want and click OK.
If your DBMS supports outer joins, outer join options also
display in the Join dialog box.
Using ANSI outer joins
All PowerBuilder database interfaces except Oracle provide support
for ANSI SQL-92 outer join SQL syntax generation. PowerBuilder supports
both left and right outer joins in graphics mode in the SQL painter,
and full outer and inner joins in syntax mode.
For the DIR, SYC, and MSS database interfaces, the database
connection defaults to ANSI outer join SQL syntax if the database
server supports ANSI. For the remaining database interfaces, you
must select the version of outer join SQL syntax you want PowerBuilder to
generate by setting the OJSyntax DBParm.
When OJSyntax is set to ANSI or ANSI_Escape, the
syntax is generated according to the following BNF (Backus Naur
form):
|
1 |
OUTER-join ::= <br /> <i>table-reference</i> {LEFT | RIGHT} OUTER JOIN <i>table-reference</i> ON <i>search-condition</i> <br /> <br /> <i>table-reference</i> ::= <br /> <i>table_view_name</i> [<i>correlation_name</i>] | OUTER-join |
Order of evaluation and nesting
In ANSI SQL-92, when nesting joins, the result of the first
outer join (determined by order of ON conditions) is the operand
of the outer join that follows it. In PowerBuilder, an outer join
is considered to be nested if the left hand table-reference has
been used before within the same outer join nested sequence.
The order of evaluation for ANSI syntax nested outer joins
is determined by the order of the ON search conditions. This means
that you must create the outer joins in the intended evaluation
order and add nested outer joins to the end of the existing sequence,
so that the second table-reference in the outer join BNF above will
always be a table_view_name.
For example, if you create a left outer join between a column in
Table1 and a column in Table2, then join the column in Table2 to
a column in Table3, the product of the outer join between Table1
and Table2 is the operand for the outer join with Table3.
If OJSyntax is set to ANSI_Escape, this generates
the following syntax:
|
1 |
SELECT Table1.col1, Table2.col1, Table3.col1<br /> FROM {oj {oj Table1 LEFT OUTER JOIN Table2 ON Table1.col1 = Table2.col1}<br /> LEFT OUTER JOIN Table3 ON Table2.col1 = Table3.col1} |
Table references
Table references are considered equal when the table names
are equal and there is either no alias (correlation name) or the
same alias for both. Reusing the right hand operand is not allowed,
because ANSI does not allow referencing the table_view_name twice
in the same statement without an alias.
Determining left and right outer joins
When you create a join condition, the table you select first
in the painter is the left operand of the outer join. The table
that you select second is the right operand. The condition you select
from the Joins dialog box determines whether the join is a left
or right outer join.
For example, suppose you select the dept_id column
in the employee table, then select the dept_id column in
the department table, then choose the following condition:
|
1 |
employee.dept_id = department.dept_id and rows from department that have no employee |
The syntax generated is:
|
1 |
SELECT employee.dept_id, department.dept_id<br /> FROM {oj "employee" LEFT OUTER JOIN "department" ON "employee"."dept_id" = "department"."dept_id"} |
If you select the condition with rows
from department that have no employee, you
create a right outer join instead.
![]() Equivalent statements The syntax generated when you select Table A then Table B
Equivalent statements The syntax generated when you select Table A then Table B
and create a left outer join is equivalent to the syntax generated
when you select Table B then Table A and create a right outer join.
For more about outer joins, see your DBMS
documentation.
Using retrieval arguments
If you know which rows will be retrieved into the DataWindow object during execution–that
is, if you can fully specify the SELECT statement without having
to provide a variable–you don’t need to specify
retrieval arguments.
Adding retrieval arguments
If you decide later that you need arguments, you can return
to the Select painter to define the arguments.
![]() Defining retrieval arguments in the DataWindow painter You can select View>Column Specifications from the
Defining retrieval arguments in the DataWindow painter You can select View>Column Specifications from the
menu bar. In the Column Specification view, a column of checkboxes
next to the columns in the data source lets you identify the columns
users should be prompted for. This, like the Retrieval Arguments
prompt, calls the Retrieve function.
See Chapter 18, “Enhancing DataWindow Objects “.
If you want the user to be prompted to identify which rows
to retrieve, you can define retrieval arguments when defining the
SQL SELECT statement. For example, consider these situations:
- Retrieving the row in the
Employee table for an employee ID entered into a textbox. You must
pass that information to the SELECT statement as an argument during
execution. - Retrieving all rows from a table for a department
selected from a dropdown listbox. The department is passed as an
argument during execution. Using retrieval arguments during execution If a DataWindow object has retrieval arguments, call the Retrieve
function of the DataWindow control to retrieve data during execution
and pass the arguments in the function.
For more information, see the DataWindow
Reference
.
![]() To define retrieval arguments:
To define retrieval arguments:
-
In the Select painter, select Design>Retrieval
Arguments from the menu bar. -
Enter a name and select a data type for each argument.
You can enter any valid SQL identifier for the argument name.
The position number identifies the argument position in the Retrieve
function you code in a script that retrieves data into the DataWindow object. -
Click Add to define additional arguments as needed
and click OK when done.
Specifying an array as a retrieval argument
You can specify an array of values as your retrieval argument.
Choose the type of array from the Type dropdown listbox in the Specify
Retrieval Arguments dialog box. You specify an array if you want
to use the IN operator in your WHERE clause to retrieve rows that
match one of a set of values. For example:
|
1 |
SELECT * from employee |
|
1 |
WHERE dept_id IN (100, 200, 500) |
retrieves all employees in department 100, 200, or 500. If
you want your user to specify the list of departments to retrieve,
you define the retrieval argument as a number array (such as 100,
200, 500
).
In the script that does the retrieval, you declare an array
and reference it in the Retrieve function, such as:
|
1 |
int x[3]<br /> // Now populate the array with values<br /> // such as x[1] = sle_dept.Text, and so on<br /> // then retrieve the data, as follows.<br /> dw_1.Retrieve(x) |
PowerBuilder passes the appropriate comma-delimited list to
the function (such as 100, 200, 500
if x[1] = 100,
x[2] = 200, and x[3] = 500).
When building the SELECT statement, you reference the retrieval
arguments in the WHERE or HAVING clause, as described in the next
section.
Specifying selection, sorting,and grouping criteria
In the SELECT statement associated with a DataWindow object, you
can add selection, sorting, and grouping criteria that are added
to the SQL Statement and processed by the DBMS as part of the retrieval.
| To do this | Use this clause |
|---|---|
| Limit the data that is retrieved from the database |
WHERE |
| Sort the retrieved data before it is brought into the DataWindow object |
ORDER BY |
| Group the retrieved data before it is brought into the DataWindow object |
GROUP BY |
| Limit the groups specified in the GROUP BY clause |
HAVING |
![]() Dynamically selecting, sorting, and grouping data Selection, sorting, and grouping criteria that you define
Dynamically selecting, sorting, and grouping data Selection, sorting, and grouping criteria that you define
in the Select painter are added to the SQL statement and processed
by the DBMS as part of the retrieval. You can also define selection,
sorting, and grouping criteria that are created and processed dynamically
by PowerBuilder after
data has been retrieved
from the DBMS.
For more information, see Chapter 21, “Filtering, Sorting, and
Grouping Rows “.
Referencing retrieval arguments
If you have defined retrieval arguments, you will reference
the argument(s) in the WHERE or HAVING clause. In SQL statements,
variables (called host variables) are always prefaced with a colon
to distinguish them from column names.
For example, if the DataWindow object is retrieving all rows from
the Department table where the dept_id matches a value
provided by the user during execution, your WHERE clause will look
something like this:
|
1 |
WHERE dept_id = :Entered_id |
where Entered_id was defined previously as an argument
in the Specify Retrieval Arguments dialog box.
![]() Referencing arrays Use the IN operator and reference the retrieval argument in
Referencing arrays Use the IN operator and reference the retrieval argument in
the WHERE or HAVING clause.
For example, if you reference an array defined as deptarray,
the expression in the WHERE tab might look like this:
|
1 |
"employee.dept_id" IN (:deptarray) |
You need to supply the parentheses yourself.
Defining WHERE criteria
You can limit the rows that are retrieved into the DataWindow object by specifying
selection criteria that correspond to the WHERE clause in the SELECT
statement.
For example, if you are retrieving information about employees,
you can limit the employees to those in Sales and Marketing, or
to those in Sales and Marketing who make more than $50,000.
![]() To define WHERE criteria:
To define WHERE criteria:
-
Click the Where tab to make the Where view
available (or select View>Where if the Where view is not
currently displayed).Each row in the Where view is a place for entering an expression
that limits the retrieval of rows. -
Click in the first row under Column to display
columns in a dropdown list.or
Select Columns from the popup menu.
-
Select the column you want to use in the left-hand
side of the expression.The equality (=) operator displays in the Operator
column. Using a function or retrieval argument in the expression To use a function, select Functions from the popup menu and
click a listed function. These are the functions provided by the
DBMS.To use a retrieval argument, select Arguments from the popup
menu. You must have defined a retrieval argument already. -
(Optional) Change the default equality operator.
Enter the operator you want, or click to display a list of
operators and select an operator. -
Under Value, specify the right-hand side of the
expression. You can:- Type
a value. - Paste a column, function, or retrieval argument
(if there is one) by selecting Columns, Functions, or Arguments
from the popup menu. - Paste a value from the database by selecting Value
from the popup menu, then selecting a value from the list of values
retrieved from the database. (It may take some time to display values
if the column has many values in the database.) - Define a nested SELECT statement by selecting Select
from the popup menu. In the Nested Select dialog box you can define
a nested SELECT statement. Click Return when you have finished.
- Type
-
Continue to define additional WHERE expressions as needed.
For each additional expression, select a logical operator
(AND or OR) to connect the multiple boolean expressions into one
expression that PowerBuilder evaluates as true or false to limit the
rows that are retrieved. -
Define sorting (Sort tab), grouping (Group tab), and
limiting (Having tab) criteria as appropriate. - Click the Return button to return to the DataWindow painter.
Defining ORDER BY criteria
You can sort the rows that are retrieved into the DataWindow object by specifying
columns that correspond to the ORDER BY clause in the SELECT statement.
For example, if you are retrieving information about employees,
you can sort on department, and then within each department, you
can sort on employee ID.
![]() To define ORDER BY criteria:
To define ORDER BY criteria:
-
Click the Sort tab to make the Sort view
available (or select View>Sort if the Sort view is not
currently displayed).The columns you selected display in the order of selection.
You may need to scroll to see your selections. -
Drag the first column you want to sort on to the
right side of the Sort view.This specifies the column for the first level of sorting.
By default, the column is sorted in ascending order. To specify
descending order, clear the Ascending checkbox. -
Continue to specify additional columns for sorting
in ascending or descending order as needed.You can change the sorting order by dragging the selected
column names up or down.With the following sorting specification,
rows will be sorted first by department name, then by employee ID: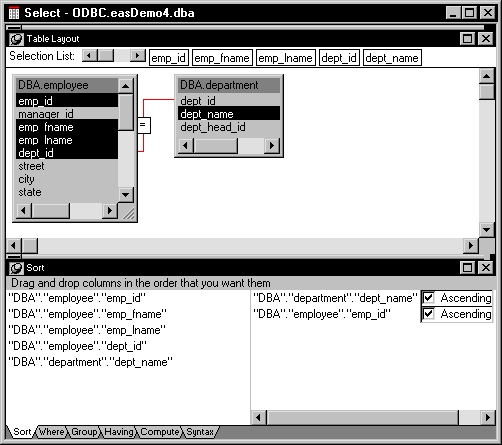
-
Define limiting (Where tab), grouping (Group tab),
and limiting groups (Having tab) criteria as appropriate. - Click the SQL Select button to return to the DataWindow painter.
Defining GROUP BY criteria
You can group the retrieved rows by specifying groups that
correspond to the GROUP BY clause in the SELECT statement. This
grouping happens before
the data is retrieved
into the DataWindow object. Each group is retrieved as one row into the DataWindow object.
For example, if in the SELECT statement you group data from
the Employee table by department ID, you will get one row back from
the database for every department represented in the Employee table.
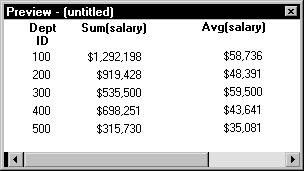
You can also specify computed columns, such as total and average
salary, for the grouped data. Here is the corresponding SELECT statement:
|
1 |
SELECT dept_id, sum(salary), avg(salary)<br /> FROM employee<i><br /> GROUP BY dept_id</i> |
If you specify this with the Employee table in the EAS Demo DB,
you will get five rows back, one for each department:
For more about GROUP BY, see your DBMS documentation.
![]() To define GROUP BY criteria:
To define GROUP BY criteria:
-
Click the Group tab to make the Group view
available (or select View>Group if the Group view is not
currently displayed).The columns in the tables you selected display in the left
side of the Group view. You may need to scroll to see your selections. -
Drag the first column you want to group on to
the right side of the Group view.This specifies the column for grouping. Columns are grouped
in the order they are displayed in the right side of the Group view.
In the following, the DataWindow object will be grouped by department ID: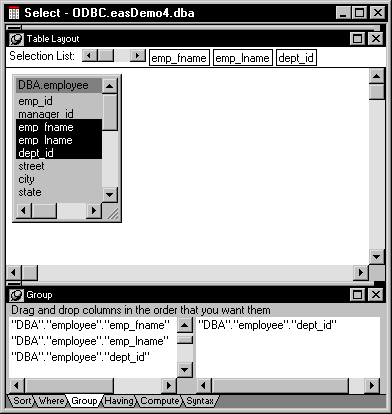
-
Continue to specify additional columns for grouping
within the first grouping column as needed.To change the grouping order, drag the column names in the
right side to the positions you want. -
Define sorting (Sort tab), limiting (Where tab),
and limiting groups (Having tab) criteria as appropriate. -
Click the Return button to return to the DataWindow
painter.
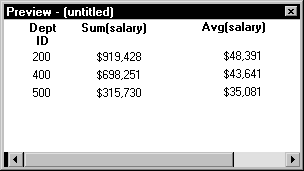
Defining HAVING criteria
If you have defined groups, you can define HAVING criteria
to restrict the retrieved groups. For example, if you group employees
by department, you can restrict the retrieved groups to departments
whose employees have an average salary of less than $50,000.
This corresponds to:
|
1 |
SELECT dept_id, sum(salary), avg(salary)<br /> FROM employee<br /> GROUP BY dept_id<i><br /> HAVING avg(salary) < 50000</i> |
If you specify this with the Employee table in the EAS Demo DB,
you will get three rows back, because there are three departments
that have average salaries less than $50,000:
![]() To define HAVING criteria:
To define HAVING criteria:
-
Click the Having tab to make the Having
view available (or select View>Having if the Having view
is not currently displayed).Each row in the Having view is a place for entering an expression
that limits which groups are retrieved. For information on how to
define criteria in the Having view, see the procedure in “Defining WHERE criteria”.
Using Query
When you choose Query as the data source, you select a predefined
SQL SELECT statement (a query) as specifying
the data for your DataWindow object.
![]() To define the data using Query:
To define the data using Query:
-
While using any of the DataWindow wizards,
click Query in the Choose Data Source dialog box. Then click Next.The Select Query dialog box displays.
-
Type the name of a query or use the Browse button
to find the query. Then click Next. -
Finish interacting with the DataWindow wizard
as needed for the presentation style you are using.
To learn how to create queries, see “Defining queries “.
Using External
If the data for the DataWindow object is not coming from a database (either through
a native Sybase database interface or through ODBC), specify External
as the data source. You then specify the data columns and their
types so PowerBuilder can build the appropriate DataWindow object to hold
the data. These columns make up the result set. PowerBuilder places
the columns you specified in the result set in the DataWindow object.
![]() To define the data using External:
To define the data using External:
-
Click External in the Choose Data Source
dialog box in the wizard. Then click Next.The Define Result Set dialog box displays for you to specify
the first column in the result set. -
Enter the name and type of the column.
Available data types are listed in the dropdown listbox.
-
Click Add to enter the name and type of any additional
columns you want in the result set. -
Click Next when you have added all the columns
you want.
What you do next
In a script, you will need to tell PowerBuilder how to get data
into the DataWindow object in your application. Typically, you will import
data during execution using a function (such as ImportFile and ImportString)
or do some data manipulation and use the SetItem function to populate
the DataWindow.
For more about these functions, see the DataWindow
Reference
.
You can also import data values from an external file into
the DataWindow object or report.
![]() To import the data values from an external file:
To import the data values from an external file:
-
Make sure the Preview view of the DataWindow object is
selected. -
Select Rows>Import from the menu bar.
The Select Import File dialog box displays.
-
Select the type of files to list from the List
Files of Type dropdown listbox (either TXT or DBF files). -
Enter the name of the import file and click OK.
Alternatively, you can select the name from the file list.
Use the Drives dropdown listbox and the Directories box as needed
to display the list of files that includes the one you want.
Using Stored Procedure
A stored procedure is a set of precompiled
and preoptimized SQL statements that performs some database operation.
Stored procedures reside where the database resides, and you can
access them as needed.
You can specify a stored procedure as the data source for
a DataWindow object if your DBMS supports stored procedures.
For information on support for stored procedures,
see your database documentation.
![]() If the Stored Procedure icon is not displayed The icon for the Stored Procedure data source displays in
If the Stored Procedure icon is not displayed The icon for the Stored Procedure data source displays in
the Choose Data Source dialog box in the DataWindow wizards only
if the database to which you are connected supports stored procedures.
![]() To define the data using Stored Procedure:
To define the data using Stored Procedure:
-
Select Stored Procedure in the Choose Data
Source dialog box in the wizard. Then click Next.The Select Stored Procedure dialog box displays a list of
the stored procedures in the current database: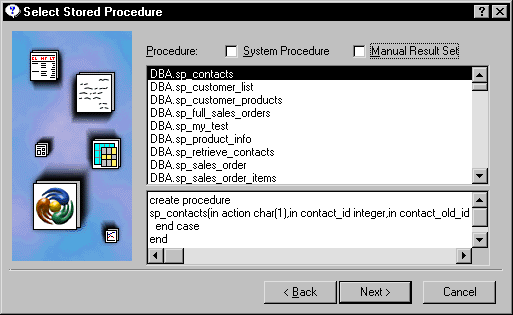
-
Select a stored procedure from the list.
To list system procedures, select the System Procedure checkbox.
The syntax of the selected stored procedure displays below
the list of stored procedures. -
Specify how you want the result set description
built:- Build the result set description
automatically Clear the Manual Result Set checkbox and click Next.
PowerBuilder executes the stored procedure and builds the result
set description for you. - Define the result set description manually Select the Manual Result Set checkbox and click Next.
In the Define Stored Procedure Result Set dialog box:- Enter the name and type of
the first column in the result set. - To Add additional columns, click Add.
- To define retrieval arguments or change to another
stored procedure, click More.
- Enter the name and type of
Your preference is saved PowerBuilder records your preference for building result set
descriptions for stored procedure DataWindow objects in the variable Stored_Procedure_Build
in the PowerBuilder initialization file. If this variable is set to
1, PowerBuilder will automatically build the result set; if the variable
is set to 0, you will be prompted to define the result set description. - Build the result set description
-
Continue in the DataWindow wizard as needed for
the presentation style you are using.When you have finished interacting with the wizard, you go
to the DataWindow painter with the columns specified in the result
set placed in the DataWindow object.For information about defining retrieval arguments
for DataWindow objects, see Chapter 18, “Enhancing DataWindow Objects “.
![]() To edit the result set description:
To edit the result set description:
-
Select Design>Data Source from
the menu bar.This displays the Column Specification view if it’s
not already displayed. -
Select Stored Procedure from the Column Specification
view’s popup menu.The Modify Stored Procedure dialog box displays.
-
Edit the Execute statement, select another stored
procedure, or add arguments. -
When you have defined the entire result set, click
OK.You return to the DataWindow painter with the columns specified
in the result set placed in the DataWindow object.For information about defining retrieval arguments
for DataWindow objects, see Chapter 18, “Enhancing DataWindow Objects “.