Creating a .NET Windows Forms project
You can create a project to deploy the application in the
target wizard or by using the .NET Windows Forms wizard on the Project
page of the New dialog box.
![]() To build a .NET Windows Forms project object:
To build a .NET Windows Forms project object:
-
On the Specify Project Information page,
specify the name of the project and the library in which the project
object will be saved. -
On the Specify Application General Information
page, optionally specify a product name for the application.This can be different from the name of the application and
is used as the name of the product on the General page in the Project
painter.You can also specify the name of the .NET Windows Forms executable
file (by default, this is the name of the application object with
the extension .exe) and the major and minor
versions and build and revision numbers for the current build (the
default is 1.0.0.0). -
On the Specify Win32 Dynamic Library Files page,
click the Add button to specify the names of any dynamic libraries
required by your application.The list is prepopulated with the names of libraries referenced
in the application’s code. -
On the Specify Support for Smart Client page,
select the check box if you want to publish the application as a
smart client. Otherwise, click Next and then Finish.If you select this check box, the wizard displays additional
pages on which you set publish and update options. For more information
about completing these wizard pages, see Chapter 10, “Intelligent Deployment
and Update.”
Setting properties for a .NET Windows Forms project
After you click Finish in the wizard, PowerBuilder creates
a .NET Windows Forms project in the target library that you selected
and opens the project in the Project painter. The painter displays
all the values you entered in the wizard and allows you to modify
them. It also displays additional properties that you can set only
in the painter.
| Tab page | Properties |
|---|---|
| General | The output path is where the application is deployed in the file system. This is not the same as the location where the application is published if you choose to publish the application as a smart client application. The build type determines whether the project is deployed The rebuild scope determines whether the project build is incremental Clear the Enable DEBUG Symbol check box if you do not want |
| Resource Files | PowerBuilder .NET Windows Forms do not support PBR files, and they are unable to locate images embedded in PBD files. You can, however, search a PBR file for images required by the application. All resource files must be relative to the path of the .NET Clear the check box in the Recursive column for a directory For smart client applications, the Publish Type column indicates whether |
| Library Files | Use the Library Files tab page to make sure all the PowerBuilder library files (PBLs or PBDs) that contain DataWindow, Query, and Pipeline objects used by the application are deployed with the application. If you select the check box next to the name of a PBL that contains these types of objects, PowerBuilder compiles the selected PBL into a PBD file before deploying it.
If your application uses external functions, use the Add button |
| Version | Use the Version tab page to specify information that displays in the generated executable file’s Properties dialog box in Windows Explorer. The company name is used if you publish the application. For more information, see “Publish the application”. |
| Post-build | Use the Post-build tab page to specify a set of commands to be executed after building the application, but before the deployment process starts. A command can be the name of a stand-alone executable file or an operating system command such as copy or move. You can save a separate processing sequence for debug builds and release builds. (You change the build type of a project deployment on the General tab of the Project painter.) |
| Security | Use the Security tab page to generate a manifest file (either external or embedded) and to set the execution level of the application.To meet the certification requirements of the Windows Vista Logo program the application executable must have an embedded manifest that defines the execution level and specifies whether access to the user interface of another window is required. You can also use the Security tab to configure CAS security For information about manifest file requirements, see “Security requirements”. For information |
| Run | Use the Run tab page to specify any command line arguments that the application requires, as well as the name of the working directory in which the application starts. |
| Sign | The Assembly group box on the Sign tab page allows you to attach strong name key files to the assemblies that your project generates. You must also use the Sign tab page to attach digital certificates to manifest files that you publish for smart client applications. For more information about strong name key files, see “Strong-named assemblies”. For information |
Intelligent update pages
The remaining pages in the Project painter are enabled if
you checked the smart client check box in the wizard or on the General
page. Check this box if you want to publish the application to a
server so that users can download it and install updates as you
make them available. For more information, see Chapter 10, “Intelligent Deployment
and Update.”
Resource and other required files
Click the Add Files button on the Resource Files page to select
image files that your application requires. PowerBuilder .NET Windows
Forms applications do not support PBR files, and they are unable
to locate images embedded in PBD files. All resource files must
be relative to the path of the .NET Windows Forms target. If the
files your application requires are not in the directory structure
accessible from the Choose Required Resource Files dialog box, copy them
into the directory structure, then reopen the dialog box.
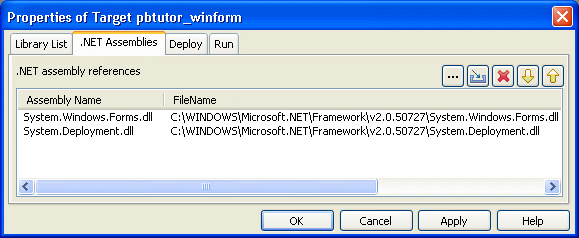
If your application uses .NET assemblies, as in the previous
example, specify them on the .NET Assemblies tab page in the target’s
Properties dialog box. Before you deploy a PowerBuilder .NET smart
client application that uses data files, make sure the System.Windows.Forms.dll and System.Deployment.dll assemblies
are listed on this page.
Other files, such as database drivers and PowerBuilder DLLs,
should be included on the Prerequisites page if you are publishing
a smart client application, or on the Library Files page.
Security requirements
Use
the Security tab page to specify whether the application has a manifest
file that specifies its requested execution level and whether the
manifest file is external or embedded in the application. The
concept of execution level was introduced as part of Vista User
Account Control (UAC). This manifest file is not the same as the
manifest files generated when you publish a Windows Forms application
as a smart client (ClickOnce) application.
If you want to deploy an application to the Windows Vista
operating system that meets the certification requirements of the
Windows Vista Logo program, you must follow UAC guidelines. The
executable file must have an embedded manifest that defines the
execution level and specifies whether access to the user interface
of another window is required. The Vista Application Information
Service (AIS) checks the manifest file to determine the privileges with
which to launch the process.
Generate options
Select Embedded manifest if your application needs to be certified
for Vista. A manifest file with the execution level you select is
embedded in the application’s executable file.
You can also select External manifest to generate a standalone
manifest file in XML format that you ship with your application’s
executable file, or No manifest if you do not need to distribute
a manifest file.
![]() .NET SDK required for embedded manifest If you select Embedded manifest for a Windows Forms target,
.NET SDK required for embedded manifest If you select Embedded manifest for a Windows Forms target,
you must have a supported version of the .NET Framework SDK installed
on your system, because the process that embeds the manifest in
the executable file uses the mt.exe tool that
is distributed with the SDK.
Execution level
Select As Invoker if the application does not need elevated
or administrative privileges. Selecting a different execution level
will probably require that you modify your application to isolate
administrative features in a separate process to receive Vista certification.
Select Require Administrator if the application process must
be created by a member of the Administrators group. If the application
user does not start the process as an administrator, a message box
displays so that the user can enter the appropriate credentials.
Select Highest Available to have the AIS retrieve the highest
available access privileges for the user who starts the process.
UI access
If the application needs to drive input to higher privilege
windows on the desktop, such as an on-screen keyboard, select the “Allow
access to protected system UI” check box. For most applications
you should not select this check box. Microsoft provides this setting
for user interface Assistive Technology (Section 508) applications.
![]() Authenticode signing required If you check the Allow access to protected system UI check
Authenticode signing required If you check the Allow access to protected system UI check
box, the application must be Authenticode signed and must reside
in a protected location, such as Program Files or Windowssystem32.