Collecting trace information
There are three ways to collect trace information. You can
use:
- The Profiling tab on the System Options dialog box
- A window similar to the Profiling tab
- Trace objects and functions
Use the Profiling tab if you want to trace an entire application
run in the development environment. For more information, see “Tracing an entire application
in PowerBuilder”.
Use a window or trace objects and functions if you want to
create a trace file for selected parts of the application or the
entire application, either in the development environment or when
running an executable file. See “Using a window” and “Collecting trace information
using PowerScript functions”.
![]() Collection time The timer values in the trace file exclude the time taken
Collection time The timer values in the trace file exclude the time taken
to collect the trace data. Because an application can be idle (while
displaying a MessageBox, for example), percentage metrics are most
meaningful when you control tracing programmatically, which can
help minimize idle time. Percentages are less meaningful when you
create a trace file for a complete application.
Whichever method you use, you can specify:
- The name and location
of the trace file and optional labels for blocks of trace data - The kind of timer used in the trace file
- The activities you want recorded in the trace file
Trace file names and labels
The default name of the trace file is the name of the application
with the extension PBP. The trace file is saved
in the directory where the PBL or executable file resides and overwrites
any existing file of the same name. If you run several different
tests on the same application, you should change the trace file
name for each test.
You can also associate a label with the trace data. If you
are tracing several different parts of an application in a single
test run, you can associate a different label with the trace data
(the trace block) for each part of the application.
Timer kinds
There are three kinds of timer: clock, process, and thread.
If your analysis does not require timing information, you can omit
timing information from the trace file to improve performance.
If you do not specify a timer kind, the time at which each
activity begins and ends is recorded using the clock timer, which
measures an absolute time with reference to an external activity,
such as the machine’s start-up time. The clock timer measures
time in microseconds. Depending on the speed of your machine’s
central processing unit, the clock timer can offer a resolution
of less than one microsecond. A timer’s resolution is the
smallest unit of time the timer can measure.
You can also use process or thread timers, which measure time
in microseconds with reference to when the process or thread being
executed started. You should always use the thread timer for distributed
applications. Both process and thread timers exclude the time taken
by any other running processes or threads so that they give you
a more accurate measurement of how long the process or thread is
taking to execute, but both have a lower resolution than the clock
timer.
Trace activities
You can choose to record in the trace file the time at which
any of the following activities occurs. If you are using the System
Options dialog box or a window, you select the check boxes for the
activities you want. If you are using PowerScript functions to collect
trace information, you use the TraceActivity enumerated
type to identify the activity.
| Trace Activities check box | What is recorded | TraceActivity value |
|---|---|---|
| Routine Entry/Exit | Routine entry or exit | ActRoutine! |
| Routine Line Hits | Execution of any line in any routine | ActLine! |
| Embedded SQL | Use of an embedded SQL verb | ActESQL! |
| Object Creation/ Destruction |
Object creation or destruction | ActObjectCreate!, ActObjectDestroy! |
| User Defined Activities | A user-defined activity that records an informational message |
ActUser! |
| System Errors | A system error or warning | ActError! |
| Garbage Collection | Garbage collection | ActGarbageCollect! |
| Not available | Routine entry and exit, embedded SQL verbs, object creation and destruction, and garbage collection |
ActProfile! |
| Not available | All except ActLine! | ActTrace! |
When you begin and end tracing, an activity of type ActBegin!
is automatically recorded in the trace file. User-defined activities,
which you use to log informational messages to the trace file, are
the only trace activities enabled by default.
Tracing an entire application in PowerBuilder
Use the Profiling tab on the System Options dialog box if
you want to collect trace data for an entire application run in
the PowerBuilder development environment.
![]() To trace an entire application in PowerBuilder:
To trace an entire application in PowerBuilder:
-
Select Tools>System Options from
the PowerBar and select the Profiling tab. -
Specify a name for the trace file, select the
trace options you want, and click OK.When you run the application, the activities you selected
are logged in the trace file.
Using a window
You can create a window that is similar to the Profiling tab
on the System Options dialog box and add it to any application that
is under development, so that you can start and stop tracing when
testing specific actions. This window lets you specify a trace file
name, label, and timer kind, as well as which activities you want
to trace:
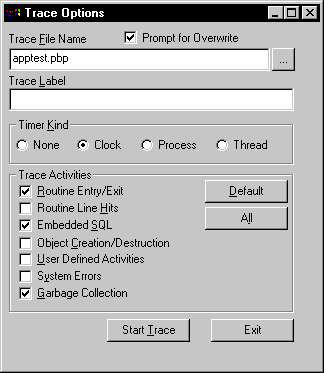
The following instance variables are defined for the window:
|
1 |
TimerKind itk_kind<br />string is_title = 'Trace Options '<br />string is_starttext |
The open event for the window sets some defaults:
|
1 |
application lapp_current<br />lapp_current = getapplication()<br />itk_kind = Clock!<br />is_starttext = cb_startstop.text<br />sle_filename.text = classname(lapp_current)+'.pbp' |
The following code shows the script for the Clicked event
of the Start Trace button. The text for the button is set to Start
Trace in the painter. When the user clicks Start Trace, the button
label changes to Stop Trace. The Clicked event script checks the
text on the button before either starting or stopping tracing. This
script uses the functions described in “Collecting trace information
using PowerScript functions”:
|
1 |
// instance variables:<br />// errorreturn le_errorreturn<br />integer li_key<br /><br />// Check that the button label is Start Trace<br />// and a trace file name has been entered<br />if this.text = is_starttext then<br /> if len(trim(sle_filename.text)) = 0 then<br /> messagebox(parent.title, &<br /> 'Trace file name is required',information!)<br /> sle_filename.setfocus()<br /> return<br /> end if<br /><br /> // If Prompt for overwrite is checked and the<br /> // file exists, pop up a response window<br /> if cbx_prompt.checked and &<br /> fileexists(sle_filename.text) then<br /> li_key = messagebox(parent.title, &<br /> 'OK to overwrite '+sle_filename.text, &<br /> question!,okcancel!,1)<br /> if li_key = 2 then return<br /> end if<br /> <br /> // Open the trace file<br /> TraceOpen( sle_filename.text, itk_kind )<br /> <br /> // Enable tracing for checked activities<br /> // For each activity, check for errors and close<br /> // the trace file if an error occurs<br /> if cbx_embeddedsql.checked then <br /> le_errorreturn = TraceEnableActivity( ActESql! )<br /> if le_errorreturn <> Success! then<br /> of_errmsg(le_errorreturn, &<br /> 'TraceEnableActivity( ActESql! )')<br /> le_errorreturn = Traceclose()<br /> if le_errorreturn <> Success! then<br /> of_errmsg(le_errorreturn,'TraceClose')<br /> end if<br /> return<br /> end if<br /> end if<br /><br /> if cbx_routineentry.checked then <br /> le_errorreturn =TraceEnableActivity(ActRoutine!)<br /> if le_errorreturn <> Success! then<br /> of_errmsg(le_errorreturn, &<br /> 'TraceEnableActivity( ActRoutine! )')<br /> Traceclose()<br /> if le_errorreturn <> Success! then<br /> of_errmsg(le_errorreturn,'TraceClose')<br /> end if<br /> return<br /> end if<br /> end if<br /><br /> if cbx_userdefined.checked then <br /> le_errorreturn = TraceEnableActivity( ActUser! )<br /> if le_errorreturn <> Success! then<br /> of_errmsg(le_errorreturn, & 'TraceEnableActivity( ActUser! )')<br /> Traceclose()<br /> if le_errorreturn <> Success! then<br /> of_errmsg(le_errorreturn,'TraceClose')<br /> end if<br /> return<br /> end if<br /> end if<br /><br /> if cbx_systemerrors.checked then <br /> le_errorreturn = TraceEnableActivity(ActError! )<br /> if le_errorreturn <> Success! then<br /> of_errmsg(le_errorreturn, &<br /> 'TraceEnableActivity( ActError! )')<br /> Traceclose()<br /> if le_errorreturn <> Success! then<br /> of_errmsg(le_errorreturn,'TraceClose')<br /> end if<br /> return<br /> end if<br /> end if<br /><br /> if cbx_routineline.checked then <br /> le_errorreturn = TraceEnableActivity( ActLine! )<br /> if le_errorreturn <> Success! then<br /> of_errmsg(le_errorreturn, &<br /> ' TraceEnableActivity( ActLine! )')<br /> Traceclose()<br /> if le_errorreturn <> Success! then<br /> of_errmsg(le_errorreturn,'TraceClose')<br /> end if<br /> return<br /> end if<br /> end if<br /> if cbx_objectcreate.checked then <br /> le_errorreturn = & TraceEnableActivity( ActObjectCreate! )<br /> if le_errorreturn <> Success! then<br /> of_errmsg(le_errorreturn, &<br /> 'TraceEnableActivity( ActObject! )')<br /> Traceclose()<br /> if le_errorreturn <> Success! then<br /> of_errmsg(le_errorreturn,'TraceClose')<br /> end if<br /> return<br /> end if<br /> le_errorreturn = &<br /> TraceEnableActivity( ActObjectDestroy! )<br /> if le_errorreturn <> Success! then<br /> of_errmsg(le_errorreturn, &<br /> 'TraceEnableActivity(ActObjectDestroy!)')<br /> Traceclose()<br /> if le_errorreturn <> Success! then<br /> of_errmsg(le_errorreturn,'TraceClose')<br /> end if<br /> return<br /> end if<br /> end if<br /><br /> if cbx_garbagecoll.checked then <br /> le_errorreturn = &<br /> TraceEnableActivity( ActGarbageCollect! )<br /> if le_errorreturn <> Success! then<br /> of_errmsg(le_errorreturn, &<br /> 'TraceEnableActivity(ActGarbageCollect! )')<br /> Traceclose()<br /> if le_errorreturn <> Success! then<br /> of_errmsg(le_errorreturn,'TraceClose')<br /> end if<br /> return<br /> end if<br /> end if<br /><br /> // Start tracing<br /> le_errorreturn =TraceBegin( sle_tracelabel.text )<br /> if le_errorreturn <> Success! then<br /> of_errmsg(le_errorreturn,'TraceBegin')<br /> return<br /> end if<br /> <br /> // Change the title of the window and the <br /> // text of the Start Trace button<br /> parent.title = is_title + '(Tracing)'<br /> this.text = 'Stop &Tracing'<br />// If the button label is Stop Trace, stop tracing<br />// and close the trace file<br />else<br /> le_errorreturn =TraceEnd()<br /> if le_errorreturn <> Success! then<br /> of_errmsg(le_errorreturn,'TraceEnd')<br /> return<br /> end if<br /><br /> le_errorreturn =TraceClose()<br /> if le_errorreturn <> Success! then<br /> of_errmsg(le_errorreturn,'TraceClose')<br /> end if<br /> this.text = is_starttext<br /> parent.title = is_title <br />end if |
of_errmsg function
The window uses two functions to handle error messages. The of_errmsg function
displays a message box:
|
1 |
// of_errmsg<br />Messagebox( this.title,'Error executing '+ as_msg + &<br /> '. Error code : '+ of_converterror(ae_error) ) |
of_converterror function
The of_converterror function converts
the ErrorReturn parameter to a string:
|
1 |
// of_converterror: convert enumerated type <br />// ErrorReturn parameter to text.<br />String ls_result<br />choose case a_error<br /> Case Success!<br /> ls_result = "Success!"<br /> Case FileCloseError!<br /> ls_result = "FileCloseError!"<br /> Case FileOpenError!<br /> ls_result = "FileOpenError!"<br /> Case FileReadError!<br /> ls_result = "FileReadError!"<br /> Case FileWriteError!<br /> ls_result = "FileWriteError!"<br /> Case FileNotOpenError!<br /> ls_result = "FileNotOpenError!"<br /> Case FileAlreadyOpenError!<br /> ls_result = "FileAlreadyOpenError!"<br /> Case FileInvalidFormatError!<br /> ls_result = "FileInvalidFormatError!"<br /> Case FileNotSetError!<br /> ls_result = "FileNotSetError!"<br /> Case EventNotExistError!<br /> ls_result = "EventNotExistError!"<br /> Case EventWrongPrototypeError!<br /> ls_result = "EventWrongPrototypeError!"<br /> Case ModelNotExistsError!<br /> ls_result = "ModelNotExistsError!"<br /> Case ModelExistsError!<br /> ls_result = "ModelExistsError!"<br /> Case TraceStartedError!<br /> ls_result = "TraceStartedError!"<br /> Case TraceNotStartedError!<br /> ls_result = "TraceNotStartedError!"<br /> Case TraceNoMoreNodes!<br /> ls_result = "TraceNoMoreNodes!"<br /> Case TraceGeneralError!<br /> ls_result = "TraceGeneralError!"<br /> Case FeatureNotSupportedError!<br /> ls_result = "FeatureNotSupportedError!"<br /> Case else<br /> ls_result = "Unknown Error Code"<br />end choose<br />return ls_result |
Collecting trace information using PowerScript functions
You use the PowerScript system functions listed in Table 31-2 to collect information
in a trace file. Each of these functions returns a value of type ErrorReturn,
an enumerated datatype.
| Use this PowerScript function | To do this |
|---|---|
| TraceOpen | Open a named trace file and set the timer kind. |
| TraceEnableActivity | Enable logging of the specified activity. |
| TraceBegin | Start logging all enabled activities. You can pass an optional label for the trace block. |
| TraceError | Log a severity level and error message to the trace file. |
| TraceUser | Log a reference number and informational message to the trace file. |
| TraceEnd | Stop logging all enabled activities. |
| TraceDisableActivity | Disable logging of the specified activity. |
| TraceClose | Close the open trace file. |
In general, you call the functions in the order shown in the
table. That is, you must call TraceOpen before
you call any other trace functions. You call TraceClose when
you have finished tracing.
TraceEnableActivity and TraceDisableActivity can
be called only when a trace file is open but tracing has not begun
or has stopped–that is, before you call TraceBegin or
after you call TraceEnd.
TraceUser and TraceError can
be called only when the trace file is open and tracing is active–that
is, after you call TraceBegin and before you
call TraceEnd.
About TraceUser and TraceError
You can use TraceUser to record specific
events in the trace file, such as the beginning and end of a body
of code. You can also record the execution of a statement you never
expected to reach, such as the DEFAULT statement
in a CHOOSE CASE block. TraceError works
just like TraceUser, but you can use it to signal
more severe problems.
Both TraceUser and TraceError take
a number and text string as arguments. You can use a simple text
string that states what activity occurred, or you can build a string
that provides more diagnostic information by including some context, such
as the current values of variables. Run the application with only
ActUser! or ActError! tracing turned on and then use the Profiling
Trace View to pinpoint problems quickly.
Example: trace data collection
In this example, the user selects a timer kind from a drop-down
list and enters a name for the trace file in a single-line edit
box. Typically you would use the ErrorReturn return
value from every trace call to return an error message if the call
fails. For brevity, the example shows this only for the TraceOpen call.
Several trace activities are disabled for a second trace block.
The activities that are not specifically disabled
remain enabled until TraceClose is called.
|
1 |
ErrorReturn le_err<br />integer li_key<br />TimerKind ltk_kind<br /><br />CHOOSE CASE ddlb_timerkind.Text<br /> CASE "None"<br /> ltk_kind = TimerNone!<br /> CASE "Clock"<br /> ltk_kind = Clock!<br /> CASE "Process"<br /> ltk_kind = Process!<br /> CASE "Thread"<br /> ltk_kind = Thread!<br />END CHOOSE<br /><br />// Open the trace file and return an error message<br />// if the open fails<br />le_err = <i>TraceOpen</i>( sle_fileName.Text, ltk_kind )<br />IF le_err <> Success! THEN &<br /> of_errmsg(le_err, 'TraceOpen failed')<br /> RETURN<br />END IF<br /><br />// Enable trace activities. Enabling ActLine!<br />// enables ActRoutine! implicitly<br />TraceEnableActivity(ActESQL!)<br />TraceEnableActivity(ActUser!)<br />TraceEnableActivity(ActError!)<br />TraceEnableActivity(ActLine!)<br />TraceEnableActivity(ActObjectCreate!)<br />TraceEnableActivity(ActObjectDestroy!)<br />TraceEnableActivity(ActGarbageCollect!)<br /><br /><i>TraceBegin</i>("Trace_block_1")<br />// first block of code to be traced<br />// this block has the label Trace_block_1<br />...<i><br /><br />TraceEnd</i>()<br /><br />// disable trace activities not needed for<br />// second block<br />TraceDisableActivity(ActLine! )<br />TraceDisableActivity(ActObjectCreate!)<br />TraceDisableActivity(ActObjectDestroy!)<br />TraceDisableActivity(ActGarbageCollect!)<br /><br /><i>TraceBegin</i>("Trace_block_2")<br />// second block of code to be traced<br />...<i><br /><br />TraceEnd</i>()<br /><i>TraceClose</i>() |