Building a new user object
This section describes how to build a user object from scratch.
You use this technique to create user objects that are not based
on existing user objects.
Creating a new user object
![]() To create a new user object:
To create a new user object:
-
Open the New dialog box.
-
On PB Object tab page, select the kind of user
object you want to create.The five user object choices display at the top of the tab
page: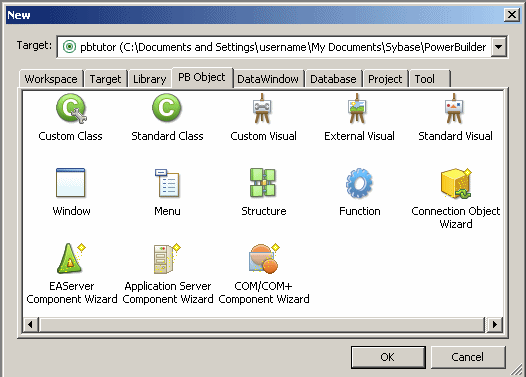
-
Click OK.
What you do next depends on the type of user object you selected.
For all user objects except Standard Class and Standard Visual,
the User Object painter opens.The remainder of this section describes how to build each
type of user object.
Building a custom class user object
On the PB Object tab page of the New dialog box, if you select
Custom Class and click OK, the User Object painter for custom class
user objects opens.
![]() To build the custom class user object:
To build the custom class user object:
-
Declare functions,
structures, or variables you need for the user object. -
Create and compile scripts for the user object.
Custom class user objects have built-in constructor and destructor
events. -
Save the user object.
Using AutoInstantiate
You can create custom class user objects that are autoinstantiated,
which provides you with the ability to define methods.
Autoinstantiated user objects do not require explicit CREATE or DESTROY statements
when you use them. They are instantiated when you call them in a script
and destroyed automatically.
![]() To define an autoinstantiated custom class user
To define an autoinstantiated custom class user
object:
-
In the Properties view, select the AutoInstantiate
check box.
For more information about autoinstantiation,
see the PowerScript Reference.
Using the EAServer Project
property
In the Properties view, if you specify an EAServer or Application Server project
that will be used to generate an EAServer or
Application Server component (a custom class user object with the
characteristics needed for deployment to an application server), live editing is enabled. When
live editing is enabled in the User Object painter, PowerBuilder
builds the project for an application server component each time
you save the user object.
For information about EAServer components
and live editing, see Application Techniques
.
Building a standard class user object
On the PB Object tab page of the New dialog box, if you select
Standard Class and click OK, the Select Standard Class Type dialog
box displays.
![]() To build the standard class user object:
To build the standard class user object:
-
In
the Select Standard Class Type dialog box, select the built-in system object
that you want your user object to inherit from and click OK. -
Declare functions, structures, or variables you
need for the user object. For a list of properties and functions Use the Browser to list the built-in properties inherited
from the selected system object. Use the Function List view or the
Browser to list the functions inherited from the selected system
object. -
Declare any user events needed for the user object.
For information about user events, see “Communicating between a
window and a user object “. -
In the Script view, create and compile scripts
for the user object.Class user objects have built-in constructor and destructor
events. -
Save the user object.
Building a custom visual user object
On the PB Object tab page of the New dialog box, if you select
Custom Visual and click OK, the User Object painter for custom visual
user objects opens. It looks like the Window painter, but the empty
box that displays in the Layout view is the new custom visual user
object.
Building a custom visual user object is similar to building
a window, described in Chapter 11, “Working with Windows.” The views available in the Window painter
and the User Object painter for custom visual user objects are the
same.
![]() To build the custom visual user object:
To build the custom visual user object:
-
Place the controls you want in the custom
visual user object. -
Work with the custom visual user object as you
would with a window in the Window painter:- Define the properties of the controls
- Declare functions, structures, or variables as necessary
- Declare any events needed for the user object or
its controls
For information about user events, see “Communicating between a
window and a user object “. - In the Script view, create and compile the scripts
for the user object or its controls
You can write scripts for each control in a custom visual
user object.For more information on events associated
with custom visual user objects, see “Events in user objects”.
-
Save the user object.
Building an external visual user object
On the PB Object tab page of the New dialog box, if you select
External Visual and click OK, the User Object painter for external
visual user objects opens.
![]() To build an external visual user object:
To build an external visual user object:
-
In the Properties view, click the
Browse button next to the LibraryName box. -
In the Select Custom Control DLL dialog box, select
the DLL that defines the user object and click OK. -
In the Properties view, enter the following information,
as necessary, and click OK:- The
class name registered in the DLL
Information about the class name is usually provided by the
vendor of the purchased DLL. - Text in the Text box
This will be displayed only if the object has a text style
property. - Display properties (border and scroll bars)
- Decimal values for the style bits associated with
the class
Information about style bits is usually provided by the vendor
of the purchased DLL. PowerBuilder will OR these values with the
values selected in the display properties for the control.
- The
-
Declare any functions, structures, or variables
you need to declare for the user object.You can declare functions, structures, and variables for the
user object in the Script view. Information about functions is usually
provided by the vendor of the purchased DLL. -
Declare any needed events for the user object.
For information about user events, see “Communicating between a
window and a user object “. -
In the Script view, create and compile the scripts
for the user object.For more information on events associated
with external visual user objects, see “Events in user objects”. -
Save the user object.
Building a standard visual user object
On the PB Object tab page of the New dialog box, if you select
Standard Visual and click OK, the Select Standard Visual Type dialog
box displays.
![]() To build a standard visual user object:
To build a standard visual user object:
-
In
the Select Standard Visual Type dialog box, select the PowerBuilder control
you want to use to build your standard visual user object and click OK.The selected control displays in the workspace. Your visual
user object will have the properties and events associated with
the PowerBuilder control you are modifying. -
Work with the control as you do in the Window
painter:- Review the default
properties and make any necessary changes - Declare functions, structures, or variables as necessary
You can declare these in the Script view. - Declare any user events needed for the user object
For information about user events, see “Communicating between a
window and a user object “. - Create and compile the scripts for the user object
Standard visual user objects have the same events as the PowerBuilder
control you modified to create the object.
- Review the default
-
Save the user object.
Events in user objects
When you build a user object, you can write scripts for any
event associated with that user object.
Events in class user objects
Most custom class user objects have only constructor and destructor
events. Activate and deactivate events are created for EAServer and Application Server
custom class user objects that you create using the Target or PB
Object wizards in the New dialog box. For more information, see Application Techniques
.
| Event | Occurs when |
|---|---|
| Constructor | The user object is created |
| Destructor | The user object is destroyed |
| Activate | The user object is activated in an application server (EAServer component wizard only) |
| Deactivate | The user object is deactivated in an application server (EAServer component wizard only) |
Standard class user objects have the same events as the PowerBuilder
system object from which they inherit.
Events in visual user objects
Standard visual user objects have the same events as the PowerBuilder
control from which they inherit. Custom and external visual user
objects have a common set of events.
| Event | Occurs when |
|---|---|
| Constructor | Immediately before the Open event of the window and when the user object is dynamically placed in a window |
| Destructor | Immediately after the Close event of the window and when the user object is dynamically removed from a window |
| DragDrop | A dragged object is dropped on the user object |
| DragEnter | A dragged object enters the user object |
| DragLeave | A dragged object leaves the user object |
| DragWithin | A dragged object is moved within the user object |
| Help | A user presses the F1 key or clicks the context Help button [?] on the title bar of the window with which the menu is associated and then points and clicks on a menu item |
| Other | A Windows message occurs that is not a PowerBuilder event |
| RButtonDown | The right mouse button is pressed |
For more about drag and drop, see Application
Techniques
.
Saving a user object
![]() To save a user object:
To save a user object:
-
In the User Object painter, select File>Save
from the menu bar or click the Save button in the painter bar.If you have previously saved the user object, PowerBuilder
saves the new version in the same library and returns you to the
User Object painter.If you have not previously saved the user object, PowerBuilder
displays the Save User Object dialog box. -
Enter a name in the User Objects box.
For naming considerations, see “Naming the user object”.
-
Enter comments to describe the user object.
These display in the Select User Object dialog box and in
the Library painter, and will document the purpose of the user object. -
Specify the library in which to save the user
object.To make a user object available to all applications, save
it in a common library and include the library in the library search
path for each application. -
Click OK to save the user object.
![]() Validation for server components In the User Object painter for a custom class user object,
Validation for server components In the User Object painter for a custom class user object,
the Design menu has EAServer/Application
Server Validation and .NET Web Service Validation items. If you
are select a validation menu item for one of these component types
to enable validation, a check displays next to the menu item. When
you save the object, you might see some error messages.
For information about EAServer validation, see Application
Techniques
.
Naming the user object
A user object name can be any valid PowerBuilder identifier
up to 40 characters. For information about PowerBuilder identifiers,
see the PowerScript Reference
.
Naming conventions
You should adopt naming conventions to make it easy to understand
a user object’s type and purpose.
One convention you could follow is to use u_ as
the prefix for visual user objects and n_ as
the prefix for class (nonvisual) user objects. For standard classes,
include the standard prefix for the object or control from which
the class inherits in the name. For external user objects, include ex_ in
the name, and for custom class user objects, include cst_ in
the name.
Table 15-3 shows
some examples of this convention.
| Type of user object | Format | Example |
|---|---|---|
| Standard visual | u_control_purpose | u_cb_close, a CommandButton that closes a window |
| Custom visual | u_purpose | u_toolbar, a toolbar |
| External visual | u_ex_purpose | u_ex_sound, outputs sound |
| Standard class | n_systemobject_purpose | n_trans_test, derived from the Transaction object and used for testing |
| Custom class | n_cst_purpose | n_cst_commission, calculates commissions |
For a list of naming conventions, see “Naming conventions” in Chapter 5, “Working with Targets.”