Source control operations in PowerBuilder
The following
source control operations are described in this section:
- Adding objects to source
control - Checking objects out from
source control - Checking objects in to source
control - Clearing the checked-out
status of objects - Synchronizing objects with
the source control server - Refreshing the status of
objects - Comparing local objects
with source control versions - Displaying the source control
version history - Removing objects from source
control
Source control operations on workspace and PBL files are performed
on the objects contained in the current workspace or in target PBLs,
not on the actual PBW and PBL files. The PBW and PBL files cannot
be added to source control through the PowerBuilder interface. Source
control operations are not enabled for target PBD files or for any
of the objects in target PBD files.
Adding objects to source control
You add an object to your source control project by selecting
the Add To Source Control menu item from the object’s pop-up
menu in the System Tree or in the Library painter. You can also
select an object in a Library painter view and then select Entry>Source
Control>Add To Source Control from the Library painter
menu bar.
What happens when you add objects to source control
When you add an object to source control, the icon in front
of the object changes from a plus sign to a green dot, indicating
that the object on the local machine is in sync with the object
on the server.
PowerBuilder creates read-only object files in the local root
directory for each PowerBuilder object that you add to source control.
These files can be automatically deleted if you selected the Delete
PowerBuilder Generated Object Files option as a source control connection
property (although you cannot do this for certain SCC systems such
as Perforce or ClearCase). Read-only attributes are also assigned
to any Web target files that you add to source control. Read-only
attributes are not changed by PowerBuilder if you later remove a
workspace containing these files from source control.
Adding multiple objects to source control
If the object you select is a PowerBuilder workspace, a dialog
box displays listing all the objects for that workspace that are
not currently under source control (although the workspace PBW and
target PBLs are not included in the list). If the object you select
is a PowerBuilder target, and at least one of the objects in that
target has not been registered with the current source control project,
PowerBuilder displays a dialog box that prompts you to:
- Select multiple files contained in the target
- Register the target file only
If you select the multiple files radio button, another dialog
box displays with a list of objects to add to source control. A
check box next to each object lets you select which objects you
want to add to source control. By default, check boxes are selected
for all objects that are not in your source control project. They
are not selected for any object already under source control.

You can resize all source control dialog boxes listing multiple
files by placing a cursor over the edge of a dialog box until a
two-headed arrow displays, then dragging the edge in the direction
of one of the arrow heads.
![]() Selecting multiple files from a PBL If you select Add To Source Control for a target PBL, you
Selecting multiple files from a PBL If you select Add To Source Control for a target PBL, you
immediately see the list of multiple files from that PBL in the
Add To Source Control dialog box. There is no need for an intervening
dialog box as there is for a target or workspace, since you cannot
register a PBL file to source control from the PowerBuilder UI–you
can only register the objects contained in that PBL.
You can also select multiple objects to add to source control
from the List view of the Library painter (without selecting a workspace,
target, or PBL).
The Add To Source Control menu item is disabled for all objects
that are registered in source control except workspaces and targets.
If you select the Add To Source Control menu item for a workspace
or target in which all the objects are already registered to source
control, PowerBuilder displays the Add To Source Control dialog
box with an empty list of files. You cannot add objects to your
source control project that are already registered with that project.
Creating a mapping file for target PBLs
When you add a target or an object (in a target that is not
under source control) to source control, PowerBuilder creates a
PBG file. A PBG file maps objects in a target to a particular PBL
in a PowerScript target. One PBG file is created per PBL, so there
can be multiple PBG files per PowerScript target. PBG files are
also used to list target directories and subdirectories for Web
targets, but there is only one PBG file per Web target.
If a PBG file already exists for a target PBL containing the
object you are adding to source control, PowerBuilder checks the
PBG file out of source control and adds the name of the object to
the names of objects already listed in the PBG file. It then checks
the PBG file back into source control.
The PBG files are used by PowerBuilder to make sure that objects
are distributed to the correct PBLs and targets when you check the
objects out (or get the latest versions of the objects) from source
control.
If your source control system requires comments on registration
and check in, you get separate message boxes for the PBG file and
the objects that you are adding to source control. If your source
control system gives you the option of adding the same comments
to all the objects you are registering, you can still get additional
message boxes for PBG files, since PBG files are checked in separately.
Because it is possible for PBG files to get out of sync, it
is important that the project manager monitor these files to make
sure they map all objects to the correct PBLs and contain references
to all objects in the source control project. However, you cannot
explicitly check in or check out PBG files through the PowerBuilder
SCC API.
For more information on modifying PBG files, see “Editing the PBG file for
a source-controlled target”.
Checking objects out from source control
Enabling
multiple user checkout
Checking out an object from a source control system usually
prevents other users from checking in modified versions of the same
object. By default, PowerBuilder assumes that any object checked
out by a user is exclusively reserved for that user until the object
is checked back in.
Some source control systems, such as Serena Version Manager
(formerly Merant PVCS) and MKS Source Integrity, permit multiple
user checkouts. In these systems, you can allow shared checkouts
of the same object. PowerBuilder can recognize shared checkouts,
but only if you add the following instruction to the Library section
of the PB.INI file:
|
1 |
[Library] |
|
1 |
SccMultiCheckout=1 |
After you add this PB.INI setting, PowerBuilder shows a red
check mark as part of a compound icon to indicate that an object
is checked out to another user in a shared (nonexclusive) mode.
PowerBuilder allows you to check out an object with this compound
icon, even though another user has already checked the object out.
![]() Multiple user checkouts If you configure the PB.INI file to allow multiple user checkouts,
Multiple user checkouts If you configure the PB.INI file to allow multiple user checkouts,
you must make sure that you have a way to manage updates to the
same object by multiple users. The merge functionality is not supported
by the SCC API, so either you must configure merge operations through
the Advanced Check Out dialog box of the source control system,
or you must merge the changes using the source control management
system instead of the PowerBuilder user interface.
What happens
When you check out an object, PowerBuilder:
- Locks
the object in the archive so that no one else can modify it - Copies the object to the directory for the target
to which it belongs - For a PowerScript object, compiles the object and
regenerates it in the target PBL to which it is mapped - Displays a check mark icon next to the object in
your System Tree and in your Library painter to show that the object
has been checked out
Checking out multiple objects
If you select the Check Out menu item for a PowerBuilder target
that is not already checked out, and at least one of the objects
in that target is available for checkout, PowerBuilder displays
a dialog box that prompts you to:
- Select multiple
files contained in the target - Check out the target file only
If you select the multiple file option, or if the target file
is already checked out, the Check Out dialog box displays the list
of objects from that target that are available for checkout. A check
box next to each object in the list lets you choose which objects
you want to check out. By default, check boxes are selected for
all objects that are not currently checked out of source control.
The Deselect All button in the Check Out dialog box lets you
clear all the check boxes with a single click. When none of the
objects in the list is selected, the button text becomes Select
All, and you can click the button to select all the objects in the
list.
You can also select multiple objects (without selecting a target)
in the List view of the Library painter. The PowerBuilder SCC API
does not let you check out an object that you or that someone else
has already checked out or that is not yet registered with source
control. If you use multiple object selection to select an object
that is already checked out, PowerBuilder does not include this
object in the list view of the Check Out dialog box.
Creating a source control branch
If your source control system supports branching and its SCC
API lets you check out a version of an object that is not the most
recent version in source control, you can select the version you
want in the Advanced Check Out dialog box (that you access by clicking
the Advanced button in the Check Out dialog box). When you select
an earlier version, PowerBuilder displays a message box telling
you it will create a branch when you check the object back in. You
can click Yes to continue checking out the object or No to leave
the object unlocked in the source control project. If this is part
of a multiple object check-out, you can select Yes To All or No
To All.
![]() If you want just a read-only copy of the latest version
If you want just a read-only copy of the latest version
of an object Instead of checking out an object and locking it in the source
control system, you can choose to get the latest version of the
object with a read-only attribute. See “Synchronizing objects with
the source control server”.
![]() To check out an object from source control:
To check out an object from source control:
-
Right-click the object in the System Tree
or in a Library painter view and select Check Out from the pop-up
menu.or
Select the object in a Library painter view and select
Entry>Source Control>Check Out from the Library
painter menu.The Check Out dialog box displays the name of the object you
selected. For PowerScript objects, the object listing includes the
name of the PBL that contains the selected object.If you selected multiple objects, the Check Out dialog box
displays the list of objects available for checkout. You can also
display a list of available objects when you select a target file
for checkout. A check mark next to an object in the list marks the
object as assigned for checkout. -
Make sure that the check box is selected next
to the object you want to check out, and click OK.
Checking objects in to source control
When you finish working with an object that you checked out,
you must check it back in so other developers can use it, or you
must clear the object’s checked-out status. You cannot check in objects
that you have not checked out.
![]() If you do not want to use the checked-out version Instead of checking an entry back in, you can choose not to
If you do not want to use the checked-out version Instead of checking an entry back in, you can choose not to
use the checked-out version by clearing the checked-out
status of the entry. See “Clearing the checked-out
status of objects”.
Checking in multiple objects
If you select the Check In menu item for a workspace, PowerBuilder
lists all the objects in the workspace that are available for check-in.
If you select the Check In menu item for a PowerBuilder target that
is currently checked out to you, and at least one of the objects
in that target is also checked out to you, PowerBuilder displays
a dialog box that prompts you to:
- Select multiple
files contained in the target - Check in the target file only
If you select the multiple file option, or if the target file
is not currently checked out to you, the Check In dialog box displays
the list of objects from that target that are available for you
to check in. A check box next to each object in the list lets you
choose which objects you want to check in. By default, check boxes
are selected for all objects that you currently have checked out
of source control.
The Deselect All button in the Check In dialog box lets you
clear all the check boxes with a single click. When none of the
objects in the list is selected, the button text becomes Select
All, and you can click the button to select all the objects in the
list.
You can also select multiple objects (without selecting a
workspace or target) in the List view of the Library painter. The
PowerBuilder SCC API does not let you check in an object that you
have not checked out of source control. If you use multiple object
selection to select an object that is not checked out to you, PowerBuilder
does not include this object in the list view of the Check In dialog
box.
![]() To check in objects to source control:
To check in objects to source control:
-
Right-click the object in the System Tree
or in a Library painter view and select Check In from the pop-up
menu.or
Select the object in a Library painter view and select
Entry>Source Control>Check In from the Library
painter menu.The Check In dialog box displays the name of the object you
selected. If you selected multiple objects or a workspace, the Check
In dialog box displays the list of objects available for check-in.
You can also display a list of available objects when you select
a target file. A check mark next to an object in the list marks
the object as assigned for check-in. -
Make sure the check box is selected next to the
object you want to check in and click OK.
Clearing the checked-out status of objects
Sometimes you need to clear
(revert) the checked-out status of an object without checking it
back into source control. This is usually the case if you modify
the object but then decide not to use the changes you have made.
When you undo a check-out on an object, PowerBuilder replaces your
local copy with the latest version of the object on the source control
server. For PowerScript targets, it compiles and regenerates the
object in its target PBL.
Clearing the status of multiple objects
If you select the Undo Check Out menu item for a PowerBuilder
target that is checked out to you, and at least one of the objects
in that target is also checked out to you, PowerBuilder displays
a dialog box that prompts you to:
- Select multiple
files contained in the target - Undo the checked-out status for the target file
only
If you select the multiple file option, or if the target file
is not currently checked out to you, the Undo Check Out dialog box
displays the list of objects from that target that are locked by
you in source control. A check box next to each object in the list
lets you choose the objects for which you want to undo the checked-out
status. By default, check boxes are selected for all objects that
are currently checked out to you from source control.
You can also select multiple objects (without selecting a target)
in the List view of the Library painter. The PowerBuilder SCC API
does not let you undo the checked-out status of an object that you
have not checked out of source control. If you use multiple object
selection to select an object that is not checked out to you, PowerBuilder
does not include this object in the list view of the Undo Check
Out dialog box.
![]() To clear the checked-out status of entries:
To clear the checked-out status of entries:
-
Right-click the object in the System Tree
or in a Library painter view and select Undo Check Out from the
pop-up menu.or
Select the object in a Library painter view and select
Entry>Source Control>Undo Check Out from the Library
painter menu.The Undo Check Out dialog box displays the name of the object
you selected. If you selected multiple objects, the Undo Check Out
dialog box displays the list of objects in the selection that are
currently checked out to you. You can also display a list of objects
that are checked out to you when you select a target file. -
Make sure that the check box is selected next
to the object whose checked-out status you want to clear,
and click OK.
Synchronizing objects with the source control server
You can synchronize local copies of PowerBuilder objects with
the latest versions of these objects in source control without checking
them out from the source control system. The objects copied to your
local machine are read-only. The newly-copied PowerScript objects
are then compiled into their target PBLs.
If there are exported PowerScript files in your local path
that are not marked read-only, and you did not select the Suppress
Prompts To Overwrite Read-Only Files option, your source
control system may prompt you before attempting to overwrite these
files during synchronization. If you are synchronizing multiple objects
at the same time, you can select:
- Yes To All,
to overwrite all files in your selection. - No To All, to cancel the synchronization for all
objects in the selection that have writable files in the local path.
Synchronizing an object does not lock that object on the source
control server. After you synchronize local objects to the latest
version of these objects in source control, other developers can
continue to perform source control operations on these objects.
If you want only to check whether the status of the objects
has changed on the source control server, you can use the Refresh
Status menu item from the Library painter Entry menu or System Tree
pop-up menus. The Refresh Status command runs on a background thread.
If you do not use the Refresh Status feature before getting the
latest versions of workspace or target objects, then PowerBuilder
has to obtain status and out-of-sync information from the
SCC provider in real time during a GetLatestVersion call.For more
information, see “Refreshing the status of
objects”.
![]() To synchronize a local object with the latest
To synchronize a local object with the latest
source control version:
-
Right-click the object in the System Tree
or in a Library painter view and select Get Latest Version from
the pop-up menu.or
Select the object in a Library painter view and select
Entry>Source Control>Get Latest Version from the
Library painter menu.The Get Latest Version dialog box displays the name of the
object you selected. If you selected multiple objects in the Library
painter List view, the Get Latest Version dialog box lists all the
objects in your selection. If you selected a workspace, the Get
Latest Version dialog box lists all the objects referenced in the
PBG files belonging to your workspace. You can also display a list
of available objects (from the PBG files for a target) when you
select the Get Latest Version menu item for a target file.A check mark next to an object in the list assigns the object
for synchronization. By default only objects that are currently
out of sync are selected in this list. You can use the Select All
button to select all the objects for synchronization. If all objects
are selected, the button text becomes Deselect All. Its function
also changes, allowing you to clear all the selections with a single
click. -
Make sure that the check box is selected next
to the object for which you want to get the latest version, and
click OK.
Refreshing the status of objects
PowerBuilder uses the
source control connection defined for a workspace to check periodically
on the status of all objects in the workspace. You can set the status
refresh rate for a workspace on the Source Control page of the Workspace
Properties dialog box. You can also select the Perform Diff on Status
Update option to detect any differences between objects in your
local directories and objects on the source control server.
For more information about source control options you can
set on your workspace, see “Setting up a connection
profile”.
PowerBuilder stores status information in memory, but it does
not automatically update the source control status of an object
until a System Tree or Library painter node containing that object
has been expanded and the time since the last status update for
that object exceeds the status refresh rate.
Status information can still get out of sync if multiple users
access the same source control project simultaneously and you do
not refresh the view of your System Tree or Library painter. By
using the Refresh Status menu item, you can force a status update
for objects in your workspace without waiting for the refresh rate
to expire, and without having to open and close tree view nodes containing
these objects.
The Refresh Status feature runs in the background on a secondary
thread. This allows you to continue working in PowerBuilder while
the operation proceeds. When the Refresh Status command is executed,
your SCC status cache is populated with fresh status values. This
allows subsequent operations like a target-wide synchronization
(through a GetLatestVersion call) to run much faster.
![]() To refresh the status of objects:
To refresh the status of objects:
-
Right-click the object in the System Tree
or in a Library painter view and select Refresh Status from the
pop-up menu.or
Select the object in a Library painter view and select
Entry>Source Control>Refresh Status from the Library
painter menu.If the object you selected is not a workspace, target, or
PBL file, the object status is refreshed and any change is made
visible by a change in the source control icon next to the object.
If you selected an object in a Library painter view, the status
of this object in the System Tree is also updated.For information about the meaning of source control icons
in PowerBuilder, see “Viewing the status of source-controlled
objects”. -
If the object you selected in step 1 is a workspace
or target file, select a radio button to indicate whether you want
to refresh the status of the selected file only or of multiple files
in the workspace or target. -
If the object you selected in step 1 is a PBL,
or if you selected the multiple files option in step 2, make sure
that the check box is selected next to the object or objects whose
status you want to refresh, and click OK.Status is refreshed for every object selected in the Refresh
Status dialog box. Any change in status is made visible by a change
in the source control icon next to the objects (in the selected
workspace, target, or PBL) that are refreshed.
Comparing local objects with source control versions
The PowerBuilder SCC API lets you compare an object in your
local directory with a version of the object in the source control
archive (or project). By default, the comparison is made with the
latest version in the archive, although most source control systems
let you compare your local object to any version in the archive.
Using this feature, you can determine what changes have been made
to an object since it was last checked into source control.
Setting up PBNative for object comparisons
PBNative does not have its own visual difference utility,
but it does allow you to select one that you have already installed.
You must use only a 32-bit visual difference utility for the object
comparisons.You can select any or all of the following options when
you set up the utility to work with a PBNative repository:
| Option | Select this if |
|---|---|
| Enclose file names in double quotes | Your visual difference utility does not handle spaces in file names. |
| Refer to local PBL entry as argument #1 | You do not want the visual difference utility to use the repository object as the first file in a file comparison. |
| Generate short (8.3) file names | Your visual difference utility does not handle long file names. |
| Generate an extra space prior to file arguments |
Your visual difference utility requires an extra space between files that are listed as arguments when you open the utility from a command line. This option has been added for backward compatibility only, as an extra space was automatically added by PowerBuilder 8. |
![]() To set up PBNative for object comparisons
To set up PBNative for object comparisons
-
Right-click the Workspace object in the
System Tree and click the Source Control tab in the Workspace Properties
dialog box.PBNative should be your selection for the source control system,
and you must have a project and local root directory configured.
If you are connected already to source control, you can skip the
next step. -
Click Connect.
The Connect button is disabled if you are already connected
to source control. -
Click Advanced.
The PBNative Options dialog box displays.
-
Type the path to a visual difference utility followed
by the argument string required by your utility to perform a diff
(comparison) on two objects.Typically, you would add two %s parameter
markers to indicate where PowerBuilder should perform automatic
file name substitution. The following figure shows a setting used
to call the Microsoft WinDiff utility: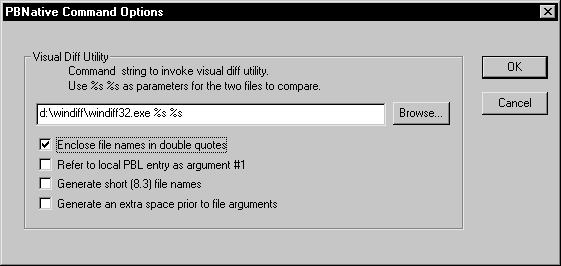
-
(Optional) Select any or all of the check box
options in the PBNative Command Options dialog box for your object
comparisons. -
Click OK twice.
You are now set to use your visual difference utility to compare
objects on the local machine and the server.
Using Show Differences to compare objects
You can select Show Differences from a pop-up menu or from
the Library painter menu bar. If the object you want to compare
has not been added to the source control project defined for your
workspace, the Show Differences menu item is not available.
![]() To compare a local object with the latest source
To compare a local object with the latest source
control version:
-
Right-click the object in the System Tree
or in a Library painter view andselect Show Differences from the pop-up menu.
or
Select the object in a Library painter view and select
Entry>Source Control>Show Differences from the
Library painter menu bar.A dialog box from your source control system displays.
 PBNative connections Skip the next step if you are using a visual difference utility
with PBNative. The difference utility displays the files directly
or indicates that there are no differences between the files. -
Select the source control comparison options you
want and click OK.Some source control systems support additional comparison
functions. You may need to run the source control manager for these
functions. See your source control system documentation for more
information.
Displaying the source control version history
For some source control systems, the PowerBuilder SCC API lets
you show the version control history of an object in source control.
Using this feature, you can determine what changes have been made
to an object since it was first checked into source control.
The Show History menu item is not visible if the object for
which you want to display a version history has not been added to
the source control project defined for your workspace. It is grayed
out if your source control system does not support this functionality
through the PowerBuilder SCC API.
![]() To display the source control version history:
To display the source control version history:
-
Right-click the object in the System Tree
or in a Library painter view andselect Show History from the pop-up menu.
or
Select the object in a Library painter view and select
Entry>Source Control>Show History from the Library
painter menu bar.A dialog box from your source control system displays.
-
Select the source control options you want and
click OK.Some source control systems support additional tracing and
reporting functions for objects in their archives. You may need
to run the source control manager for these functions. See your
source control system documentation for more information.
Removing objects from source control
The PowerBuilder SCC API lets you remove objects from source
control, although for some source control systems, you may have
to use the source control manager to delete the archives for the
objects you remove. You cannot remove an object that is currently
checked out from source control.
You cannot delete a source-controlled object from a local
PowerBuilder workspace before that object has been removed from
source control. There is no requirement, however, that the source
control archive be deleted before you delete the object from its
PowerBuilder workspace.
![]() To remove objects from source control:
To remove objects from source control:
-
Select the object in a Library painter
view and select Entry>Source Control>Remove From
Source Control from the Library painter menu.The Remove From Source Control dialog box displays the name
of the object you selected.If you selected multiple objects or a workspace, the Remove
From Source Control dialog box displays the list of objects in your
selection that are not currently checked out from source control.
You can also display a list of available objects when you select
the Remove From Source Control menu item for a target file. A check
mark next to an object in the list marks the object as assigned
for removal from source control. -
Make sure that the check box is selected next
to the object you want to remove, and click OK.