The PowerBuilder environment
When you start PowerBuilder the first time
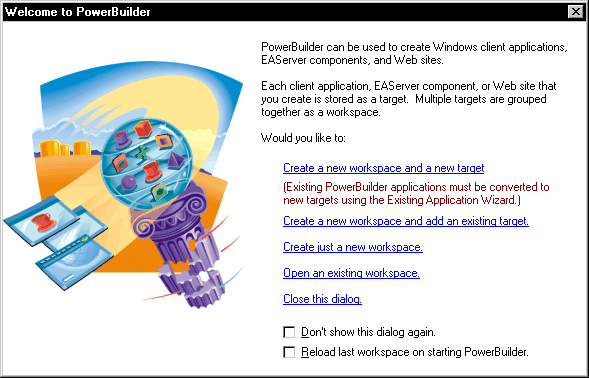
When you start PowerBuilder for the first time, the Welcome
to PowerBuilder dialog box lets you create a new workspace with
or without targets:
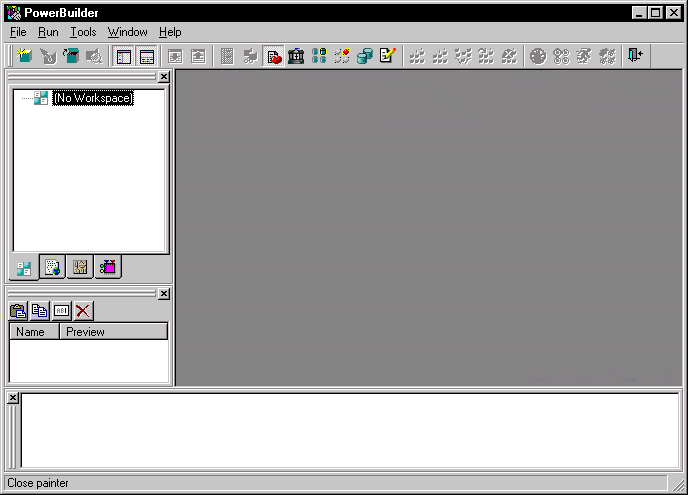
When PowerBuilder starts
When PowerBuilder starts, it opens in a window that contains
a menu bar and the PowerBar at the top, the System Tree and Clip
window on the left, and the Output window at the bottom. The gray
area will display the painters and editors you will open when you
start working with objects.
If you do not create a workspace and target, the PowerBuilder
environment looks like this:
The System Tree window
What it is
The System Tree window provides an active resource of programming information
you will want to use while developing targets. It not only lets
you get information, it also lets you drag objects into painter
views (such as the Script view, Layout view, and HTML editor) for
immediate use.
| This tab | Displays this content |
|---|---|
| Workspace | Workspace contents — including targets, folders, files, and libraries |
| Page | The page components of the active page open in the HTML editor |
| Language | HTML tags, client and server-side object models (objects, properties, methods, and events), and JavaScript, DynaScript, and VBScript syntax elements |
| Components | ActiveX controls, Plugins, Java Applets, JavaBeans, and EAServer hosts available to your target |
The System Tree window displays by default when you start
PowerBuilder for the first time. You can hide or display the System
Tree using the System button on the PowerBar or by selecting Window>System
Tree.
![]() If you’re developing a Web target For information on using the System tree when you are developing
If you’re developing a Web target For information on using the System tree when you are developing
a Web site, see Working with Web Targets
. The
Page and Language tabs are relevant only
when
you are developing a Web target.
Using the Workspace tab page
The Workspace tab page in the System Tree displays the current
workspace and all its targets. PowerScript targets display the library
list for the target and all the objects in each PBL. Web targets
display the contents of the root folder of the Web target. The Workspace
tab page in the System Tree works like a tree view in the Library
painter, but you can keep it open all the time to serve as the control
center of the development environment.
As in the Library painter, you can set the root of the Workspace
page to your computer’s root directory, the current selection,
or any directory or library, as well as to the current workspace.
![]() Working with targets To see the popup menu that lets you perform operations on
Working with targets To see the popup menu that lets you perform operations on
a target such as search, build, and migrate, you must set the root
of the System Tree or the view in the Library painter to the current
workspace.
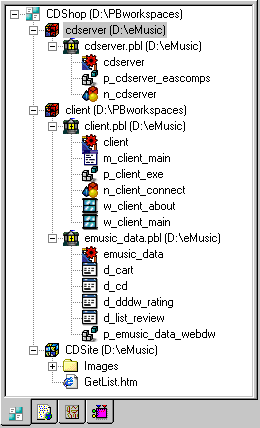
The following illustration shows a workspace with two PowerScript
targets and one web target. One of the PowerScript targets, client,
has a second library, emusic_data.pbl, in its library search
path.
You can use the Workspace page as the hub of your PowerBuilder
session. Popup menus let you build and deploy targets and open and
edit any object. The following table lists the actions you can take
on each item that displays on the Workspace page. You can also set
properties for each item, choose which object types display in the
tree view, change the root of the Workspace page, and reset the
root to the current workspace.
| Item | Menu action items |
|---|---|
| Workspace | New (opens New dialog box), Add Target, Open Workspace, Incremental Build, Full Build, Deploy, Debug, Run, Close, Show, Properties |
| PowerScript target | New, Search, Incremental Build, Full Build, Migrate, Deploy, Debug, Run, Remove Target, Show, Properties |
| Web target | New, Import Files, Import Folder, Incremental Build, Full Build, Deploy, Debug, Run, Remove Target, Show, Properties |
| PBL | Delete, Search, Optimize, Print Directory, Build Runtime Library, Import, Show, Properties |
| PowerBuilder object | Edit, Edit Source, Copy, Move, Delete, Export, Regenerate, Search, Print, PropertiesInherit and Run/Preview are only available for some object types. Source control items are only available if source control information is associated with the target |
| Web target object | Edit, Rename, Delete, Build, Properties |
Using the Page tab page
The Page tab page in the System Tree displays the Microsoft
Internet Explorer object model and hierarchy for the page currently
displayed in the HTML editor. This page is only used with Web targets.
The Page tab lists properties, methods, and events for the
following types of objects on your page:
- Predefined
HTML and JavaScript objects that are part of the IE object model - User-defined objects for which you have set a name
or ID attribute, such as forms and scripts
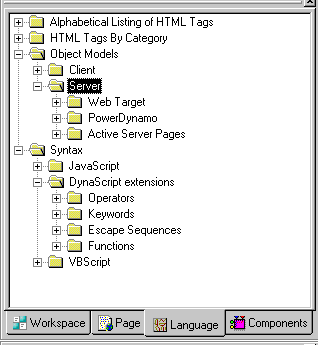
Using the Language tab page
The Language tab page in the System Tree lists the language
elements available to Web targets:
- The HTML
elements and attributes defined in HTML Version 3.2, as well as
extensions to HTML defined by Microsoft and Netscape, organized alphabetically
and by category - Syntax and object models for the client- and server-side
scripting languages used by Web targets
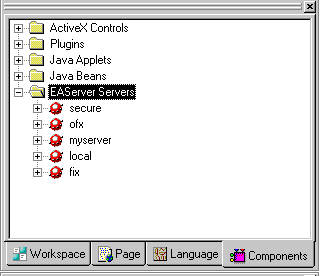
Using the Components tab page
The Components tab page in the System Tree displays the ActiveX
controls, plugins, Java applets, and JavaBeans installed on your
system as well as the EAServer CTS components accessible from your
system.
The PowerBar
What it is
Like the System Tree, the PowerBar provides a main control
point for building PowerBuilder applications. From the PowerBar you
can create new objects and applications, open existing objects,
and debug and run the current application.

Buttons on the PowerBar
When you are getting
used to using PowerBuilder, you may want to display a label on each
button to remind you of its purpose. To do so, place your cursor to
the right of the last button, click the right mouse button, and
select Show Text from the popup menu.
From left to right on the PowerBar, here are the buttons and
what you can do after you click a button:
| This PowerBar button | Lets you do this |
|---|---|
| New | Create new objects |
| Inherit | Create new windows, user objects, and menus by inheriting from an existing object |
| Open | Open existing objects |
| Run/Preview | Run windows or preview DataWindows |
| System Tree | Work in the System Tree window, which can serve as the hub of your development session. For more information see “The System Tree window “ |
| Output Window | Examine the output of a variety of operations (migration, builds, deployment, project execution, object saves, and searches). See “The Output window” |
| Next Error, Previous Error | Navigate through the Output window |
| To-Do List | Keep track of development tasks you need to do for the current application and use links to quickly get you to the place where you complete the tasks |
| Browser | View information about system objects and objects in your application, such as their properties, events, functions, and global variables, and copy, export, or print the information |
| Clip Window | Store objects or code you use frequently. You can drag or copy items to the Clip window to be saved and then drag or copy these items to the appropriate painter view when you want to use them. See “The Clip window” |
| Library | Manage your libraries using the Library painter |
| DB Profile | Define and use named sets of parameters to connect to a particular database |
| EAServer Profile | Define the connection parameters for a particular server. You can then use this predefined profile whenever you need to connect to EAServer |
| Database | Maintain databases and database tables, control user access to databases, and manipulate data in databases using the Database painter |
| Edit | Edit text files (such as source, resource, and initialization files) in the file editor |
| Incremental Build Workspace | Update all the targets and objects in the workspace that have changed since the last build |
| Full Build Workspace | Update all the targets and objects in the workspace |
| Deploy Workspace | Deploy all the targets in the workspace |
| Skip, Stop | Interrupt a build, deploy, or search operation. When a series of operations is in progress, such as a full deploy of the workspace, the Skip button lets you jump to the next operation. The Stop button cancels all operations |
| Debug | Debug the last target you ran or debugged. You can set breakpoints and watch expressions, step through your code, examine and change variables during execution, and view the call stack and objects in memory |
| Select & Debug | Select a target and open the Debugger |
| Run | Run the last target you ran or debugged just as your users would run it |
| Select & Run | Select a target and run it |
| Exit | Close PowerBuilder |
Customizing the PowerBar
You can customize the PowerBar. For example, you can choose
whether to move the PowerBar around, add buttons for operations
you perform frequently, and display text in the buttons.
For more information, see “Using toolbars”.
About PowerTips
In the PowerBar, you’ll notice that when you leave
the mouse pointer over a button for a second or two, PowerBuilder displays
a brief description of the button, called a PowerTip. PowerTips display in PowerBuilder wherever
there are toolbar buttons.
The Clip window
What it is
You can store code fragments you use frequently in the Clip
window. You copy text to the Clip window to save it and then drag
or copy this text to the appropriate Script view or editor when
you want to use it.
Using the Clip window
The Clip window displays a list of named clips and a preview
of the information contained in each. It provides buttons to move
Clip window contents to the clipboard, copy clipboard contents to
the Clip window, rename a clip, and delete a clip. Clips you save
in one workspace are available in all your workspaces; you may want
to use a naming convention that reflects this.
For example, you might use standard error-checking code when
you use the ConnectToServer function to connect to EAServer. To
copy it to the clipboard, highlight the code in a Script view and
select Copy from the popup menu. In the Clip window, click the Paste
icon, and name the clip. Now you can drag the clip from the Clip
window to any script in which you want to connect to EAServer. You
can also use the Copy icon to copy the clip to the clipboard.
You can hide or display the Clip window using the Clip Window
button on the PowerBar or by selecting Window>Clip.

The Output window
What it is
The output of a variety of operations (migration, builds,
deployment, project execution, object saves, and searches) displays
in the Output window. You control operations in the window using
the Skip, Stop, Next Error, and Previous Error buttons or menu options.
You can hide or display the Output window using the Output
button on the PowerBar or by selecting Window>Output.

Using the Output window
When appropriate, lines in the Output window provide links
that invoke the appropriate painter when you double-click on that
line. The popup menu also provides the options Edit and Edit Source
to open an object in a painter or the Source editor.