Building a new window
This section describes how to build windows from scratch.
You use this technique to create windows that are not based on existing
windows.
Creating a new window
![]() To create a new window:
To create a new window:
-
Open the New dialog box.
-
On the PB Object tab page, select Window.
-
Click OK.
The Window painter opens. The new window displays in the Window painter’s
Layout view and its default properties display in the Properties view.
Defining the window’s properties
Every window and control has a style that determines how it
appears to the user. You define a window’s style by choosing
settings in the Window painter’s Properties view. A window’s style encompasses
its:
- Type
- Basic appearance
- Initial position on the screen
- Icon when minimized
- Pointer
![]() About defining a window’s style When you define a window’s style in the Window painter,
About defining a window’s style When you define a window’s style in the Window painter,
you are actually assigning values to the properties for the window.
You can programmatically change a window’s style during
execution by setting its properties in scripts. For a complete list
of window properties, see Objects and Controls
.
![]() To specify window properties:
To specify window properties:
-
Click
the window’s background to display the window’s
properties in the Properties view. Another way to display window properties You can also select the window name in the Control List view.
 -
Choose the tab appropriate to the property you
want to specify:
| To specify the window’s | Choose this tab |
|---|---|
| Name, type, state, color, and whether a menu is associated with it |
General |
| Icon to represent the window when you minimize it |
General |
| Transparency | General |
| Opening and closing animation styles | General |
| Position and size when it displays at runtime |
Other |
| Default cursor whenever the mouse moves over the window |
Other |
| Horizontal and vertical scroll bar placement | Scroll |
| Toolbar placement | Toolbar |
Using the General property page
Use the General property page to specify the following window
information:
- Window type
- Title bar text
- Menu name
- Color
- Transparency
- Animation
Specifying the window’s type
The first thing you should do is specify the type of window
you are creating.
![]() To specify the window’s type:
To specify the window’s type:
-
In the Properties view for the window,
select the General tab. -
Scroll down the property page and select the appropriate
window type from the WindowType drop-down list.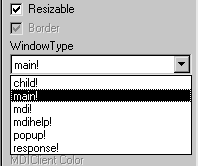
Depending on the type of window, PowerBuilder enables or disables
certain check boxes that specify other properties of the window.
For example, if you are creating a main window, the Title Bar check
box is disabled. Main windows always have title
bars, so you cannot clear the Title Bar check box.
Specifying other basic window properties
By selecting and clearing check boxes on the General property
page, you can specify whether the window is resizable or minimizable,
is enabled, has a border, and so on.
Note the following:
- A main window must
have a title bar - A child window cannot have a menu
- A response window cannot have a menu, Minimize box,
or Maximize box
Associating a menu with the window
Many of your windows will have a menu associated with them.
![]() To associate a menu with the window:
To associate a menu with the window:
-
Do one of the following:
- Enter
the name of the menu in the Menu Name text box on the General property
page - Click the Browse button and select the menu from
the Select Object dialog box, which displays a list of all menus
available to the application
- Enter
-
Click the Preview button in the PainterBar to
see the menu.For information about preview, see “Viewing your work “.
![]() Changing the menu You can change a menu associated with a window during execution
Changing the menu You can change a menu associated with a window during execution
using the ChangeMenu function. For more information,
see the PowerScript Reference
.
Choosing a window color
You can change the background color of your window.
![]() To specify the color of a window:
To specify the color of a window:
-
Do one of the following:
- Specify the color of the window from the BackColor
drop-down list on the General property page - If the window is an MDI window, specify a color
in the MDI Client Color drop-down list
- Specify the color of the window from the BackColor
Changing default window colors
For main, child, pop-up, and response windows, the default
color is ButtonFace if you are defining a 3D window, and white if
you are not. If you or the user specified different display colors
in the Windows Control Panel, a 3D window will display in the color
that is set for the window background.
You can change the default for windows that are not 3D in
the Application painter Properties view. To do so, click the Additional
Properties button on the General page and modify the Background
color on the Text Font tab page. New windows that are not 3D will
have the new color you specified.
For more about using colors in windows, including
how to define your own custom colors, see Chapter 12, “Working with Controls .”
Choosing the window icon
If the window can be minimized, you can specify an icon to
represent the minimized window. If you do not choose an icon, PowerBuilder
uses the application icon for the minimized window.
![]() To choose the window icon:
To choose the window icon:
-
Click the window’s background
so the Properties view displays window properties. -
Select the General tab.
-
Choose the icon from the Icon drop-down list or
use the Browse (…) button to select an icon (.ICO)
file.The icon you chose displays in the Icon list.
![]() Changing the icon at runtime You can change the window icon at runtime by assigning in
Changing the icon at runtime You can change the window icon at runtime by assigning in
code the name of the icon file to the window’s Icon property,
window.Icon.
Specifying the window’s transparency
You can specify a value between 1 and 100% for the
Transparency property of a window. This property is useful if you
want a non-modal dialog box to remain visible but become semi-transparent
when it loses focus.
Opening and closing windows
with an animated effect
You can use a special effect when a window opens or closes.
Effects include fading in or out, opening from the center, and sliding
or rolling from the top, bottom, left, or right. You specify animation
effects with the OpenAnimation, CloseAnimation, and AnimationTime
properties. Set the AnimationTime property to between 1 and 5000
milliseconds to specify how long the animation effect takes to complete.
For example, if your application displays a splash screen
while the application’s main window is initializing, you
can set the splash screen’s CloseAnimation property to
have the window fade out rather than just disappearing when the
application is initialized or after a timeout by setting the CloseAnimation
property to FadeAnimation!.
Choosing the window’s size and position
![]() To resize a window in the Layout view:
To resize a window in the Layout view:
-
Drag the edge of the window in the Window
painter’s Layout view.
Resizing a window is easiest using the Layout view, but you
can also change the window’s width and height properties
in the Properties view.
![]() To specify a window’s position and size:
To specify a window’s position and size:
-
Click the window’s background
so the Properties view displays window properties. -
Select the Other tab.
-
Enter values for x and y locations in PowerBuilder
units. About x and y values For main, pop-up, response, and MDI frame windows, x and y
locations are relative to the upper-left corner of the screen. For
child windows, x and y are relative to the parent. -
Enter values for width and height in PowerBuilder
units.The size of the window changes in the Layout view.
-
To see the position of the window, click the Preview
button in the PainterBar (not the Preview button on the PowerBar). -
To return to PowerBuilder, close the window.
For information about preview, see “Viewing your work “.
About PowerBuilder units
All window measurements are in PowerBuilder units (PBUs).
Using these units, you can build applications that look similar
on different resolution screens. A PBU is defined in terms of logical
inches. The size of a logical inch is defined by your operating
system as a specific number of pixels. The number is dependent on
the display device. Windows typically uses 96 pixels per logical
inch for small fonts and 120 pixels per logical inch for large fonts.
Almost all sizes in the Window painter and in scripts are
expressed as PowerBuilder units. The two exceptions are text size,
which is expressed in points, and grid size in the Window and DataWindow
painters, which is in pixels.
For more about PowerBuilder units, see the PowerScript
Reference
.
Choosing the window’s pointer
The default pointer used when the mouse is over a window is
an arrow. You can change this default on the Other page in the properties
view.
![]() To choose the window pointer:
To choose the window pointer:
-
Click the window’s background
so the Properties view displays window properties. -
Select the Other tab.
-
At the bottom of the property page, choose the
pointer from the Pointer drop-down list or use the Browse (…)
button to select a cursor (.CUR) file.
![]() Specifying the pointer for a control You can specify the pointer that displays when the mouse is
Specifying the pointer for a control You can specify the pointer that displays when the mouse is
over an individual control. Select the control to display the Properties
view for the control, then specify the Pointer property on the Other
page.
Specifying window scrolling
If your window is resizable, it is possible that not all the
window’s contents will be visible during execution. In
such cases, you should make the window scrollable by providing vertical
and horizontal scroll bars. You do this on the Scroll property page.
By default, PowerBuilder controls scrolling when scroll bars
are present. You can control the amount of scrolling.
![]() To specify window scrolling:
To specify window scrolling:
-
Click the window’s background
so the Properties view displays window properties. -
Select the Scroll tab.
-
Indicate which scroll bars you want to display
by selecting the HScrollBar and VScrollBar check boxes. -
Specify scrolling characteristics as follows:
Option Meaning UnitsPerLine The number of PowerBuilder units to scroll
up or down when the user clicks the up or down arrow in the vertical scroll
bar. When the value is 0 (the default), it scrolls 1/100 the
height of the window.UnitsPerColumn The number of PowerBuilder units to scroll
right or left when the user clicks the right or left arrow in the
horizontal scroll bar. When the value is 0 (the default), it scrolls
1/100 the width of the window.ColumnsPerPage The number of columns to scroll when
the user clicks the horizontal scroll bar itself. When the value
is 0 (the default), it scrolls 10 columns.LinesPerPage The number of lines to scroll when the
user clicks the vertical scroll bar itself. When the value is 0
(the default), it scrolls 10 lines.
Specifying toolbar properties
You can specify whether or not you want to display a menu
toolbar (if the menu you associate with your window assigns toolbar
buttons to menu objects) in your window. If you choose to display
the toolbar, you can specify the location for it.
![]() To specify toolbar properties:
To specify toolbar properties:
-
Click the window’s background
so the Properties view displays window properties. -
Select the Toolbar tab.
-
To display the toolbar with your window, select
the ToolbarVisible check box. -
Set the location of the toolbar by selecting an
alignment option from the ToolbarAlignment drop-down list. -
If you choose Float as your toolbar alignment,
you must set the following values:- X and Y coordinates
for the toolbar - Width and Height for the toolbar
- X and Y coordinates
For more information about defining toolbars,
see Chapter 14, “Working with Menus and Toolbars.”
Adding controls
When you build a window, you place controls, such as CheckBox, CommandButton,
and MultiLineEdit controls, in the window to request and receive
information from the user and to present information to the user.
After you place a control in the window, you can define its
style, move and resize it, and write scripts to determine how the
control responds to events.
For more information, see Chapter 12, “Working with Controls .”
Adding nonvisual objects
You can
automatically create nonvisual objects in a window by inserting
a nonvisual object in the window. You do this if you want the services
of a nonvisual object available to your window. The nonvisual object
you insert can be a custom class or standard class user object.
You insert a nonvisual object in a window
in the same way you insert one in a user object. For more information,
see “Using class user objects”.
Saving the window
You can save the window you are working on at any time.
![]() To save a window:
To save a window:
-
Select File>Save from the menu
bar.If you have previously saved the window, PowerBuilder saves
the new version in the same library and returns you to the Window
painter workspace.If you have not previously saved the window, PowerBuilder
displays the Save Window dialog box. -
Name the window in the Windows text box (see below).
-
Type comments in the Comments text box to describe
the window.These comments display in the Select Window window and in
the Library painter. It is a good idea to use comments so you and
others can easily remember the purpose of the window later. -
Specify the library where you want to save the
window. -
Click OK.
Naming the window
The window name can be any valid PowerBuilder identifier of
up to 40 characters. For information about PowerBuilder identifiers,
see the PowerScript Reference
.
A commonly used convention is to preface all window names
with w_ and use a suffix that helps
you identify the particular window. For example, you might name
a window that displays employee data w_empdata.