Using the Preview view of a DataWindow object
You use the Preview view of a DataWindow object to view it as it
will appear with data and test the processing that takes place in
it.
 To display the Preview view of a DataWindow object open
in the DataWindow painter:
-
If the Preview view is not already displayed,
select View>Preview from the menu bar.In the Preview view, the bars that indicate the bands do not
display, and, if you selected Retrieve on Preview in the DataWindow wizard, PowerBuilder retrieves
all the rows from the database. You are prompted to supply arguments
if you defined retrieval arguments. In external DataWindow objects If the DataWindow object uses the External data source, no data is retrieved. You
can import data, as described in “Importing data into a DataWindow object”. In DataWindow objects that have stored data If the DataWindow object has stored data in it, no data is retrieved
from the database.As the rows are being retrieved, the Retrieve button in the PainterBar changes
to a Cancel button. You can click the Cancel button to stop the retrieval. -
Test your DataWindow object.
For example, modify some data, update the database, re-retrieve
rows, and so on, as described below.
Retrieving data
Where PowerBuilder gets data
PowerBuilder follows this order of precedence to supply the
data in your DataWindow object:
- If you have saved data in the DataWindow object, PowerBuilder uses
the saved rows from the DataWindow object and does not retrieve data from the
database. - PowerBuilder uses the data in the cache, if there
is any. - If there is no data in the cache yet, PowerBuilder retrieves
data from the database automatically, with one exception. If the
Retrieve on Preview option is off, you have to request retrieval
explicitly, as described next.
Previewing without retrieving data
If you do not want PowerBuilder to retrieve data from the database automatically
when the Preview view opens, you can clear the Retrieve on Preview
option. The Preview view shows the DataWindow object without retrieving
data.
To be able to preview without retrieving data
automatically:
-
Select Design>Options from the
menu bar.The DataWindow Options dialog box displays.
-
Clear the Retrieve on Preview check box on the
General page.When this check box is cleared, your request to preview the DataWindow object does
not result in automatic data retrieval from the database.
Retrieve on Preview check box is available in the DataWindow wizards During the initial creation of a DataWindow object, you can set the
Retrieve on Preview option.
PowerBuilder uses data caching
When PowerBuilder first retrieves data, it stores the data internally.
When it refreshes the Preview view, PowerBuilder displays the stored
data instead of retrieving rows from the database again. This can
save you a lot of time, since data retrieval can be time consuming.
How using data from the cache affects you
Because PowerBuilder accesses the cache and does not automatically
retrieve data every time you preview, you might not have what you
want when you preview. The data you see in preview and the data
in the database can be out of sync.
For example, if you are working with live data that changes
frequently or with statistics based on changing data and you spend
time designing the DataWindow object, the data you are looking at may no
longer match the database. In this case, retrieve again just before
printing.
Explicitly retrieving data
You can explicitly request retrieval at any time.
To retrieve rows from the database:
-
Do one of the following:
- Click
the Retrieve button in the PainterBar. - Select Rows>Retrieve from the menu bar.
- Select Retrieve from the Preview view’s
pop-up menu.
Supplying argument values or criteria If the DataWindow object has retrieval arguments or is set up to
prompt for criteria, you are prompted to supply values for the arguments
or to specify criteria.PowerBuilder retrieves the rows. As PowerBuilder retrieves, the
Retrieve button changes to a Cancel button. You can click the Cancel
button to stop the retrieval at any time. - Click
Sharing data with the Data view
The Data view displays data that can be used to populate a DataWindow object. When
the ShareData pop-up menu item in the Data view is checked, changes you
make in the Data view are reflected in the Preview view and vice
versa.
Other options that affect retrieval
These other options can affect retrieval:
- Retrieve Rows As Needed Lets you specify that only the rows needed to display the
current portion of the DataWindow object should be retrieved. When you
scroll downward, additional rows are retrieved. This can speed up
reporting in certain situations.
See “Retrieving rows as needed”. - Retrieve Rows to Disk Lets you specify that PowerBuilder should save retrieved data
on your hard disk in a temporary file rather than keep the data
in memory. When you preview the DataWindow object, PowerBuilder swaps rows
of data from the temporary file into memory as needed.
For information, see “Saving retrieved rows to
disk “.
Modifying data
You can add, modify, or delete rows in the Preview view. When
you have finished manipulating the data, you can apply the changes
to the database.
Changing input language
You (and your users) can add or modify data in a DataWindow
object in multiple input languages. If you use multiple input languages,
you can display a Language bar on your desktop to change the current
input language. In a DataWindow object, the input language in effect
the first time a column gets focus becomes the default input language
for that column. If you subsequently change the input language when
that column has focus, the new input language becomes the default
for that column. This behavior does not apply to columns that have
the RightToLeft property set.
If looking at data from a view or from more than one
table By default, you cannot update data in a DataWindow object that contains
a view or more than one table. For more about updating DataWindow objects, see Chapter 21, “Controlling Updates in DataWindow Objects.”
To modify existing data:
-
Tab to the field and enter a new value.
The Preview view uses validation rules, display formats, and
edit styles that you have defined for the columns, either in the
Database painter or in this particular DataWindow object.
To save the changes to the database, you must apply them,
as described next.
To add a row:
-
Click the Insert Row button.
PowerBuilder creates a blank row.
-
Enter data for a row.
To save the changes to the database, you must apply them,
as described below.
Adding a row in an application Clicking the Insert Row button in the Preview view is equivalent
to calling the InsertRow method and then the ScrollToRow method
at runtime.
To delete a row:
-
Click the Delete Row button.
PowerBuilder removes the row from the display.
To save the changes to the database, you must apply them,
as described below.
Deleting a row in an application Clicking the Delete Row button in the Preview view is equivalent
to calling the DeleteRow method at runtime.
To apply changes to the database:
-
Click the Update Database button.
PowerBuilder updates the table with all the changes you have
made.
Applying changes in an application Clicking the Update Database button in the Preview view is
equivalent to calling the Update method at runtime.
Viewing row information
You can display information about the data you have retrieved.
To display the row information:
-
Select Rows>Described from the
menu bar.The Describe Rows dialog box displays, showing the number
of:- Rows that have been deleted
in the painter but not yet deleted from the database - Rows displayed in the Preview view
- Rows that have been filtered
- Rows that have been modified in the painter but
not yet modified in the database
- Rows that have been deleted
All row counts are zero until you retrieve the data from the
database or add a new row. The count changes when you modify the
displayed data or test filter criteria.
Importing data into a DataWindow object
You can import and
display data from an external source and save the imported data
in the database.
To import data into a DataWindow object:
-
Select Rows>Import from the menu
bar. -
Specify the file from which you want to import
the data.The types of files that you can import into the painter display
in the List Files of Type drop-down list. -
Click Open.
PowerBuilder reads the data from the file into the DataWindow painter. You
can then click the Update Database button in the PainterBar to add
the new rows to the database.
Data from file must match DataWindow definition When importing data from a file, the datatypes of the data
must match, column for column, all the columns in the DataWindow definition
(the columns specified in the SELECT statement),
not just the columns that are displayed in the DataWindow object.
For information about importing XML data, see Chapter 29, ” Exporting
and Importing XML Data.”
Using print preview
You can print the data displayed in the Preview view. Before
printing, you can preview the output on the screen. Your computer must
have a default printer specified, otherwise properties handled by
the printer driver, such as page orientation, are ignored.
To preview printed output before printing:
-
Be sure the Preview view is selected (current)
and then select File>Print Preview from the menu bar.Print Preview displays the DataWindow object as it will print.
Using the IntelliMouse pointing device Using the IntelliMouse pointing device, users can scroll
a DataWindow object by rotating the wheel. Users can also zoom a DataWindow object larger
or smaller by holding down the Ctrl key while rotating the wheel.
Controlling the display of rulers
You can choose whether to display rulers around page borders.
To control the display of rulers in Print Preview:
-
Select/deselect File>Print
Preview Rulers from the menu bar.
Changing margins
You can dynamically change margins while previewing a DataWindow object.
To change the margins in Print Preview:
-
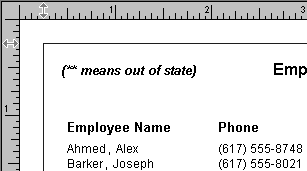
Drag the margin boundaries on the rulers.
The following picture shows the left and top margin boundaries.
There are also boundaries for the right and bottom margins. The
picture shows the outline of the margin. If you do not want to see
the outline, clear the Print Preview Shows Outline check box on
the Print Specifications page in the Properties view.
Changing margins at runtime Using the Modify method, you can display
a DataWindow object in print preview at runtime. While in print preview,
users can also change margins by dragging boundaries. A user event
in the DataWindow control (pbm_dwnprintmarginchange) is
triggered when print margins are changed. Changing margins can affect
the page count, so if you use the Describe method to
display the page count in your application (for example, in MicroHelp),
you must code a script for the user event to recalculate the page
count.
Zooming the page
You can reduce or enlarge the amount of the page that displays
in the Print Preview view. This does not affect the printed output.
To zoom the page on the display screen:
-
Select File>Print Preview Zoom
from the menu bar. -
Select the magnification you want and click OK.
The display of the page zooms in or out as appropriate. The
size of the contents of the page changes proportionately as you
zoom. This type of zooming affects your display but does not affect
printing.
Zooming the contents
In addition to zooming the display on the screen, you can
also zoom the contents, affecting the amount of material that prints
on a page.
To zoom the contents of a DataWindow object with respect
to the printed page:
-
Select Design>Zoom from the menu
bar. -
Select the magnification you want and click OK.
The contents of the page zooms in or out as appropriate. If
you enlarge the contents so they no longer fit, PowerBuilder creates
additional pages as needed.
Printing data
You can print a DataWindow object while the Preview view is displayed.
You can print all pages, a range of pages, only the current page,
or only odd or even pages. You can also specify whether you want
multiple copies, collated copies, and printing to a file.
Avoiding large rows
To avoid multiple blank pages and other anomalies in printed
reports, no row in the DataWindow object should be larger than the size
of the target page. The page boundary is often reached in long text
columns with AutoSizeHeight on. It can also be reached when detail
rows are combined with page and group headers and trailers, or when
they contain multiple nested DataWindow objects or a column that has been
resized to be larger than the page.
When a row contains large multiline edit columns, it can be
broken into a series of rows, each containing one text line. These
text lines become the source for a nested DataWindow object. The nested DataWindow object determines
how many of its rows fit in the remaining page space.
Page break before last row
The summary band in a report is always printed on the same
page as the last row of data. This means that you sometimes
find a page break before the last row of data even if
there is sufficient space to print the row. If you want the last row
to print on the same page as the preceding rows, the summary
band must be made small enough to fit on the page as well.
To change printers or settings before printing
You can choose File>Printer Setup from the menu bar.
To print a DataWindow object:
-
Select File>PrintReport from the
menu bar to display the Print dialog box. -
Specify the number of copies to print.
-
Specify the pages: select All or Current Page,
or type page numbers and/or page ranges in the Pages box. -
Specify all pages, even pages, or odd pages in
the Print drop-down list. -
If you want to print to a file rather than to
the printer, select the Print to File check box. -
If you want to change the collating option, clear
or select the Collate Copies check box and click OK.If you specified print to file, the Print to File dialog box
displays. -
Enter a file name and click OK.
The extension PRN indicates that the
file is prepared for the printer. Change the drive, the directory,
or both, if you want.
Working in a grid DataWindow object
If you are viewing a grid-style DataWindow object in the Preview
view, you can make the following changes. Whatever you do in the
Preview view is reflected in the Design view:
- Resize columns
- Reorder columns
- Split the display into two horizontal scrolling
regions
You can use this feature to keep one or more columns stationary
on the screen while scrolling through other columns. - Copy data to the clipboard
These features are also available to your users Users of your application can also manipulate columns in these
ways in a grid DataWindow object at runtime.
To resize a column in a grid DataWindow object:
-
Position the mouse pointer
at a column boundary in the header.The pointer changes to a two-headed arrow.
-
Press and hold the left mouse button and drag
the mouse to move the boundary. -
Release the mouse button when the column is the
correct width.
To reorder columns in a grid DataWindow object:
-
Press and hold the left mouse button on
a column heading.PowerBuilder selects the column and displays a line representing
the column border. -
Drag the mouse left or right to move the column.
-
Release the mouse button.
To use split horizontal scrolling in a grid DataWindow object:
-
To divide the grid into two regions that
can scroll independently of each other, position the mouse pointer
at the left end of the horizontal scroll bar.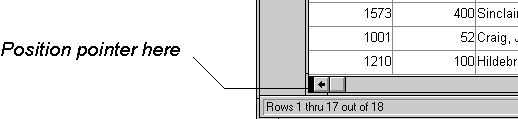
The pointer changes to a two-headed arrow.
-
Press and hold the left mouse button and drag
the mouse to the right to create a new horizontal scrolling border. -
Release the mouse button.
You now have two independent scrolling regions in the grid DataWindow object.
To copy data to the clipboard from a grid DataWindow object:
-
Select the cells whose data you want to
copy to the clipboard:- To select an entire column, click its header.
- To select neighboring columns, press and hold Shift,
then click the headers. - To select non-neighboring columns, press and hold
Ctrl, then click the headers. - To select cells, press the left mouse button on
the bottom border of a cell and drag the mouse.
Selected cells are highlighted.
-
Select Edit>Copy from the menu bar.
The contents of the selected cells are copied to the clipboard.
If you copied the contents of more than one column, the data is
separated by tabs.