Preparations
Before making changes to the PowerBuilder client app, let’s follow
the steps below to make sure 1) the PowerBuilder application can run
successfully, 2) the app has been deployed as an installable cloud app
successfully, and 3) the PowerServer C# solution (including the built-in
JWT server) has been successfully generated.
In this tutorial, we will take Sales Demo as an example.
Step 1: Select Windows Start |
Appeon PowerBuilder 2022 R2, and then
right-click Example Sales App and
select More | Run
as administrator.
Step 2: When the SalesDemo workspace is loaded in the PowerBuilder
IDE, click the Run button in the
PowerBuilder toolbar.
Step 3: When the application main window is opened, click the
Address icon in the application ribbon
bar and make sure data can be successfully retrieved.
Step 4: Create and configure a PowerServer project for the Sales
Demo app (detailed instructions are provided in Quick Start > Guide 1).
IMPORTANT: In the Security page, select Use
built-in JWT server from the Auth
Template list box, view the license terms, and select the
“I have read and agree to the
license…” option.

Step 5: Deploy the application as an installable cloud app. The
PowerServer C# solution is generated, but the installable cloud app
cannot run yet because further settings and changes are required, as
explained in the subsequent sections.
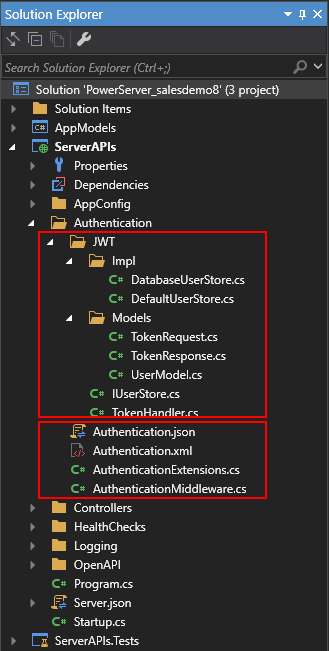
The PowerServer C# solution contains a built-in JWT server and the
authentication class files as shown below.
-
The built-in JWT server authenticates the user credential and
returns a token. The built-in server is included in the ServerAPIs project; it runs automatically
when the PowerServer Web APIs (the ServerAPIs project) runs.-
DefaultUserStore.cs
defines two users by default. You can change this file to define
more users. These users will be used by the built-in server to
validate the users passed from the client.The users can also be defined and stored in the database.
Refer to Validate username
and password against a database for more
information. -
DatabaseUserStore.cs can
be added with scripts to connect with an authentication database
where the users are defined and stored.
-
-
The authentication class and configuration files will be used
by the PowerServer Web APIs to validate the token passed from the
client and, if validation is successful, data will be obtained from
the database.-
Authentication.json
contains the settings for enabling the authentication feature
(“PowerServer:EnableAuthentication”) and specifying the JWT
token information (“JwtSetting”).The “PowerServer:EnableAuthentication” setting is set to
true by default. Setting it to
false will turn off the
authentication feature. The “JwtSetting” block is used to
specify the token information including the issuer, audience and
security key.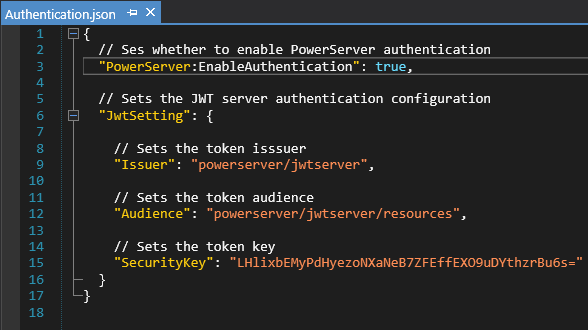
-