DatePicker
The DatePicker control provides an easy way for a user to select
a single date. The user can choose to edit the date in the control or
to select a date from a drop-down calendar. The calendar is similar to
the MonthCalendar control, which can be used to select a range of
dates. As an alternative to the drop-down calendar, you can set the
ShowUpDown property to display up and down arrows that allow users to
specify one element of the date at a time.
The drop-down calendar can only be used to select a date. The up
and down arrows lets users specify a time as well as a date. The
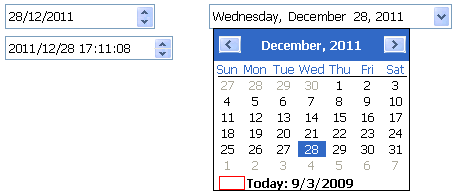
following illustration shows three DatePicker controls. The controls
on the left have the ShowUpDown property set. One uses the standard
date format, and the other uses a custom format that displays the date
and time. The control on the right uses the default drop-down calendar
option and the standard long date format.
You can set initial properties for the appearance and behavior
of the control in the Properties view. Properties that apply to the
drop-down calendar portion of the control are similar to the
properties that apply to the MonthCalendar control and display on the
Calendar page in the Properties view. For example, you can choose
which day of the week displays as the first day in the week, whether
the current date is circled, and whether a “Today Section” showing the
current date displays at the bottom of the calendar.
Specifying a format
You can choose to display the date in the DatePicker control as
a long date, a short date, a time, or with a custom format. To set a
custom format in the painter, select dtfCustom! from the Format list
and type the format in the Custom Format field. For example, the
second control on the left in the previous illustration uses the
custom format yyyy/MM/dd HH:mm:ss. The uppercase H for the hour format
specifies a 24-hour clock. The following statements set the Format
property to use a custom format and set the CustomFormat property to
show the full name of the month, the day of the month followed by a
comma, and the four-digit year:
|
1 2 |
dp_1.Format = dtfCustom! dp_1.CustomFormat = "MMMM dd, yyyy" |
For a complete list of formats you can use, see the description
of the CustomFormat property in the section called “CustomFormat” in Objects and Controls.
Specifying maximum and minimum
dates
The MaxDate and MinDate properties determine the range of dates
that a user can enter or pick in the control. If you set a restricted
range, the calendar displays only the months in the range you set, and
if users type a date outside the range into the control, the date
reverts to its previous value.
Editing modes
When a user tabs into a DatePicker control, the control is in
normal editing mode and behaves in much the same way as an EditMask
control with a Date or DateTime mask. Users can edit the part of the
date (year, month, day, hour, minutes, or seconds) that has focus
using the up/down arrow keys on the keyboard or, for numeric fields,
the number keys. Use the left/right arrow keys to move between parts
of the date.
If the control has a drop-down calendar, users can navigate from
one month or year to another using the controls in the calendar and
click to select a date. If the ShowUpDown option is set, users can
change the selected part of the date or time with the up and down keys
in the control. To navigate in the drop-down calendar, a user
can:
-
Click the arrows in the top corners to move from month to
month -
Click the month to display a list of months, then click a
month to select it -
Click the year to display a spin control, then use the spin
control’s arrows to select a year -
Click a date to select the date and close the
calendar -
Press the Esc key to close the calendar without changing the
selection
Allowing users to edit the date
directly
You can give users a third way to change the date by setting the
AllowEdit property to “true”. The user can then press F2 or click in
the control to select all the text in the control for editing. When
the control loses focus, the control returns to normal editing mode
and the UserString event is fired. The UserString event lets you test
whether the text the user entered in the control is a valid date and
set the value to the new date if it is valid. If it is valid, you can
use the event’s dtm by reference argument to set the value to the new
date. This code in the UserString event tests whether the date is
valid and within range:
|
1 2 3 4 5 6 7 8 9 10 11 12 |
Date d IF IsDate(userstr) THEN d = Date(userstr) IF (this.maxdate >= d and this.mindate <= d) THEN dtm = DateTime(d) ELSE MessageBox("Date is out of range", userstr) END IF ELSE MessageBox("Date is invalid", userstr) END IF |
The Value property
The Value property contains the date and time to which the
control is set. If you do not specify a date, the Value property
defaults to the current date and time. You can set the property in the
painter or in a script. If you change the value at runtime, the
display is updated automatically. The Value property has two parts
that can be obtained from the DateValue and TimeValue properties.
These properties should be used only to obtain the date and time parts
of the Value property; they cannot be used to set a date or time. The
Text property and the GetText function return the Value property as a
string formatted according to your format property settings.
You can use the SetValue function to set the Value property in a
control using separate date and time values or a single DateTime
value. This example sets the property control using separate date and
time values:
|
1 2 3 4 5 6 7 |
date d time t d=date("2016/12/27") t=time("12:00:00") dp_1.SetValue(d, t) |
This example sets the Value property using a DateTime
value:
|
1 2 3 4 5 6 |
date d time t datetime dt dt = DateTime(d, t) dp_1.SetValue(dt) |
Localizing the DatePicker
control
The DatePicker control is designed to work in different locales.
The string values in the DatePicker control support non-English
characters and the names of months and days of the week in the
calendar display in the local language. You can set the FirstDayOfWeek
property on the Calendar page in the Properties view to have the
drop-down calendar use Monday or any other day of the week as the
first day.
The MaxDate and MinDate properties and the date part of the
Value property use the Short Date format specified in the regional
settings in the Windows control panel of the local computer, and the
time part uses the local computer’s time format. The three predefined
display formats—long date, short date, and time—also depend on the
local computer’s regional settings.