Copying AutoCommit and Lock syntax from the Preview
tab
The easiest way to specify AutoCommit and Lock in a
PowerBuilder application script is to copy the PowerScript syntax from
the Preview tab in the Database Profile Setup dialog box into your
script, modifying the default Transaction object name (SQLCA) if
necessary.
As you complete the Database Profile Setup dialog box in the
development environment, PowerBuilder generates the correct connection
syntax on the Preview tab for each selected option. Therefore, copying
the syntax directly from the Preview tab ensures that you use the
correct PowerScript syntax in your script.
To copy AutoCommit and Lock syntax from the Preview tab into
your script:
-
On the Connection tab in the Database Profile Setup dialog
box for your connection, supply values for AutoCommit and Lock
(Isolation Level) as required.For instructions, see Setting AutoCommit and
Lock in a PowerBuilder application script.For example, in addition to values for basic connection
parameters (Server, Login ID, Password, and Database), the
Connection tab for the following Adaptive Server profile named
Sales shows nondefault settings for Isolation Level and AutoCommit
Mode.For information about the DBParm parameters for your
interface and the values to supply, click Help. -
Click Apply to save your changes to the current tab without
closing the Database Profile Setup dialog box. -
Click the Preview tab.
The correct PowerScript syntax for each selected option
displays in the Database Connection Syntax box. For
example: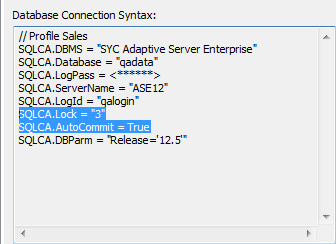
-
Select one or more lines of text in the Database Connection
Syntax box and click Copy.PowerBuilder copies the selected text to the
clipboard. -
Click OK to close the Database Profile Setup dialog
box. -
Paste the selected text from the Preview tab into your
script, modifying the default Transaction object name (SQLCA) if
necessary.