Connection Information

To perform the requested action, WordPress needs to access your web server. Please enter your FTP credentials to proceed. If you do not remember your credentials, you should contact your web host.

Connection Type

Configure the PowerServer project – PB Docs 2022 – PowerBuilder Library

Configure the PowerServer project – PB Docs 2022

Configure the PowerServer project

Once you have created a PowerServer project, you can open it from
the System Tree and modify the properties if necessary. The Project
painter for the PowerServer project looks like this.

ps_tutorial_90.png

The following describes each of the pages and options you can
specify in the Project painter for PowerServer.
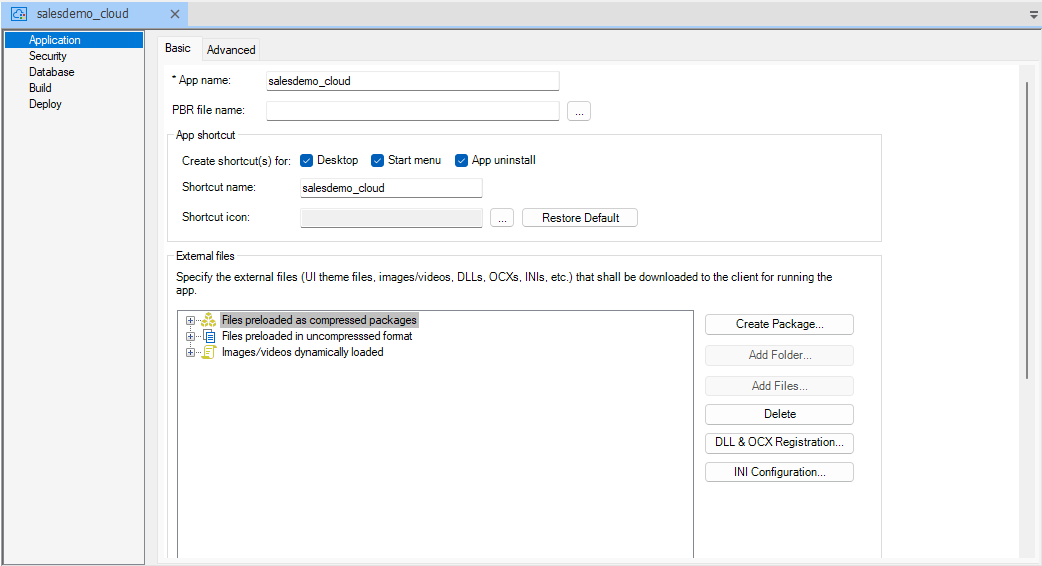
Application page

The Application page > Basic tab has the following
settings:

Option or option group

What you specify

App name

Specify a name for the application. The application
name is mainly used in the following places:

  • The name of the Cloud App launcher EXE file.

  • The default App shortcut name.

  • The automatically generated directory name of Cloud
    App launcher files after Build and Deploy.

    When starting the Cloud App launcher through the
    URL, the name is used in the URL.

  • The generated C# solution.

    The application name will appear in
    UserExtensionsAppConfigApplications.json. It will also
    appear in the PowerServer_ApplicationConfig table if the
    solution of storing the configuration in the database is
    used.

PBR file name

(Optional) Specify a PowerBuilder resource file
(PBR) for your application if you dynamically reference
resources (such as bitmaps and icons) in your scripts and you
want the resources included in the application instead of having
to distribute the resources separately.

You can type
the name of a PBR file in the box or click the button next to
the box to browse your directories for the PBR file you want to
include. The PBR file as well as the resources it references
must reside in the application directory or subdirectory; and
only relative paths of the PBR file and the resources will be
accepted.

For more about PBRs, see Distributing
resources
in PowerBuilder User Guide.

App shortcut
group

You can specify whether to create shortcuts
for:

  • Desktop — Specify whether to create an application
    shortcut icon on the client desktop.

  • Start menu — Specify whether to create an
    application start shortcut menu in the Windows start
    menu.

  • App uninstall — Specify whether to create an
    application uninstall shortcut menu in the Windows start
    menu.

You can also customize the app shortcut
name and the shortcut icon.

  • Shortcut name — Specify the shortcut name on the
    client desktop. The default shortcut name is the same as
    the default app name.

  • Shortcut icon — Specify the shortcut icon on the
    client desktop. The icon file must be added to External Files first before it can
    be selected here, and the image resolutions should be
    16*16 pixels, 48*48 pixels or 256*256 pixels.

External files” group

Specify the custom user external files and/or the
resource files that are referenced in the PowerScript. Make sure
all these files are placed in the same folder or sub-folder of
the application target (.pbt) file.

These files will
be deployed together with the other application files to the
server. If these files are changed later, you can replace these
files on the server using the CustomizeDeploy.dll tool without
needing to deploy the application again. For more information,
refer to Change the
deployed app using commands
.

Files preloaded as compressed packages
and Files preloaded in
uncompressed format

The custom user
external files will be downloaded from the server before the
application starts. It is recommended that you deploy the files
which are large or stay unchanged most of the time (such as UI
theme files) as one compressed package, so that it can be
transferred faster; and deploy the files which may be modified
(hence downloaded) frequently as individual files, or deploy
them as a separate package because they need to be downloaded
frequently.

  • To deploy files as one compressed package, select
    Files preloaded as compressed
    packages
    from the list box, then click
    Create Package to create
    a package, and then click Add
    Folder
    or Add
    Files
    to add the folder or files under this
    package.

  • To deploy files as individual files, select
    Files preloaded in uncompressed
    format
    from the list box, and then click
    Add Folder or Add Files to add the folder or
    files under it.

The custom user external files may
include the following:

  • INI files (including pb.ini, pblab.ini, pbodb.ini
    etc.)

    You can specify the update strategy for the INI file
    by clicking the INI
    Configuration
    button. More details are provided
    below.

  • DLL/OCX files (requiring no administrator rights to
    register)

    You can specify which DLL/OCX files can be
    registered by Regsvr32 or Regasm by clicking the DLL & OCX Registration button.
    More details are provided below.

  • XML files or image files used by the UI theme or
    external functions

  • text files, PDF files or any other files used by the
    external function

Images/videos
dynamically loaded

The resource files
(such as images, videos etc.) are downloaded from the server at
the moment when they are used by the application. You can select
Images/videos dynamically
loaded
and then click Add
Folder
or Add Files
to add the folder or files under it.

DLL & OCX Registration

If the DLL/OCX files need to be registered and can
be registered by Regsvr32 or Regasm without requiring the
administrator rights, you can click DLL
& OCX Registration
to select the DLL/OCX files so
that they can be registered by Regsvr32 or Regasm automatically
before the application starts; if the DLL/OCX files need to be
registered but cannot be registered by Regsvr32 or Regasm or
they need to be registered using administrator rights, you can
specify the registration commands in Preload Event in the PowerServer Project
painter > Application page
> Advanced
tab.

INI
Configuration

When the application is
updated, the INI file can be updated with the specified
strategy. Click the INI
Configuration
button and then select one or more INI
files and configure the strategy for them at one time; or select
and configure for the INI file one by one.

  • Overwrite update — The INI file on the client will
    be updated if the INI file downloaded from the server has
    been updated, and changes made to the local INI file will
    be lost.

  • Merge update — The INI file on the client will be
    merged with the INI file downloaded from the server, so
    changes made to the local INI file will be preserved and
    merged into the INI file downloaded from the server. But
    notice that any setting that exists in the local INI file
    but not in the downloaded INI file will be removed.

  • Do not update — Once the INI file is downloaded to
    the client, it shall never be updated with the INI file
    downloaded from the server.

Note

The external files cannot contain any file that has
the same name as the application, or the PBD or p-code file
to be generated, otherwise duplicate name error
occurs.

For example, [appname].exe, [appname].xml,
[appname].manifest file etc. cannot be added to External
Files.

For another example, test.pbl will be deployed as
test.pbd, therefore, test.pbd cannot be added to External
Files.

The Application page >
Advanced tab has the following settings:

Option
group

What you specify

Runtime
files

Select the runtime files according to the features
used in the application. The runtime files will be downloaded
from the server to the client, for the application to
run.

You can select Typical to automatically select all files
(except the WebBrowser control), or select Custom to select files
manually.

The deployment tool does not actually
deploy the files, instead it notifies the application to
download such files (corresponding to the runtime version
displayed) from the server directly, therefore, you will need to
make sure the corresponding version of PowerBuilder Runtime is
uploaded to the server when you upload the Cloud App Launcher to
the server (view
detailed instructions
).

When the project is
opened, if the runtime version configured in the System Options
dialog (Tools > System Options) is different from the runtime
version last saved with the project, they both will be displayed
(as shown below); and then when the project is saved, the
runtime version in the System Options dialog (the second text
box) will be saved with the project.

runtime_page.png

Client app
download
” group

Specify when to download the application files —
before the application starts or at the moment when they are
called by the application at runtime.

If you select
Download the app files as
necessary
“, the following files will be downloaded
before the app runs: 1) the PowerBuilder Runtime files, 2) the
application executable, and 3) the files you selected to be
preloaded in External Files;
the other files will be downloaded at the moment they are called
by the app.

If you select “Download all the app files at app
startup
“, the runtime files, app executable, the
application files, and external files are all downloaded at the
startup, except for the image files that are set to be
dynamically loaded in the External
Files
settings.

Client app
download
” group > Show the loading animation
before the app runs

Specify whether to show an animation (as shown
below) when the application prepares for startup. The animation
will disappear when the application’s first window
displays.

This option should not be selected if the
application starts with no user interface; otherwise the
animation will not disappear.

loading_animation.png

You can deploy your own animation to replace
the default animation (as shown above). For detailed steps,
refer to Customize
the app entry page
.

Preload event
group

(Optional) Specify the commands that will be
executed immediately after files are downloaded and before the
application starts. For example, you can specify commands to
register DLL/OCX files that cannot be registered by Regsrv32 or
Regasm or require administrator rights to register; or any other
commands that need to be executed with administrator
rights.

If the commands need to be executed with the
administrator rights, you should select the Run as administrator
option.

You can specify how often the commands
should be executed: if you select “Only
when the app first starts or is updated
“, the
commands will be executed for only one time when the application
is launched for the first time or when the application is
updated; if you select “Every time the app
starts
“, the commands will be executed every time
when the application runs.

The commands can be any
Windows commands or user-defined commands.

For
example, suppose there is a DLL file from the application that
needs to be registered on the client, you can enter the
following commands:

Note: As the commands
are executed silently, any commands that will pause the
execution and wait for user input will cause the application to
wait endlessly.

Commandline argument

Specify the command line arguments for the
application. The arguments will be directly passed to the
application when the application is run. And the arguments will
be automatically saved and updated to the app startup icon on
the desktop and the app shortcut menu in Windows
start.

The arguments specified here are static and
cannot be modified at runtime. If you want to pass the argument
dynamically at runtime, you can specify the argument in the
application URL (for example,
http://localhost/salesdemo/?arg=1). But note that the arguments
appended to the application URL cannot contain special
characters such as “?”, “#”, as they have special meanings in
HTML URL; if you want to use these characters in the argument
name or value, you can specify them in Commandline argument as static arguments,
so that they can be passed to the application directly instead
of being sent as part of the URL.

You can also pass
arguments to the EXE directly. If there are multiple arguments,
please include them in quotation marks or separate them with a
delimiter (instead of a space), for
example,

C:Users<username>AppDataRoamingPBAppsApplicationslocalhost_<appname><appname>.exe
“parm1 parm2
parm3”

C:Users<username>AppDataRoamingPBAppsApplicationslocalhost_<appname><appname>.exe
parm1/parm2/parm3

If you call
the CommandParm function to get
the command line arguments, the command line arguments will be
automatically saved (in pbapp.ini) and used by the other
installable cloud applications. If you don’t want the command
line arguments to be saved and used by the other apps, you can
follow instructions in this
article
to clear the values.

Security
page

The Security page has the following settings:

Option or option group

What you specify

Encrypt all the compiled p-code
files

Select whether to encrypt the object files when
compiled from the PowerBuilder dynamic libraries.

Validate the application integrity before the app
runs

Specify whether to validate the hash of every
object file before they are loaded, so that files changed
illegally will not be run.

Auth Template

Specify the authentication template for PowerServer
Web APIs. For more information, refer to Select an
authentication template
.

Signing

Select whether to digitally sign the application
executable file
(appname.exe).

If you want to
digitally sign the application executable file, you can specify
the settings required for signing under the “Use the SignTool utility from the Windows
SDK
” option, for example, SignTool location, signing
certificate, certificate password, signature algorithm, and URL
of the time stamp server. And make sure Microsoft’s SignTool has
been installed on the current machine.

Or you can
place the signing scripts in a file (with file extension as
.cmd) and then select the file for the “Use your own signing script” option. For
example, to sign the application executable file
(appname.exe) using Microsoft’s SignTool,
you may create a cmd file that includes the following
scripts:

After
the executable file is generated and before it is deployed to
the server, PowerBuilder will sign the executable file using
your own signing scripts or using the SignTool settings you
specified.

Make sure the PowerBuilder user has the
appropriate rights to access the time stamp server and sign
files.

Manifest Information

Select whether to generate a manifest file (either
external or embedded) and to set the execution level of the
application.

For further information, see Attaching
or embedding manifest files
in PowerBuilder User
Guide.

Database
page

The Database page > Basic tab has the following
settings:

Option or option group

What you specify

Provider

Select the database provider for connecting with
the application database.

The database connection
will be used at application deployment and runtime. The database
connection is required 1) when converting the PowerBuilder
DataWindow objects to C# models during the deployment process;
and 2) when accessing data from the database at application
runtime.

See Configure the
database connection
for more details.

Cache name

Specify a name for the database connection cache.
This cache will be automatically mapped to the SQLCA transaction
object.

(various database connection settings according to
the selected provider)

The connection settings may vary from the database
provider. For connection settings for each database provider,
refer to Tutorial:
Connecting to the Database
.

Database driver
group

If you have selected the “I have read and agree to
the license terms of the driver shown above” option, the
corresponding database driver will be downloaded from NuGet site
automatically when compiling the PowerServer Web APIs. See Select the database
driver
for more details.

Additional
settings
” group

Click the More
button to configure the additional settings of the database
connection.

The Database page >
Advanced tab has the following settings:

Option or option group

What you specify

DB connection
profile
” group

Create various DB connection profiles which include
database connections to be used in different environments, for
example, database connections for the development environment,
testing environment, production environment, etc. See Create DB connection
profiles
for more details.

Database
connection
” group

Click New to
create a new database connection cache or click Edit to modify an existing cache. See
Configure
the database connection in the Database Configuration
dialog
for more details.

Transaction-to-cache
mappings
” group

Map the transaction object with the database cache.
See Map the
transaction object with the cache
for more
details.

Build
page

The Build page > Basic tab has the following settings:

Option or option group

What you specify

Rebuild

Specify how to build the
application:

  • Full — Regenerates
    and redeploys all object files to the server. It is
    strongly recommended that you always select Full if you
    build and deploy the project to the production
    environment.

  • Incremental
    Regenerates and redeploys only objects that have changed,
    and objects that inherit or reference any objects that
    have changed, since the last time you built the
    application.

  • Cursory
    (ultra-fast)
    — Regenerates and redeploys only
    objects that have changed. Unlike Incremental, Cursory
    will not generate objects that have inheritances or
    references with the changed object. Therefore, Cursory
    should be used 1) after the project has been full built,
    2) only independent objects have been changed or the
    change has no impact on the other objects.

    For Cursory
    (ultra-fast)
    to take effect, you will need to
    enable the option “At every save, create temp files
    required for cursory (ultra-fast) rebuild” in the
    Application Properties | PowerServer tab (it is not
    selected by default). After you enable the option, please
    perform a Build & Deploy on the PowerServer project
    using the Full build
    option before selecting Cursory
    (ultra-fast)
    .

    Note

    When the user selects the option “At every save,
    create temp files required for cursory (ultra-fast)
    rebuild”, the IDE will generate two types of temporary
    files whenever the object is
    added/imported/copied/changed and then saved in the IDE:

    1. runtime files of the current saved object(s),
      which are stored in the “[pbtname]_pbobjects” folder
      under the current application target;

    2. handles of the ESQLs in the current saved
      object(s), which are stored in the user’s temporary
      directory.

    And then during the build and deployment process
    of Cursory
    (ultra-fast)
    , the IDE will perform the
    following actions:

    1. Directly upload the runtime files from the
      “[pbtname]_pbobjects” folder and the index file of
      the object PBD to the corresponding directory in the
      client app;

    2. Generate models from the DataWindows in the
      “[pbtname]_pbobjects” folder and upload them to
      PoweServer Web APIs;

    3. Upload the handles of the ESQLs from the
      user’s temporary directory to PowerServer Web
      APIs.

    IMPORTANT: The
    “[pbtname]_pbobjects” folder and the associated
    temporary files are used specifically for the purpose of
    Cursory (ultra-fast)
    rebuild in the current project, and they will be removed
    immediately after the rebuild process is completed for
    the current project. That is to say the temporary files
    are not retained or used for subsequent rebuilds or for
    other PowerServer projects.

    Cursory
    (ultra-fast)
    does not support 1) deploying to
    External > IIS or Folder (Incremental will be used
    automatically), 2) new PBD files, 3) object moving and
    removing, 4) directory changes, 5) object(s) obtained
    from source control.

    If the object is obtained from the source control
    server, the object will not be exported and stored in
    the “[pbtname]_pbobjects” folder.

    Now that we understand the cursory rebuild is
    specific to only the changes in the current object. If
    there are changes that should be applied globally (such
    as global variables or global external functions), and
    if they are modified and saved in a non-application
    object, then only the current object will be updated
    during a cursory rebuild (the application object will
    not be updated). This means the application object will
    not reflect the changes. As a result, when running the
    application, an exception may occur due to missing
    definitions. To work around this issue, when adding or
    modifying global variables or global external functions,
    it is recommended to perform an incremental or full
    build (to update all objects, including the application
    object, with the necessary changes). Alternatively, you
    can open the application object, make a small change
    (e.g., adding a comment), and save it (this will create
    temporary files of the application object and the
    cursory rebuild will be able to update the application
    object with the necessary changes).

Platform

Select if the client app can run on 32-bit or
64-bit machines.

Enable DEBUG symbol

Select to enable any code that you placed in DEBUG
conditional code blocks. For more information, see Using
the DEBUG preprocessor symbol
in PowerBuilder User
Guide.

Target framework

Select the .NET version the solution is
targeting.

Web API solution location

Specify the location for the PowerServer C#
solution.

If the PowerServer C# solution already
exists, you can deploy the app to the existing solution, the
application data models and ESQLs will be updated in the
solution, and if you deploy a new app to an existing solution,
the application data models and ESQLs will be added to the
existing solution.

For more information, refer to
Generate the
PowerServer C# solution
.

Overwrite server settings

Choose whether to overwrite the server settings
(such as the database connection, Kestrel server port number,
PowerServer license etc.) and the authentication template in the
solution, when you deploy to the same or existing solution.

For more information, refer to What settings will be
deployed to the solution
.

The Build page > Advanced tab
has the following settings:

Option
group

What you specify

Libraries

Specify a PBR file for a dynamic library if it uses
resources (such as bitmaps and icons) and you want the resources
included in the dynamic library instead of having to distribute
the resources separately.

You can type the name of a
PBR file in the box or click the button next to the box to
browse your directories for the PBR file you want to include.
The PBR file as well as the resources it references must reside
in the application directory or subdirectory; and only relative
paths of the PBR file and the resources will be
accepted.

Versioning

Deployment version
— The deployment version number is used by the server to
determine whether to perform an install or update for the
application on the client. It is recommended to increment the
deployment version number every time when the application is
updated and re-deployed. For more, refer to Manage app
versions/updates
and Roll back to an
earlier version of app
.

Minimum compatible version — Specify the
lowest compatible version for the application. If the version
installed on the client is older than it, a forced update will
be performed, or the application will stop running. For more,
refer to Manage
app versions/updates
and Roll back to an
earlier version of app
.

Note

To effectively manage version compatibility and
prevent issues when upgrading the application, you should
follow these guidelines when defining Deployment version and Minimum compatible version (the rules
for comparing the versions are similar to the file name
sorting rules in Windows):

  • You should always increase the version number, for
    example, from 1.0.3 to 1.0.4, and should NOT decrease
    the number, for example, from 1.0.3 to 1.0.2.

  • You should use the consistent versioning
    scheme/structure, that is to say, the same total length,
    the same total segments, and the same length and format
    in each segment.

    Here are a few correct examples:

    Deployment version: 1.01, Minimum compatible
    version: 1.00

    Deployment version: 23.0.0.1, Minimum compatible
    version: 23.0.0.0

    Here are a few incorrect examples:

    Deployment version: 1.2, Minimum compatible
    version: 1.00 (these two numbers have different lengths
    in the second segment)

    Deployment version: 23.0.1, Minimum compatible
    version: 23.0.0.0 (these two numbers have different
    segments)

Available time
— Schedule the time for the deployment version to be accessible
to end users.

Expiration
time
— Schedule the time for the deployment version
to be inaccessible to end users.

If the available
time or expiration time is reached and the app is still open,
the app will not get updated, until the app is closed or the
session times out. Therefore, it is recommended that the session
timeout feature should be enabled (for apps deployed via
PowerServer) or implemented (for apps deployed via
PowerClient).

Version used by
the installer
> Product
version
— Specify the product version (in numeric
values) that will be used by Microsoft Installer to determine
whether a product needs to be updated.

Version used by the installer >
File version — Specify the
file version (in numeric values) that will be used by Microsoft
Installer to determine whether a file needs to be
updated.

Product
name
, Company name,
Description, Copyright, Product
version
, File
version
— Specify your own values for these fields
associated with the application file and with machine-code DLLs.
These values become part of the Version resource associated with
the application file, and most of them display on the Version
tab page of the Properties dialog box for the file in Windows
Explorer. The Product and File version string fields can have
any format.

The four numbers can be used to
represent the major version, minor version, point release, and
build number of your product. They must all be present. If your
file versioning system does not use all these components, you
can replace the unused numbers with zeros. The maximum value for
any of the numbers is 65535.

Others

Windows classic
style
— Select this to add a manifest file to the
application that specifies the appearance of the controls as an
application resource.

By default, this option is not
selected, which means the Windows flat style is used and the 3D
effect of some controls will be removed to have a “flat” look,
for example, the 3D lowered border of Column and Computed Field
in the DataWindow object, the background color of Button, the
BackColor and TextColor of the tooltip, and the TabBackColor of
tab header will not take effect. If you still want the 3D
effect, you should select the “Windows classic style” option
when deploying the application.

Note

If you have applied a theme to the application, you
should not check the “Enable Windows Classic Style in the
IDE” option in the System Options or the “Windows classic
style” option in the project painter and the PB.INI file (if
any) should not contain such setting, otherwise, the
application UI will be rendered in the Windows classic style
instead of the selected theme.

Deploy
page

The Deploy page > Basic tab has the following settings:

Option or option group

What you specify

Target run mode

Select Within the
IDE
to use the local Kestrel server as the target
server, or select External to
deploy to the IIS server or a folder.

Target server

You can deploy a PowerServer project to the
following servers/folder:

  • Local Kestrel
    server
    — Deploy to the local Kestrel server
    which can be run directly within the PowerBuilder IDE. The
    Kestrel server is automatically configured and used when
    you select Within the IDE
    as the target run mode. Refer to Configuring a
    server for deployment
    for more information.

    • The local Kestrel server is configured by
      default. You can directly use the default settings or
      modify the host name, port number, and/or HTTP/HTTPS
      connection method for the local Kestrel server. These
      settings will be used when the local Kestrel server
      starts within the PowerBuilder IDE or in the
      Development hosting environment. To change these
      settings, you can either 1) modify the PowerServer C#
      Solution > ServerAPIs project >
      Properties >
      launchSettings.json
      > “applicationUrl”
      setting; or 2) modify the settings here and then
      deploy the project again.

    • The App URL and the Web API site URL are
      automatically generated based on the host name, port
      number, and connection method.

  • IIS — Deploy to a
    local or remote IIS server.

    • If you have not configured the IIS server yet,
      click the Configuration button and follow
      the instructions in Configuring
      a server for deployment
      to configure the
      server.

    • Framework-dependent or
      Self-contained — A
      Self-Contained package will not only include the app
      assembly files and its dependencies, but also include
      the .NET Core runtime and libraries. Users can run it
      on a machine that has no .NET Core runtime installed.
      A Framework-Dependent package will only include the
      app assembly files and its dependencies. Users have to
      install the .NET Core runtime in order to run the
      app.

    • Portable,
      Windows 64-bit, or
      Windows 32-bit — The
      target platform that the Web APIs is published for. If
      you know the architecture of the target server, you
      can select the corresponding platform; if you are not
      sure of the server architecture, you can select
      Portable. But if you
      select Portable, you
      can only select Framework-dependent.

      Note

      Make sure the platform of Web APIs matches
      with that of the server. If you select Windows 32-bit, make sure IIS
      is 32-bit (set “Enable 32-Bit Applications” to
      True); if you select Windows
      64-bit
      , make sure IIS is 64-bit (set
      “Enable 32-Bit Applications” to False). For more,
      refer to this
      section
      .

    • App URL and
      Web API site URL
      The App URL and the Web API site URL are automatically
      generated based on the site URL in the server profile.
      If you know where the Web APIs will be running, you
      can specify the site URL in the server profile; if you
      are not sure where the Web APIs will be running, you
      can leave site URL empty and specify the Web API URL
      later in the client app >
      apprun.json file.
      See Specify
      the Web API URL
      for more details.

      If the PowerServer Web APIs is deployed as IIS
      sub-application
      , the URL must include the path
      of the sub-application.

  • Folder — Package
    the app as an executable installer or a zipped file, and
    then manually install the app to the server. Refer to
    Package
    the installable cloud app
    for more
    information.

    • If you select Zipped
      file
      , an appname.zip
      file is generated in the specified path. You can copy
      the zip file to the server and then decompress it to
      the web root; If you select Executable installer, an
      appname.exe file is generated in
      the specified path. You can copy the executable file
      to the server and then run it to install the
      application to the web root.

    • Framework-dependent or
      Self-contained — A
      Self-Contained package will not only include the app
      assembly files and its dependencies, but also include
      the .NET Core runtime and libraries. Users can run it
      on a machine that has no .NET Core runtime installed.
      A Framework-Dependent package will only include the
      app assembly files and its dependencies. Users have to
      install the .NET Core runtime in order to run the
      app.

    • Portable,
      Windows 64-bit,
      Linux 64-bit, or
      Windows 32-bit — The
      target platform that the Web APIs is published for. If
      you know the architecture of the target server, you
      can select the corresponding platform; if you are not
      sure of the server architecture, you can select
      Portable. But if you
      select Portable, you
      can only select Framework-dependent.

      Note

      Make sure the platform of Web APIs matches
      with that of the server. Take IIS for example, if
      you select Windows
      32-bit
      , make sure IIS is 32-bit (set
      “Enable 32-Bit Applications” to True); if you select
      Windows 64-bit,
      make sure IIS is 64-bit (set “Enable 32-Bit
      Applications” to False). For more, refer to this
      section
      .

    • Web API site
      URL
      — If you know where the Web APIs will
      be running, you can specify the URL here; if you are
      not sure where the Web APIs will be running, you can
      leave this field empty and specify the URL later in
      the client
      app
      > apprun.json file.

    • Specify the folder and file name where the
      package will be generated. You can select to delete
      all existing files in the zip file before
      packaging.

License code
group

You can click Auto
Import
to directly obtain and import the license from
the Appeon sites, or click Import from
File
to select and import the license
file.

Refer to Import license
and activate PowerServer
for more details.

The Deploy page > Advanced
tab has the following settings:

Option or option group

What you specify

Cloud App Launcher

Select the Cloud App Launcher to be deployed or
packaged with the app.

You can click Configuration to customize the cloud app
launcher and upload it. For how to customize the cloud app
launcher, refer to Customize cloud app
launcher
.

Runtime files

Select the runtime files to be deployed or packaged
with the app.

The runtime files compatible with the
selected platform (x86 or x64) of the client app will be
deployed or packaged.

web.config

Select whether to deploy or package the web.config
file with the app.

web.config is used by IIS to start
the PowerServer Web APIs. It is NOT required when deployed to
non-IIS servers.

apprun.json

Select whether to deploy or package the apprun.json
file with the app.

apprun.json is used by the client
app to get the download URL of launcher and runtime and the URL
of Web APIs.


Document get from Powerbuilder help
Thank you for watching.
Was this article helpful?
Subscribe
Notify of
guest
0 Comments
Oldest
Newest Most Voted
Inline Feedbacks
View all comments
0
Would love your thoughts, please comment.x
()
x