Using SnapDevelop
You can also use the Docker
method in the SnapDevelop IDE to publish and deploy the PowerServer
Web API to Docker.
Step 1: Open the PowerServer C# solution in SnapDevelop.
Click the Open C# Solution in
SnapDevelop button ( ) in the toolbar to launch the PowerServer C#
solution in SnapDevelop. Or go to the location where the PowerServer
C# solution is generated; and double click PowerServer_[appname].sln to launch the
solution in SnapDevelop.
At startup, the solution will install/update the dependencies.
Wait until the Dependencies folder
completes the install/update. (Make sure the machine can connect to
the NuGet site: https://www.nuget.org in
order to successfully install PowerServer NuGet packages).
Step 2: Add docker support to the ServerAPIs project.
-
In the Solution Explorer, right click on the ServerAPIs project node, and select
Add > Docker Support. -
In the Add Dockerfile
dialog, select the target OS: Linux or Windows, and click OK. The target OS indicates the platform
where Docker Engine and Docker Container are running. In this
tutorial, select Linux.A file named Dockerfile is
automatically created and added under the ServerAPIs project. This file contains all
the commands required for building a docker image appropriate for
the selected OS.
Step 3: Build and publish the ServerAPIs project as a docker image.

-
In the Solution Explorer, right click on the ServerAPIs project node, and select
Publish. -
In the window that appears, select Docker, and then click Start to configure for publish.
-
Keep Publish to Personal
Repository checked if you are connecting to your
own repository (not part of an organization). If the
repository is owned by an organization, clear the checkbox,
and enter the organization name. -
In the Engine field,
select the machine where Docker Engine is installed.If you select localhost, make sure you have installed
Docker Engine on the local machine; if you select a remote
machine, make sure you have installed Docker Engine to that
machine and configured Docker Engine to allow remote
connection. See Setting up a docker host
(Docker Engine) for more. -
In the Registry field,
specify where to store the docker image: Docker Hub or a
self-hosted Docker Registry. See Setting up a docker
registry for more.If you specify a repository in Docker Hub, you will need
to enter your Docker username and password. -
In the Image Name
field, enter a name for the docker image you want to create
for the project. -
Click Finish to start
building the project as an image and publishing the image to
the specified Docker Engine and docker registry.
Check the Docker Output
window and make sure the publish is successful.
-
Step 4: Run the docker image as a docker container.

-
In SnapDevelop, select View
> Docker Explorer to open the
Docker Explorer. -
In the Docker Explorer, expand the node for the machine
where Docker Engine is, and then expand Images and find the image that is created
for the project, right click it and select Run as a Container.
-
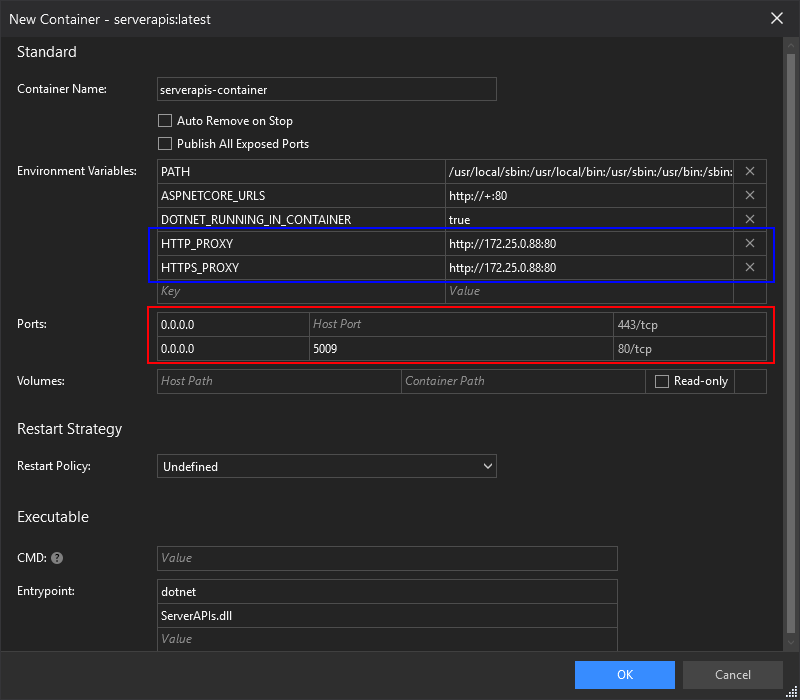
In the window that appears, specify the following settings
for the container, and click OK.-
Specify a name for the container.
-
Specify the port number for the Web APIs in the
container. Leave the IP address with the default value 0.0.0.0
which will automatically point to the IP address for Docker
Engine where the container is running.IMPORTANT:
1. When you specify the Web API URL for the client app
(Specify the Web API
URL), the actual IP address (instead of 0.0.0.0) should
be specified.2. If the docker host machine connects to Internet via a
proxy server, configure the proxy settings as the environment
variables (as shown in the blue frame below); or refer to
Configure
Docker to use a proxy server for detailed
instructions.
The container is started and added under the Containers node. You can stop, restart, or
delete the container, or execute commands using the right-click
context menu.
If you double click the container, the container
configuration and log will be displayed on the right. The Logs
section displays valuable logging information of the Web APIs at
runtime.
-