Executing additional commands
The entire build & deploy process is made up of several
steps, and additional commands can be executed before and/or after
some particular steps such as the “SourceControl” and “BuildJob”
steps.
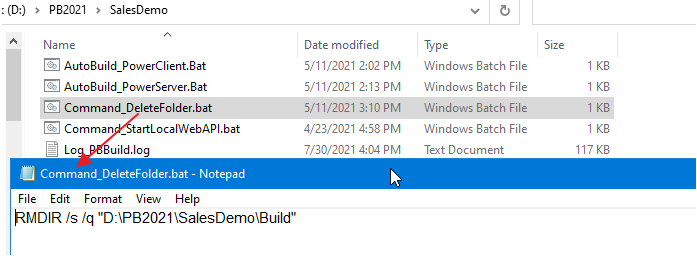
Example 1: to add commands to remove a
folder before downloading the source code.
Step 1: Create a bat file which contains the following command,
and save the bat file as Command_DeleteFolder.bat.
|
1 |
RMDIR /s /q "D:PB2022SalesDemoBuild" |
Step 2: In the build file, locate the “BuildPlan” block and then
the “PreCommand” setting; and add the file path and name of Command_DeleteFolder.bat.
|
1 2 3 4 5 6 7 |
"BuildPlan": { "SourceControl": { <span><strong>"PreCommand": "Command_DeleteFolder.bat",</strong></span> "ClearSrcBeforeDownload": false, "SVN": [ ... ], |
When the PBAutoBuild220.exe
command is executed later, it will execute the commands in Command_DeleteFolder.bat before it downloads
the source code.
Besides the “PreCommand” setting, there is also a “PostCommand”
setting for the “SourceControl” and “BuildJob” steps, which allows you
to execute commands after that particular step. See Example 2 and 3
for more details.
Example 2: to add commands to start the
PowerServer Web APIs after building the PowerServer project in the
PowerBuilder IDE.
Step 1: Create a bat file which contains the following command,
and save the bat file as startwebapi.bat.
|
1 2 |
dotnet.exe run --no -build --project C:Usersappeonsource eposPowerServer_salesdemoServerAPIsServerAPIs.csproj |
Step 2: In the build file, locate the “BuildJob” block and then
the “PostCommand” setting; and add the file path and name of startwebapi.bat.
|
1 2 3 4 5 6 7 |
"BuildJob": { "PreCommand": "", "Projects": [ <span><strong> </strong></span>... ], <span><strong>"PostCommand": "startwebapi.bat /show /sync"</strong></span> } |
When the PBAutoBuild220.exe
command is executed later, it will execute the commands in startwebapi.bat after it finishes building the
PowerServer project.
Example 3: to publish the PowerServer Web
API after building the PowerServer project in the PowerBuilder
IDE.
Step 1: Create a bat file which contains the following command,
and save the bat file as publish.bat.
|
1 2 |
dotnet.exe publish C:Usersappeonsource eposPowerServer_salesdemoServerAPIsServerAPIs.csproj -c release -o C:Publish |
Step 2: In the exported build file, locate the “BuildJob” block
and then the “PostCommand” setting; and add the file path and name of
publish.bat.
|
1 2 3 4 5 6 7 |
"BuildJob": { "PreCommand": "", "Projects": [ <span><strong> </strong></span>... ], <span><strong>"PostCommand": "publish.bat /show /sync"</strong></span> } |
When the PBAutoBuild220.exe
command is executed later, it will execute the commands in publish.bat after it finishes building the
PowerServer project.
Note
The dotnet commands can also
be integrated with Jenkins. See Task 2 for more details.