Build & deploy using commands
Instead of building and deploying the PowerServer project from
the PowerBuilder IDE, you can also build and deploy the project using
the PBAutoBuild220.exe tool.
PBAutoBuild220.exe is a
standalone tool that can compile and deploy PowerServer projects using
DOS commands on Windows. It can automate the entire build and deploy
process without requiring PowerBuilder IDE installed or any
PowerBuilder license running; it is free for use! But it requires
PowerBuilder Runtime and PowerServer Toolkit to run, so it must be
installed to a machine where PowerBuilder Runtime and PowerServer
Toolkit will also be installed. To install PBAutoBuild220.exe, run the PowerBuilder Installer and select PowerBuilder Utilities in the Programs tab.
For step-by-step guidance, refer to Tutorial:
Building your PowerServer project with commands. The PBAutoBuild220 command can integrate with Jenkins to automate the
build and deployment process for PowerServer projects. Refer to the
Jenkins user
documentations for how to use Jenkins.
Note
The PBAutoBuild220.exe tool
will not be able to upload the cloud app launcher if PowerBuilder
IDE is not installed on the same machine. Therefore, you will need
to copy the launcher from the PowerBuilder IDE (you can create a
launcher package using the Cloud App Launcher
Profiles window), and then modify the build file (the
“CloudAppLauncherPath” setting) to
point to this package, so that the tool can upload the launcher to
the server.
To build and deploy the PowerServer project with
commands:
-
Export the configurations of the PowerServer project to the
JSON file.-
Click the Export PowerServer Build
File button ( ) in the toolbar when the PowerServer
project painter is opened, or right click the workspace (or
target or PowerServer project object) and then select
Export Build File, -
In the Export Build
File dialog box, specify where to save the exported
file.If you right click the workspace and then select
Export Build File, you can
select one or more targets to export the build file for, and
then select one or more project types to export if there are
more than one type of project objects in the selected
target(s). If you select more than one project type, the
corresponding project objects will be exported to the build
file > “Projects” > [project object name]. If the
selected targets contain project objects with the same name,
only the object listed last will be added to the build
file.Select “Export the Git/SVN SourceControl settings (if
exists) from the project” if you want to export the Git/SVN
source control settings (such as login username, password,
source code path etc.) to the build file. The password will be
encrypted automatically.Specify how to overwrite the source code settings if the
build file already contains such settings. Existing settings
will be kept by default. If you want to export the current
settings, such as login username, password (encrypted), source
code path etc. to the build file, you should select “Clear
existing settings”. If you have selected “Clear existing
settings”, while have not selected “Export the Git/SVN
SourceControl settings (if exists) from the project”, then
existing settings will be removed and no settings will be
stored.Specify how to overwrite the build job settings and
project settings if the build file already contains such
settings. Such settings will be cleared by default.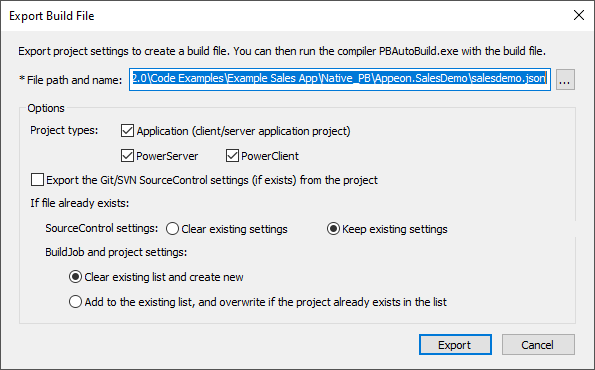
-
Click Export.
The exported JSON file includes every single setting that is
required for compiling, packaging and deploying the PowerServer
project. It also contains a “BuildPlan” block which provides
additional configurations. For more, see About the build file. -
-
Execute the PBAutoBuild220.exe file and the JSON file
in a command line to automatically build and deploy the project.
For example,1PBAutoBuild220 /f c:SalesDemo.json /l deploy.log /le error.log /lu unsupport.logThe PBAutoBuild220.exe file
supports the following parameters:-
/f — specifies the configuration file. The
configuration file (in JSON format) can be directly exported
from the PowerBuilder IDE, as described in step 1.1PBAutoBuild220 /f c:SalesDemo.json -
/l — writes the logging information to a file.
-
/le — writes the error information to a file.
-
/lu — writes the unsupported PowerScript features to a
file. For example,1PBAutoBuild220 /f c:SalesDemo.json /l deploy.log /le error.log /lu unsupport.logThe relative path specified in the parameter is relative
to the path of the configuration file. In the above example,
the three log files will be generated under the same path as
the configuration file. -
/p — specifies the password for logging into SVN or
Git. This will generate an encrypted value based on the
password. If the password contains the double quotation mark
(“), use the escape character ” to replace “.1PBAutoBuild220 /p 123456 -
/v — specify the product version (property displayed
for executable)./fv — specify the file version (property displayed for
executable)./vn — specify the product version (executable version
used by installer)./fvn — specify the file version (executable version
used by installer).You can specify for multiple projects at the same time,
in this format:
“[projectname1]:1.0.0.1;[projectname2]:1.2.3.4”. Projects are
separated with semicolons (“;”). For example,1PBAutoBuild220 /f c: est.json /v "project1:1.0.0.1;project2:1.2.3.4" /vn "project1:1.0.0.1;project2:1.2.3.4" /fv "project1:1.0.0.1;project2:1.2.3.4" /fvn "project1:1.0.0.1;project2:1.2.3.4"If no project name is specified, the version number will
be used by all projects. For example,1PBAutoBuild220 /f c: est.json /v "1.0.0.1"The version numbers specified by parameters take
precedence over those specified in the build file. -
/h or /? — displays the help information.
1PBAutoBuild220 /h

-
-
Check if PBAutoBuild220 command is successful via
errorlevel. For more information, refer to
Verifying
if PBAutoBuild is successful.
Note
The handling of PB.INI is the same in PBAutoBuild and
OrcaScript:
If the application relies on a property in PB.INI to run, for
example, [RichText] PageSizeAsControlSize=1, the user needs to copy
the PB.INI file to the directory where the application executable
resides.
If the compilation of PBAutoBuild or OrcaScript relies on a
property in PB.INI, for example, [PB] DashInIdentifiers=0, the user
needs to copy the PB.INI file to the directory where
PBAutoBuild220.exe or pbc220.exe resides.