Setting up a connection profile
In PowerBuilder you can set up a source control connection
profile at the workspace level only. Local and advanced connection
options can be defined differently on each computer for PowerBuilder
workspaces that contain the same targets.
Local connection
options
Local connection options allow you to create a trace log to
record all source control activity for your current workspace
session. You can overwrite or preserve an existing log file for each
session.
You can also make sure a comment is included for every file
checked into source control from your local computer. If you select
this connection option, the OK button on the Check In dialog box is
disabled until you type a comment for all the objects you are
checking in.
The following table lists the connection options you can use
for each local connection profile:
|
Select this option |
To do this |
|---|---|
|
Log All Source Management Activity (not |
Enable trace logging. By default the log file |
|
Append To Log File (default selection when |
Append source control activity information to |
|
Overwrite Log File (not selected by |
Overwrite the named log file with source |
|
Require Comments On Check In (not selected by |
Disable the OK button on the Check In dialog |
|
This Project Requires That I Sometimes Work |
Disable automatic connection to source control |
|
Delete PowerBuilder Generated Object Files (not |
Remove object files (such as SRDs) from the |
|
Perform Diff On Status Update |
Permit display of out-of-sync icons for local |
|
Suppress prompts to overwrite read-only |
Avoid message boxes warning that read-only |
|
Show warning when opening objects not checked |
Avoid message boxes when opening objects that |
|
Status Refresh Rate (5 minutes by |
Specifies the minimum time elapsed before |
Advanced connection
options
Advanced connection options depend on the source control
system you are using to store your workspace objects. Different
options exist for different source control systems.
Applicability of advanced options
Some advanced options might not be implemented or might be
rendered inoperable by the PowerBuilder SCC API interface. For
example, if an advanced option allows you to make local files
writable after an Undo Check Out operation, PowerBuilder still
creates read-only files when reverting an object to the current
version in source control. (PowerBuilder might even delete these
files if you selected the Delete PowerBuilder Generated Object
Files option.)
To set up a connection profile
-
Right-click the Workspace object in the System Tree (or in
the Tree view of the Library painter) and select Properties from
the pop-up menu. -
Select the Source Control tab from the Workspace
Properties dialog box. -
Select the system you want to use from the Source Control
System drop-down list.Only source control systems that are defined in your
registry
(HKEY_LOCAL_MACHINESOFTWARESourceCodeControlProviderInstalledSCCProviders)
appear in the drop-down list. -
Type in your user name for the source control
system.Some source control systems use a login name from your
registry rather than the user name that you enter here. For
these systems (such as Perforce or PVCS), you can leave this
field blank. -
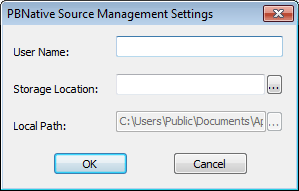
Click the ellipsis button next to the Project text
box.A dialog box from your source control system displays.
Typically it allows you to select or create a source control
project.The dialog box displayed for PBNative is shown
below:
-
Fill in the information required by your source control
system and click OK.The Project field on the Source Control page of the
Workspace Properties dialog box is typically populated with the
project name from the source control system you selected.
However, some source control systems (such as Perforce or
Vertical Sky) do not return a project name. For these systems,
you can leave this field blank. -
Type or select a path for the local root directory.
All the files that you check into and out of source
control must reside in this path or in a subdirectory of this
path. -
(Option) Select the options you want for your local
workspace connection to the source control server. -
(Option) Click the Advanced button and make any changes
you want to have apply to advanced options defined for your
source control system.The Advanced button might be grayed if you are not first
connected to a source control server. If Advanced options are
not supported for your source control system, you see only a
splash screen for the system you selected and an OK button that
you can click to return to the Workspace Properties dialog
box. -
Click Apply or click OK.